All posts by SoshaRuark

Shiraz – Soft Cheese

With the gallon of home made yoghurt sitting in the fridge, it’s time to do some thing useful besides dribble sweety tasty honey over the yoghurt and dive in head first.  Time to make…Cheese!!!

This soft cheese is a quick easy cheese that can be made in as little as a few hours with only 2 ingredients.

Shiraz

(Soft Cheese)

Translation:

Use milk that is just drawn, still warm, incorporating the renet as it is, with its skin, and whipping the milk while it is warm so that it coagulates.  Then pour it into molds made from willow…sprinkle salt (over it) and set it aside.  If you wish to eat it right away, it is not necessary to salt it, in which case it is called simple cheese.

Ingredients:

1 pint yogurt (full fat)                 1 Tbs salt

OR

1 gallon milk                             1 tablet Rennet             1 Tbs salt

Note:  Rennet is an enzyme of a young mammal’s stomach that  is still drinking milk.  When the calf (cow) or kid (goat) was slaughtered the stomach lining cut into squares and mixed with freshly drawn milk to produce cheese.  Modern day solution are chemical tablets which produce the same effect with out the need of a young mammalian’s stomach lining.

Redaction:

Take whole milk fresh, if available, if not warm up a gallon of whole store bought milk.  Heat the milk to the just boiling, then mix the milk with rennet tablets.   Stirring until the milk starts to turn solid.  Pour into molds and salt.  The molds used can be anything from a butter mold to a bread mold, though a bread mold would make a very large loaf of cheese.

A second way to make cheese is to take full fat yogurt and mix with 1 Tbs of salt then pour into a lined strainer (either multiple layers of muslin or a coffee filter) that is supported in a bowl.

yogurt and strainer

Drain of the resulting liquid until very little liquid continues to be produced from the salted yoghurt.

The translated recipe does not say pour of the liquid though there is nothing that the liquid can be used for.  I believe the draining part is omitted because this step is so common sense, that to include it would waste ink and paper.

Once there is no more liquid being produced take the soft cheese out of the filter and eat.

cheese

This type of cheese is much like a soft cream cheese or a farmers cheese. I put mine into the refrigerator where the resulting soft cheese can last up to a week, 2 weeks in a sealed container.  This is also known as a Persian yogurt or Persian cheese.

Laban – Yoghurt (Yogurt)

Unless the weather was cold 24/7, milk didn’t last very long in it’s raw liquid state.  Some thing about a protein rich environment just waiting to be eaten.  So preservation of a vital source of protein was needed.  Hence the start of preserving milk with bacteria in the form of yoghurt and cheese.

I have been wanting to cover the basics of yoghurt making for awhile and then the opportune moment came in the form of a gallon of whole milk with a small but growing hole in the container as well as live culture yoghurt on hand.  So here we go, today we cover the basic of yoghurt making that includes items on hand and nothing special or gadgety.

I have yet to find a period documented recipe on how yoghurt was made in any of the Middle East cooking texts I have.  I believe this was so well known, much like milking a cow (Cow, bucket and person…all you needed to retrieve the milk, well that and a stool to sit on) that there was and would be no need to ever mention how milk was turned into yoghurt.  Where I did pick up a good very low tech yoghurt recipe was off of a website blog called http://noimpactman.typepad.com/.   There was no relying on thermometers to say when the milk was hot enough or cool enough, nor yoghurt incubators.  A cook had to know when the milk was ready to be taken from the fire and when and how to add yoghurt.

So here is the very basic for making yoghurt with whole milk.

Supplies: Clean all dishes and utensils prior to using.

1 large pot

1 gallon whole milk

1 spactula

2 small bowls

1 table spoon measurer

2-3 Tbs yoghurt

Step 1: Put one gallon of whole milk in a clean pot.  (Any milk will do as long as it is whole milk…you want the fat that whole milk offers for good period yoghurt.)  Stir the milk every few minutes, while bringing the pot up to boil,  so the milk does not scorch on the bottom.   The pot, the spoons, bowls and jars used for this were cleaned prior so that there was not any extra bacterium to contaminate or turn the milk from yoghurt into some thing else calling out for “Mommy!” at the back of the fridge.  The milk should be allowed to boil and foam, but don’t let the milk boil out of the pot.  Then things just get messy!

boiled milk

You can see where the milk boiled up to before I turned off the flame.  I cut it a little close at the boiling/foaming phase, but just a little!

Step 2: Allow the milk to cool till you can hold your pinky finger in the milk for 10 seconds.  This is a crucial step!!  To hot and the added yoghurt bacteria will be killed off.  To cool and extra floating around the house opportunistic bacteria  will start to grow.  This would be a baaaad thing.

Step 3: Once the milk has cooled, take out 2-3 Tbs of yoghurt from a previous batch (or a store bought container with live culture) and place in one of your two clean bowls.  In the 2nd bowl place a cup of the warm milk.  Stir the yoghurt in the bowl till of a smooth and creamy.  I know this sounds silly as yoghurt is already smooth and creamy but you want to warm up and spread out the cold yoghurt in the bowl.  stirred yogurt

Step 4: Slowly poor the milk from the other bowl into the yoghurt stirring the entire time.

yogurt and milk combined

Here the cooked milk is now thicker and cooler with the addition of the yoghurt which in turn is warmed enough to add to the main pot of milk.

Step 5: Add the bowl of yoghurt and milk to the pot of boiled milk, stirring the entire time.  This is more a dribble then a pour.  Dumping the entire contents of the bowl into the pot while quick will result in less the perfect batch.  So dribble and stir until till the bowl’s ingredients have been emptied into the pot.

Step 6: Pour the pot of milk into clean jars.  I luckily had two large glass jars on hand, cleaned prior to using, and closed securely with screw on lids.

jars with milk

Step 7: Place jars in warm area of the house.  Wrap a towel around the jars to retain heat.  Let the jars sit for 12-14 hours then place into the fridge.

You will then have a gallon of yoghurt on hand.  This is a  LOT of yoghurt.  Luckily for us there are a LOT of recipes from which to use this wonderful tasty treat.  Like herbed yoghurt or Persian dried yoghurt.  There are also a variety of cheeses that can be made as well.  But first, take a bowl of your newly made yoghurt, a spoon, then drizzle a bit of honey over the yoghurt.  This is a sweet sublime treat!

Tuffahiyya (Meat with Apples)

I had a lot of apples on hand when contemplating the next set of dishes to cook.  This recipe (both of them) had been on my list to do.  This is a very simple dish that just requires having everything on hand…like apples, meat and spices.

One note,  I did change the “Intensly sour apples” to firm sweet apples i.e. honeycrisps or pink ladies.  Both of these apples keep their shape and wonderful flavor during and after cooking.

Tuffahiyya

Meat with Apples

Translation:

1st translation – According to another recipe, not the one given earlier.  Fry meat, after boiling it, in melted fat with spices.  Then take strongly sour apples and peel them and take out their seeds, and cut them up medium.  Then throw the apples in the pot or the frying pan, after taking it up, for a good while.  And when they soften and it is done.  It is left on a quiet fire and it is taken up.

(Perry, pp. 352)

2nd translation – Put meat into the pot.  Peel apples and cut them up and put them in it.  Then sweeten it. (…similarly to Safarjaliyya)

(Perry, pp. 471)

Ingredients:

2 lbs cubed stew meat  (beef, venison, goat etc)

4 medium apples, peeled, cored and cut into 1” cubes (sweet or sour)

1 tsp ea of ground: thyme, cumin, coriander, pepper, cinnamon, ginger, saffron, tumeric

1 Tbs. sesame oil

***optional: 1 tsp honey per serving

My redaction:

I cut up stew meat into manageable bite sized pieces, laid out the spices to be used, and the apple chunks.

spices

I have held the theory that meals that were eaten with bread or hands did not have the luxury/opportunity for the eater to take a piece of meat, cut it up then eat.  What was taken was probably eaten and a conversation could not be had over a meal if the participants could not talk while chewing manageable cubes of meat.  That’s just  my theory though and why I cut up stew meat into bite sized pieces.

The cubed beef was placed in a pot of water (just enough to come to the top edge of the meat) and cooked thoroughly for about 20 minutes.

meat in pot

The water will cook down as will the meat.  However the 20 – 30 minutes of cooking makes the meat tender and less chewy.  Many of the recipes would normally say to skim off the foam however this recipe is unique in not mentioning skimming at all.

Once the beef has been cooked, any excess juice was drained off  before placing the cubed cooked meat into a medium pan with the sesame oil.  Spices are then added.

meat with spices

1 tsp of spices for 2lbs of meat may sound like a lot; however we are also cooking the meat and apples, so don’t be afraid that the spices are going to over power the meat.  Everything blends very well together once the apples have been added.

After the spices have been stirred into the meat, the apple slices are added.

meat apples

Everything is mixed well, with the spices coating the meat and apples evenly and allowed to cook till the apples are soft.  Roughly 15 minutes.  I did add a 1/2 a cup of water after the meat and apples had absorbed the sesame oil, then covered the pan to allow the resulting steam to help cook the apples.

meat in bowl

After the apples have soften, the meat and apples are served in a bowl.  Honey can be added  to sweeten the flavor if desired.  I like the flavor with out the honey; the honey adds just a touch of sweetness that compliments the apples with the spices very well.  The honey is up to the personal taste on whether to have a sweet or savory dish.

Glires

Glires

Stuffed Dormice

It’s that time again, when the craving for tasty tasty piggy comes about.  So we return to our old hunting ground of recipes by the Romans for insperation.   This tasty tidbit came about by accident.  I was looking to do a very period recipe called Glires ( Stuffed Dormice).  The original Dormice are cute fluffy tailed small rodents that fit into the palm of a hand.  Dormice were raised by the Romans on large farms (called Glirarii) in great quantity, like chicken and rabbits, with the fattest of dormice being in the most demand.  They were such a popular dish that the consul Marcu Aemilius Scaurus issued a sumptuary law that attempted to prohibit the consumption of dormice, but the law was ineffective due to the popularity of these tasty morsals. (Herklotz, pg 75)  When I tried to get actual Dormice for this recipe there was a monkey pox going on (No, I didn’t make this part up!) and had to substitute some thing else.   At the original making of the recipe, I had a pork loin on hand and decided to use 1″ cuts to act as the “Dormice” body while keeping to the pork filling.   Here is my take on an old time favorite by the Romans with tasty tasty piggy.

Translation:

1). Doormice: Stuff dormice with a pork filling and with the meat of whole dormice ground with pepper, pine nuts, silphium, and garum.  Sew up, place on a baking tile, and put them in the oven; or cook the stuffed (dormice) in a pan. (Herkotz, pg. 75)

*Silphium: the Greek name for laser; a plant of the genus Ferula, now extinct.  Garlic juice is used as a substitute. (or crushed garlic)

2). Stuff the dormice with minced pork, the minced meat of the whole dormice, pounded with pepper, pin-kernels, asafetida, and liquamen,.  Sew up, and place on a tile, put in the oven or cook, stuffed, in a small oven. (Flower, pg. 205)

Ingredients:

3 – 1 1/2” pork rounds                    1/2 cup ground pork  (plain pork meat)

¼ cup pine-nuts                               1 tsp pepper

1 tsp fish sauce                                1 tsp crushed garlic

1 tsp thyme (optional)

My Redaction:

Romans’ were notorious for substituting so I have no qualms when substituting pork in the place of rodent.  I really did try for the original meat but was thwarted by a plague…ok a monkey pox.

The actual pork meat is 1 1/2″ thick cuts of pork loin though a thick cut pork chop would work as well.

spices

The pork filling is actually a pork chop ground fine in a little Cuisinart I have on hand.   Modern sausage could be used, though I’ve found the spices to be overbearing to the more subtle tastes of the nuts, pepper and garlic.

pork filling with spices

Here is the ground pork chop used for the stuffing with the spices, fish sauce and pine nuts.  Mix together.

I tried to stick to the period recipe as close as possible with the exception of adding a tsp of thyme.  The thyme is optional.  Period Roman sausage or sausage stuffing included a plethora of ingredients: “Lucanian sausages:…Pepper is ground with cumin, savory, rue, parsley, condiments, bay berries and garum.  Finely ground meat is mixed in, then ground again together with other ground ingredients…” (Herklotz, pp. 182)   The addition of thyme is acceptable as would be a host of other items though I would suggest moderation so as to not overpower the over all taste.  Experiment, but experiment with a light hand!

mixture

This is the mixture with everything incorporated into the finely ground pork.

The next step is to take the pork loin rounds and slice into the sides; roughly 2 1/2 – 3 inches wide.   Cutting into the pork loin along the sides and end with out cutting through to form a pocket on the inside of the meat.  (The picture is a little blurry…hard to handle the meat and take a picture at the same time).

sliced pork

Take the pork filling (about 1/3 of the mixture) and stuff into the opening of the pork loin, which will bulge out the side a little bit like an over stuffed wallet.

stuffed pork in dishI place the stuffed loins on their bottoms instead of laying them on the side.  I did not want any of the stuffing falling out but did want all the taste and juices to stay in the pork loin pockets.  I place at the bottom of the baking dish (no cooking tile was on hand to bake these on) a little mead I had on hand.

These bad boy stuffed piggy posing as Dormice are now ready to be placed into the oven for 30 minutes (or until thoroughly cooked) at 350.

cooked pork

I like the little extra sweetness when eating pork.  So did the Romans as the suggested sauce for Dormice is honey with poppy seeds drizzled over the tidbits, which is suggested by Pliny in Herkotz.

Hais (Date and Pistachio Balls)

This is a sweet chewy almost crunchy almost melt in your mouth treat that never goes bad.  Well okay, maybe if left outside for a couple of months they might get a taaaad moldy; however once you’ve had a bite of this you’ll never have to worry about any of these laying around…they  go fast!

Hais

Translation:

Take fine dry bread, or biscuit, and grind up well.  Take a ratl of this, and three quarters of a ratl of fresh or preserved dates with the stones removed, together with three uqiya of ground almonds and pistachios.  Knead all together very well with the hands.  Refine two uqiya of sesame-oil, and pour over, working with the hand until it is mixed in.  Make into Cabobs, and dust with fine ground sugar.  If desired, instead of sesame-oil use butter.  This is excellent for travelers.

Al-Baghdadi p.214/14, A Miscelleny p. 101

Ingredients:

2 2/3 C bread crumbs                                       2/3 C ground pistachio

2 C pitted dates                                                4 TBS sesame oil

1/3 C ground almonds                                      ½ C sugar

My Redaction:

I’ve made this recipe a few times.  Each time I experiment a little more.  In the past I’ve used store bought “plain” bread crumbs.  Fast easy and readily available.  A very nice time savor.  This time, since i had been in a bread making mood, I used the bread made from the Khushkananaj dough.  This dough bakes into a wonderful,  sesame flavored, flat bread that when left out to “dry” or go stale, grinds down into the perfect bread crumbs.   (I let the flat bread sit for about 2 hours after pulling from the oven before grinding into crumbs).   If you haven’t made enough of the Khushkananaj flat bread or run out of store bought bread crumbs, I substituted some whole grain bread crumbs (made from whole grain bread toasted then ground up).  The bread crumbs become a little more substantial and not quite  so “light”.

bread crumbs

I found I liked the taste of the home made (even with the whole grain bread crumbs) a little more then that of store bought but that doesn’t mean in a pinch I won’t buy my bread crumbs again.

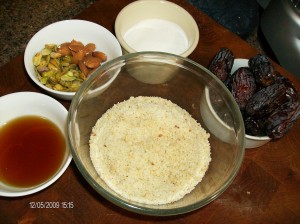
The pistachios were ground prior to the start of this recipe with the almonds bought pre-ground as well as plain bread crumbs.   ingredients

This picture shows the Khushkananaj bread crumbs prior to the whole grain bread crumbs being added.  (The picture doesn’t show ALL the dates necessary, just about a cups worth.)

I combined the dry ingredients (excluding the very sticky dates) in a large bowl.

breadcrubms w sugar pistachios

Now I had some of the almond/pistachio/spice mix left over from making Khushkananaj cookies which adds a little extra flavor to the mix.  I don’t believe that any period cook would have wasted sugar and spices by throwing out the left overs.  The left overs would have simply been incorporated into another recipe or used to experiment with.

The dates and dry ingredients were mixed together then sesame oil stirred in as needed.  The mixture was a little dry still so a extra ground up dates were added.

mixture

Here is the incorporated chopped dates and sesame oil mixed with the dry ingredients.

Once the everything has achieved a squishy consistency of well mixed ingredients, start forming balls about an inch across by rolling the dough in your hands.  If there is enough ground dates and sesame oil there should be no trouble forming balls; however if the balls start to crumble instead of compact add more dates.  The dates are sort of like the glue that binds a sweet sticky edible glue that is!

date balls

Here are a few formed ones.  Now the shape suggested is more oblong then round however the shape was very unappealing so I stuck with the ball form instead of an oblong look.

I also changed dusting with sugar to incorporating sugar into the recipe.  Dusting with sugar did two things.  The first is that the mixture is sweetened even more then just sweetness of dates.  The second is that a dusting of sugar helps to keep the date balls from sticking together.  I have found that when stored on wax paper and with the inclusion of a few extra ground nuts that sticking is not an issue.  Dust away if that is preferred though as seen dusting is not an absolute.  Time for me to go and nosh on a few of my own now!

Now this dish is a wonderful little piece.  The meat can be used on it’s own as a main dish or as a side dish to be scooped up with bread , added to the center of couscous or rice.  This also makes excellent sandwiches the day of being made or the next day when it’s a grab anything you can find to eat, stuff it into bread and go!

Bazmaward

Meat with Sour Fruit and Mint in Bread

Translation:

Take nice well done roast meat, as much as necessary, from the ribs and other parts, and pound it fine with the cleaver.  Throw fresh mint leaves on it and, if you want, a little celery leaf.  Sprinkle it with a little vinegar and lemon juice; and if you wish , put in the juice of salted lemons or of sour fruits instead of lemon juice; they are pounded with it (the meat).  Flavour it with a little milled mastic and Chinese cinnamon and sprinkle it with good rose-water.  Pound it exceedingly well until it becomes fine.  Then take some brick oven bread, watched over as it baked in the oven and let it be in the shape of a tulma loaf, (flatbread baked in the tannur oven…a round or oblong bread with a raised rim, lice Central Asian nan.)  …It should be well cooked, between dry and soft….Set it aside, then split it with the knife and stuff it well with the prepared roast, and cut it into thin pieces and arrange it in baking trays.  Throw mint leaves on it.  It is eaten right away and the following day.

(Arabic Cookery. Rodinson, pp. 382.)

Ingredients:

2.5 lbs lamb (beef or venison)               2 Tbs olive oil

(Spice rub, 1 tsp in any combination coriander, cumin, cinnamon, black caraway seeds, cayenne pepper, thyme)

To be added after cooking:

1 finely chopped salted lemon   2 Tbs mint (dried)         2 tsp pomegranate juice

1 Tbs vinegar             ¼ tsp rose-water          1 tsp cinnamon

My Redaction:

The recipe calls for rib meat as a preference as this meat is fatty.  A good substitute would be a brisket type of meat if rib meat is not available.  I originally used 2.5 lbs of leg of lamb, which means the meat was a little dryer then would be preferred.  (The second and third time I used this recipe I incorporated beef roasts.)

Spices

The lamb was cut into scallops the size of the palm of my hand and placed into a casserole dish which had been coated with olive oil and a little of the spice rub.  The meat was then layered with spicing between each layer and a final dusting of spice on the top of the meat.

Sprinkling of meat

The meat is layered with spices another layer of meat then more spices until the meat and spices fill up the baking dish or you run out of meat.

You don’t hear this often in cooking but for many period Middle Eastern cooking, lean meat is not as good as a rich fatty pieces of meat, especially for this recipe.  A little bit of sesame oil, olive oil etc would be an excellent addition to the cooking if only lean meat is available.

Once cooked the meat was allowed to cool before I chopped into small pieces.  I probably did not chop the meat as fine as the original notations indicate; however I think the sizing was suitable for sandwich stuffing and finger food.

shredded w spices

After the meat was sliced I then added the remaining ingredients to the meat, mixing well.  When the meat and spices were completely mixed, pita bread (nan can be used) was split in half and stuffed.

sandwich

A tasty treat or main meal.

When they say salty buns they weren’t kidding.  Though I did use a bit more salt then might have been necessary; the buns do make a very salty base for sweet.  I also liked the bread as a sandwich type of bun.  Good for grilled meats or the sweet and sour meats as a next day treat on salty bread.

Aqras Mumallaha

(Salted Buns)

Translation:

Take as much flour as needed and put a quarter pound of sesame oil on every pound of flour, and put in a moderate amount of salt, such that it is neither apparent nor deficient.  Bake it, after it rises, in the same way as khubz al-abazir, but (rolled) a little thinner, and when it browns lightly, take it out.  This is only made so that the appetite may incline to the salty taste, rather than the sweet, so it is served among the sweet dishes.

(Rodinson, pp. 431)

Ingredients:

2 C. flour          3 Tbs sesame oil           1 tsp salt           ¼ C water        1 tsp yeast

My Redaction:

I took 2 cups of flour and salt, combining till well blended.  The sesame oil was then added along with the water and yeast.  The yeast I placed into the water until mixed and allowed to set for 5 minutes.

dough

The recipe does not specifically say to add yeast; however with the phrase “…after it rises” makes me believe that yeast was added.  Very few kitchens have enough yeast floating through the air to make bread rise with out the addition of yeast cells.  So with that in mind I took in the need for water and yeast (technically yeast can be added with out water; however I find that with out water added with the yeast the bread is less elastic with less rise).  The dough sat until doubled in size, then formed into roughly hand sized buns and cooked at 350 till lightly brown.

HPIM1241

The dough sat rising for about an hour (you can leave bread to rise for a long while so if you forget and come back to really puffy dough…don’t panic.  The dough is still usable!).  Now you can form more then 3 out of the dough if rolled a little thinner and smaller.

If these are to be used for a dessert I would definitely suggest a smaller bun about 1-2 inches across more like a bread spoon instead of a bread pocket.

These 3 dough pieces made for very nicely formed salted buns.  Just the right size for sandwiches.

Sandwich

This is what the bread looks like stuffed with a very tasty bit of beef cut up into pieces.  The salted buns are definitly a switch hitter.  Good for both the meat and the sweet!

This bread was to be used a salty offset for the sweet dishes.  I have also used this recipe with a little less salt as a base for bread buns used for stuffing of meat into.  Very tasty and very salty.  Goes well with jams.

Khushkananaj

(Persian Dry Bread)

Translation:

Take excellent flour and put three ounces of fresh sesame oil on a pound of it.  Knead it hard with a little water.  Make it right away, with out leavening.  Then make it into long cakes and put finely pounded sugar and almonds in them, as much as they will bear; and let the sugar, like the almonds be spiced.  Sprinkle a little rose-water on them, then bake them in a tannur as bread is baked until done.  Take them up.  If you want fried, knead the dough with sesame oil and fill it and fry it and dip it in syrup and sprinkle it with sugar.

(Rodinson, pp. 425)

Ingredients:

Crust – 1.5 C flour        3 Tbs sesame oil           2 Tbs water

Filling – ¼ C almonds   ¼ C sugar

½  tsp each of ground cinnamon, cardamom, cloves, pepper

Sprinkling of rose-water

Syrup – honey or date syrup

My redaction:

My first time through on the recipe I just made the dough.  I did not do any stuffing or dipping into syrup.    I took 1.5 cups of flour and mixed with 3 Tbs of sesame oil, incorporating just enough water to form a sold but pliable dough.  I then made 2 oblong flat loaves to be cooked at 350 in the oven till golden brown.  flat bread made by dough

This dough is tasty though a lot like a pie crust dough just made with sesame oil instead of shorting.  The bread crumbs from this are AWESOME for use in anything.  We’ll refer back to this for bread crumbs at another time.

For the actual dough into stuffed cookies, I  rolled the dough on a floured surface to about ¼ inch thick (like pie dough) and cut into strips.

dough stripsThe dough strip to the left has incorporated a bit of cinnamon, which is nothing to worry about in the fundamental taste.  So if a little spicing gets incorporated into the dough…don’t worry, it’ll still be a very very tasty cookie.

The strips I rolled a little thinner and trimmed off any excess along the edges to give a more uniform and rectangular appearance.

rolled out dough

In the center of each I sprinkled the sugar, almonds and spices (mixed together in a bowl first) till there was no more room.

stuffed dough

I then folded over the edges and pressed to form a seal.

folded stuffed dough

The recipe leaves out a step and that is to seal the edges with water or egg.  The first time I did neither and there are gaps in the cooked cookies to prove it.  So with a little water on the finger tip, go along the inside of the dough before sealing, flip the edge over and press down.  The cookie is then sealed and there should be no leakage or unsightly gap showing the slip…err filling of the cookie.

Each rectangle was sprinkled with a little rose-water.  Just enough for flavor not enough to overwhelm.  The rectangles were then cooked at 350 for roughly 10 minutes or until just golden brown.  These are very dry; however with the addition of honey (or date syrup) the filled cookies become very very tasty treats.

cooked rolls and cookies

I had enough dough to make a few cookies.  They are VERY dry until you add some thing over them like honey or date syrup.  You can even make a honey rose-water syrup for dipping.  If you like dry cookies these are your new best friend, if you like things dipped into a syrup these will definitly be your new favorite.  Either way dry or with a sweet syrup you can’t go wrong serving these at your next period Middle Eastern Banquet.

Khaukhiyya (Meat with Plums)

I have made this dish many times and each time a little differently.  Each time I really love the results.  The meat can change, the cooking can be with either fresh or pickled plums.  Vegetables can be a part of or not and this always turns out excellently.  This dish is so very forgiving but always worth the effort.

This dish is a melt in your mouth fall festivle of sweet sour and smoooooth.  Remember those pickled plums (Qarasiya Mukhallala)?  Well we’re going to use those in this dish (though you don’t have to).  If pickled plums aren’t available use fresh plums!

Khaukhiyya

(Meat with Plums)

Translation:

Boil meat and plums.  Fry vegetables – Swiss chard, eggplant, carrots, gourds and so on.  Macerate the plums in the meat broth and strain it and put it with the vegetables.  Then sweeten it and garnish it with walnuts and parsley. (Rodinson, pg. 472)

Ingredients:

2lbs Beef, Venison or Lamb       3 cups pickled plums w/juice ***

¼ cup chopped walnuts                                  3 Tbs fresh chopped parsley

Vegetables:

3 cups carrots  (or combination eggplant, swiss chard, spinach, squash etc)

2 Tbs sesame oil

***If pickled plums are not available use:

2 C. fresh plums               3 Tbs honey           1 Tbs vinegar             1 C water

My redaction:

I took regular beef stew meat this time and place the meat in a pot with 3 cups of pickled plums w/ juice.  Now the plums I had pickled were put up about 5 months ago and were very very ripe.  For plums that can be served on their own and used for garnish you want to make sure that the plums are firm.  If very ripe plums are used it is more then likely that the pickling will result in a fabulous sweet/tart plum juice and shreds of plum (which work very well for this dish also!).

Spices

The plum juice is front and center.  The actual plums (in this case plum mush) are waiting to join the meat and juice in a nice long simmering bath)

meat w plums cooking

While the meat and the plums are cooking, start the carrots.  I took the 3 cups of carrots and tossed them with the sesame oil then placed in the oven for the same amount time that the meat will be simmering in the plum bath.

carrots w oil

The recipe calls for frying which takes a lot of time standing at the stove and stirring.  I chose to by pass this with excellent results by just using the oven and oil.  Works very well.  This method will work for other vegetables as well though I do suggest that carrots be cooked first (as they are firmer) then as the cooking winds down the softer veggies such as squash and swish chard are mixed about half way to 2/3 of the way to being done.  Soft cooked veggies are desired, not mushy veggies.

So carrots at 350 for about 1 hour or for as long as it takes the meat to become tender in the plum bath.  Allow the plum broth to reduce by 1/2 and thicken to an almost gravy like consistency.

Once the meat has simmered till just about falling apart tender (1- 1.5 hours), pull out the carrots (or other veggies) and place them in a ceramic dish leaving an empty spot in the center.    Place the meat chunks into the center of the veggies until all the meat is in the center or the dish is in peril of over flowing.  Spoon the plum sauce over the meat, then spinkle with chopped walnuts and parsley.

finished dish

This dish is excellent hot or cold, served on a bus or on a train, in the dark or in the rain.

Qarasiya Mukhallala (Pickled Plums)

This is a seasonal dish/item.  So while I actually do have pickled plums on hand I can’t show you how I made them…yet.  I will update this with pictures as soon as I get my hands on some fabulous plums.

So a quick history of plums:

Plums were known in Egypt by the provisions of dried prunes, cultivation of plums were spoken of by Pliny during Roman times and “the dark-skinned ‘damask plums’” were highly prized in France. (Toussaint-Samat, pg. 642).  The plums bought mundanely are referred to as black plums; however the correlation between medieval “dark-skinned” plums and today’s black plums may be only somewhat  related as the modern variety has had centuries of cultivation.  The plum thought to be closest to the original plum described is the Damson plum which “Originating in the Middle East, they were brought back to Europe during the 12th century by the crusaders”. (Krachmal)

I used a generic black skinned plum that was sweet but firm.  The sweeter the plum the squishier the fruit which does not preserve as aesthetically as if the plum were slightly greener but less sweet.  So pick a firm plum that is on the cusp of being really really ripe but can be squeezed while remaining firm to the touch.

Qarasiya Mukhallala

(Pickled Plums)

Translation:

Put them in a pickling jar and put water on them, and a little vinegar and a like amount of honey.

Medieval Arab Cookery, pg. 397

Simplistic, yes?  There are no quantities given so a little experimentation was in order.

Ingredients:

5-8 plums (varying due to size and quality) per jar*

¾ to 1 cup water                                  1/4 cup (white wine) vinegar                             1/4 cup honey

My redaction:

jar and plums

This original translation does not call for pitting or cutting of the plums; however due to today’s sized plums it is a better choice that the plums be pitted, then cut into roughly 1 inch sized cubes/chunks.

cut plums

The reason I say that today’s plums as opposed to in period, is that period plums were probably much smaller (due to not having regular irrigation or modern fertilizers) and might have been used with the pits, they might not have.  The recipe is not specific enough to know which.  I personally do not like the idea of keeping pits in fruit when preserving.  This is dislike of keeping fruit and pits together is due to bacteria that may have formed from the stem opening and be working out from the pit area if whole, with that being said I am writing what I have used and find that works for me.  On that note, pit and cut your firm just ripened plums into to quarters and place into a clean jar till the pieces are just under the rim by 1/2 inch.  I can usually fit 5-8 plums per cleaned jar (depending upon spaghetti jar or canning jar used).  This jar  holds 6 plums.

For the amount of water to vinegar to honey ratio; we know that the vinegar and the honey must equal the same amount as the comment is “…a little vinegar and a like amount of honey.”.  So with that in mind and I like sweet, I filled the jar that is filled with plums 1/2 with water.

plums w water

Do NOT fill the jar with water piror to putting the plums in.  Then things get really mess.  Fill the jar with plums first then half way with water.  Fill the next quarter with a honey, but only a quarter of the way.

plums w honey

The final quarter will be filled with vinegar to the rims edge.  make sure that the vinegar covers the pieces of plum.   Here I used a balsamic vinegar.  Any vinegar can be used i.e. wine  or apple cider.  I just liked the tart/sweet tast of the balsamic with the plums.

plums w vinegar

Then seal with a lid.  Once you seal with a lid, turn the jar upside down a few times.  This mixes everything together and gets the air bubbles to the top.  Unscrew the lid and add a little more honey or vinegar.  Seal.  Repeat once more.  You want all the air bubbles out so that bacteria does not have an air pocket to gain a foot hold.

Why were water, honey and vinegar used together?  Besides the sweet and sour taste?  Couldn’t the water be done away with?  Addressing the honey and vinegar issue first.  The honey acts as an anti-bacterial while the vinegar is extremely acidic.  Both help retard bacteria that would be on and attracted to the cut up fruit.  Water is a neutral liquid.   With the addition of a neutral liquid neither the honey nor the vinegar overwhelm the taste of the fruit while just giving a hint (strong hint) in equal portions to sweet and sour.

Note on jars:  I reuse my old spaghetti jar’s or apple sauce jars after putting them through the wash.  I do not boil to sterilize as this was not a period practice.  I do however place the jar(s) in the fridge for longevity sake.  One container of pickled plums will last a year for me (the time may vary for you so be careful!!!).   The pickled plums can be used either as a tasty treat or in recipes that call for pickles, honey and vinegar.