Subtleties

You are currently browsing the archive for the Subtleties category.


An original Subtlety

This subtlety project started as another redaction recipe in the book “Opera of Bartolomeo Scappi”. Had I presented just the twist, without any decoration the taster would enjoy and amazingly complex dish of fruit, wine and spice; however they would have been visually underwhelmed with the presentation.  Think cow patty but tasty.  The shape lends itself well to a crown or coronet. I could have gone with this idea by gilding the pastry, studding it with pearls and lapis stones, inserting rock candy sugar “diamonds” but I didn’t think that was going to be visually impressive enough.  Then I thought of doing two snakes eating the other snakes’ tail, while doing painted scales of dough and painting dragon heads; however Scappi was very insistent that this was a rolled pastry.  I wanted something that fit the shape of the twist while giving the viewer the sense of something not of land.  A true subtlety.  The idea of an underwater dessert was born.

A few elements were added to the twist for this to work.  A larger “opening” for where a sea creature could enter and exit.  The shell would need to be painted.  Some period coloring is too poisonous to use so alternatives found.   Instead, I decided to add a few things found around the larger “shell” like smaller marzipan seashells, coloring them with spices.  Then using special sugar for sand.  The final touch was the idea of forming seaweed. I had first thought of doing marzipan seaweed, but I already had marzipan seashells.  Next I thought of doing a spinach pastry but I wanted everything to be edible.  After a few days of entertaining wilder and wilder imagery, sugar became my go to for the rescue.  The Scappi Twist as a dish grew into a subtlety, not because of its original beauty and shape, but something more than the original.

Subtlety – A short overview of food as art:

The intention of a subtlety is to create an experience rather than something given as a gift or sold.  The subtlety it not durable, it spoils, it has a fixed life-span that ends when it is eaten. The subtlety entered the dining hall in motion: the scene is wheeled in, fire blazing out of the mouths of beasts and the actors are put into life-like poses animated by other performers or the imagination. (Martins)

Monarchs put the feasts to good use as ways to make a vivid point, i.e. the inducing of guests to pledge allegiance to a planned crusade.  An example: Philip the Fair, at the Feast of the Pheasant, showcased a giant Saracen entering the feasting hall leading an elephant (there is a question about the edibility of said pachyderm), with a knight (Oliver de La Marche) playing the role of the captive Eastern church. (Wheaton, pg. 8/Martins).  Another example: Henry VIII.  George Cavendish wrote about a feast sponsored by the great Tudor king in such waxing enthusiasm for the feast “…I do both lack wit in my gross old head and cunning in my bowels to declare the wondrous and curious imaginations in the same invented and devised.” (Henisch, pp. 236/Martins)  The feasting was a display to move men and women into wondrous thoughts, glossing over the harsh reality of court life or a grand and compelling gesture.

A subtlety could be simple items.  A redressed peacock on proud display or stuffed fowl riding roast piglets; or as elaborate as a full pastry castle with trees containing candied fruit, glazed and stuffed mythical beasts, and musicians.  Allegorical scenes were not uncommon, with themes like “Castle of Love” or “Lady of the Unicorn”.  A subtlety could made of just the edible, such as a re-skinned peacock, or as a combination of paper mache and lumber to accent the food in the display.  These decorative subtleties were for powerful displays and less about eating, with the production being done by carpenters, metal smiths and painters and very little with chefs. Horace Warpole describes a banquet given in honor of the birth of Duke of Burgundy, where the centerpiece was of wax figures moved by clock work at the end of the feast to represent the labor of the Dauphiness and the happy birth of the heir to the monarchy. (Martins/Craig, pp. 17)

Creating a display:

Creating a display seemed to rely heavily on allegorical content from myth, fantasy or biblical content, such as the Pegasus from myth at the Roman table (Scully, pp. 107) or Lady of the Unicorn. The thought process that goes behind making a display was how each animal was viewed in allegorical terms.

“…the horns of an antelope might get caught in a bush in the same way humans might get caught in a life of sin. The nightingale represented love, the elephant implied chastity, the ape, lewdness and lust and the peacock, the purity of someone who never turns to sin.” (Martins).

The main display item, per these views should play upon the strength of the subjects or as humorous joke on the subject matter presented.

            The seashell motif is made in the nature of humor, an underwater seascape, and miles from the ocean in a semi-arid landscape, eaten by those who do not breathe water.  And should the items be introduced to water, they would either melt or come undone by that which the represented items live in.

Seashells in Italian Artwork:

Searching for Italian seashell artwork wasn’t difficult.  The first image that came up is Sandaro Botticelli’s famous work “The Birth of Venus” 1485

Image 1 https://www.britannica.com/biography/Sandro-Botticelli by Sandaro Bottecelli

This is an amazing piece of work with an allegory for every image painted.  The painting used tempera – a method where water and egg yolk mixed with pigment.  Sometimes whole egg with or without glue or milk were also used.  The picture is canvas instead of wood. (http://www.visual-arts-cork.com/old-masters/botticelli.htm).  Aphrodite’s shell is not the type of shell I need for my display, just a representation that seashells did appear in Italian paintings of the 1500.

Image 2 https://www.pinterest.com/pin/220957925439888372/

Aguamanil de Nautilus ,1570. Colección Francesco I de Medici. H: 30 cm. Palazzo Pitti, Museo degli Argenti, Florencia, Italia.

This artwork, featuring a nautilus shell, shows the shell type for which my subtlety is based on.  Unfortunately, due to the weight of the twist and the pastry shell’s fragility, there is no way I can stand the twist on its side.  The twist has to be shown lying down. 

Method/Technique:

For an Italian themed event, I wanted to do something very Italian.  Scappi is the go to for any good period Italian dish.  The twist was just the thing.  The first few times I made this, I did not like how the dish turned out.  The taste is amazing, but the look is pure cow patty.  It needed an overhaul.

First we start with the kitchen, where the food art was made.  Scappi’s kitchen, as seen in Plate 1, shows a large spit with a smaller side area of pots, possibly soups, sops or sauces.

Plate 1: Main Kitchen

Plate 2: Pastry Kitchen

Plate 2 shows the second kitchen (Scappi, pp 636, 637) for pastry making.  The wood burning section was put above the pastry oven for better control of heat.  Different heats were used.  By varying the amount of coals allowed under any one dish or dishes.  The heats Scappi used ranged from gentle heat, slow flame, hot heat or sprightly flame.  There are descriptions calling for dishes to have heat of glowing coals or under hot ash.  (Scappi, pp 54)  With the heat evenly distributed over the top of the ovens, this gives an almost modern ability to control the heat for pastries.

This varies slightly in how the Tudor ovens have been shown. The fire oven per period cooking show Hampton Court Palace Tudor Kitchen (https://blog.kathrynmcgowan.com/tag/hampton-court-palace-tudor-kitchens/) shows the oven heated with lots of wood and the resulting coals scrapped out.  Once the coals are scraped out, dishes of raw food are placed in the oven at various times (as the oven cools) and a wooden door is placed over the opening after each round of dishes goes in.   I do not have a wood fire oven.  An oversight of the homeowners association I’m sure!  I will bring this up at the next meeting.  The nerve not to allow fire ovens.  Have they no sense of period?!  Having not outdoor or even indoor fire heated oven, I set my electric oven at 350 and cooked for 45 minutes.

 Scappi wrote on the different types of pastry he used.  The kind that was sturdy but discarded.  A second pastry made lighter and flakier by the liberal use of butter, eggs and with herbs and/or spices. 

Scappi is particular about the pan used for the twist.  “Have a Tourte pan…” I did have a nice metal pie pan, similar to the one described by Scappi (Page 644), with a flat bottom and straight sides.

Plate 12: Torte Pan(s)

For the first part, I cut up the dates, mixed in the currants and golden raisins, poured in the wine and added spices into a metal pan.  A nice Italian red wine, not period (I wouldn’t trust a 500 year old wine as drinkable no matter how good the vintage).  The dried fruit cooked for 30 minutes.  Scappi didn’t specify type of wine, just wine.  He does reference wines with descriptions of sweet whites, or reds as pleasant or robust.  (Scappi, pp 61)  I prefer robust reds for their flavor.  Cooking diminishes the wine flavors slightly, hence my use of a robust red.

A quick note on Scappi’s recipe:

He called for currents and Corinthian raisins. It is possible that the Corinthian raisins called for were currents however, my believe this is a mistranslation. If Scappi had wanted currants, currants and dates, he would have said Double the amount of currants to the amount of dates used. Hence the use of raisins instead of double the amount of currants.

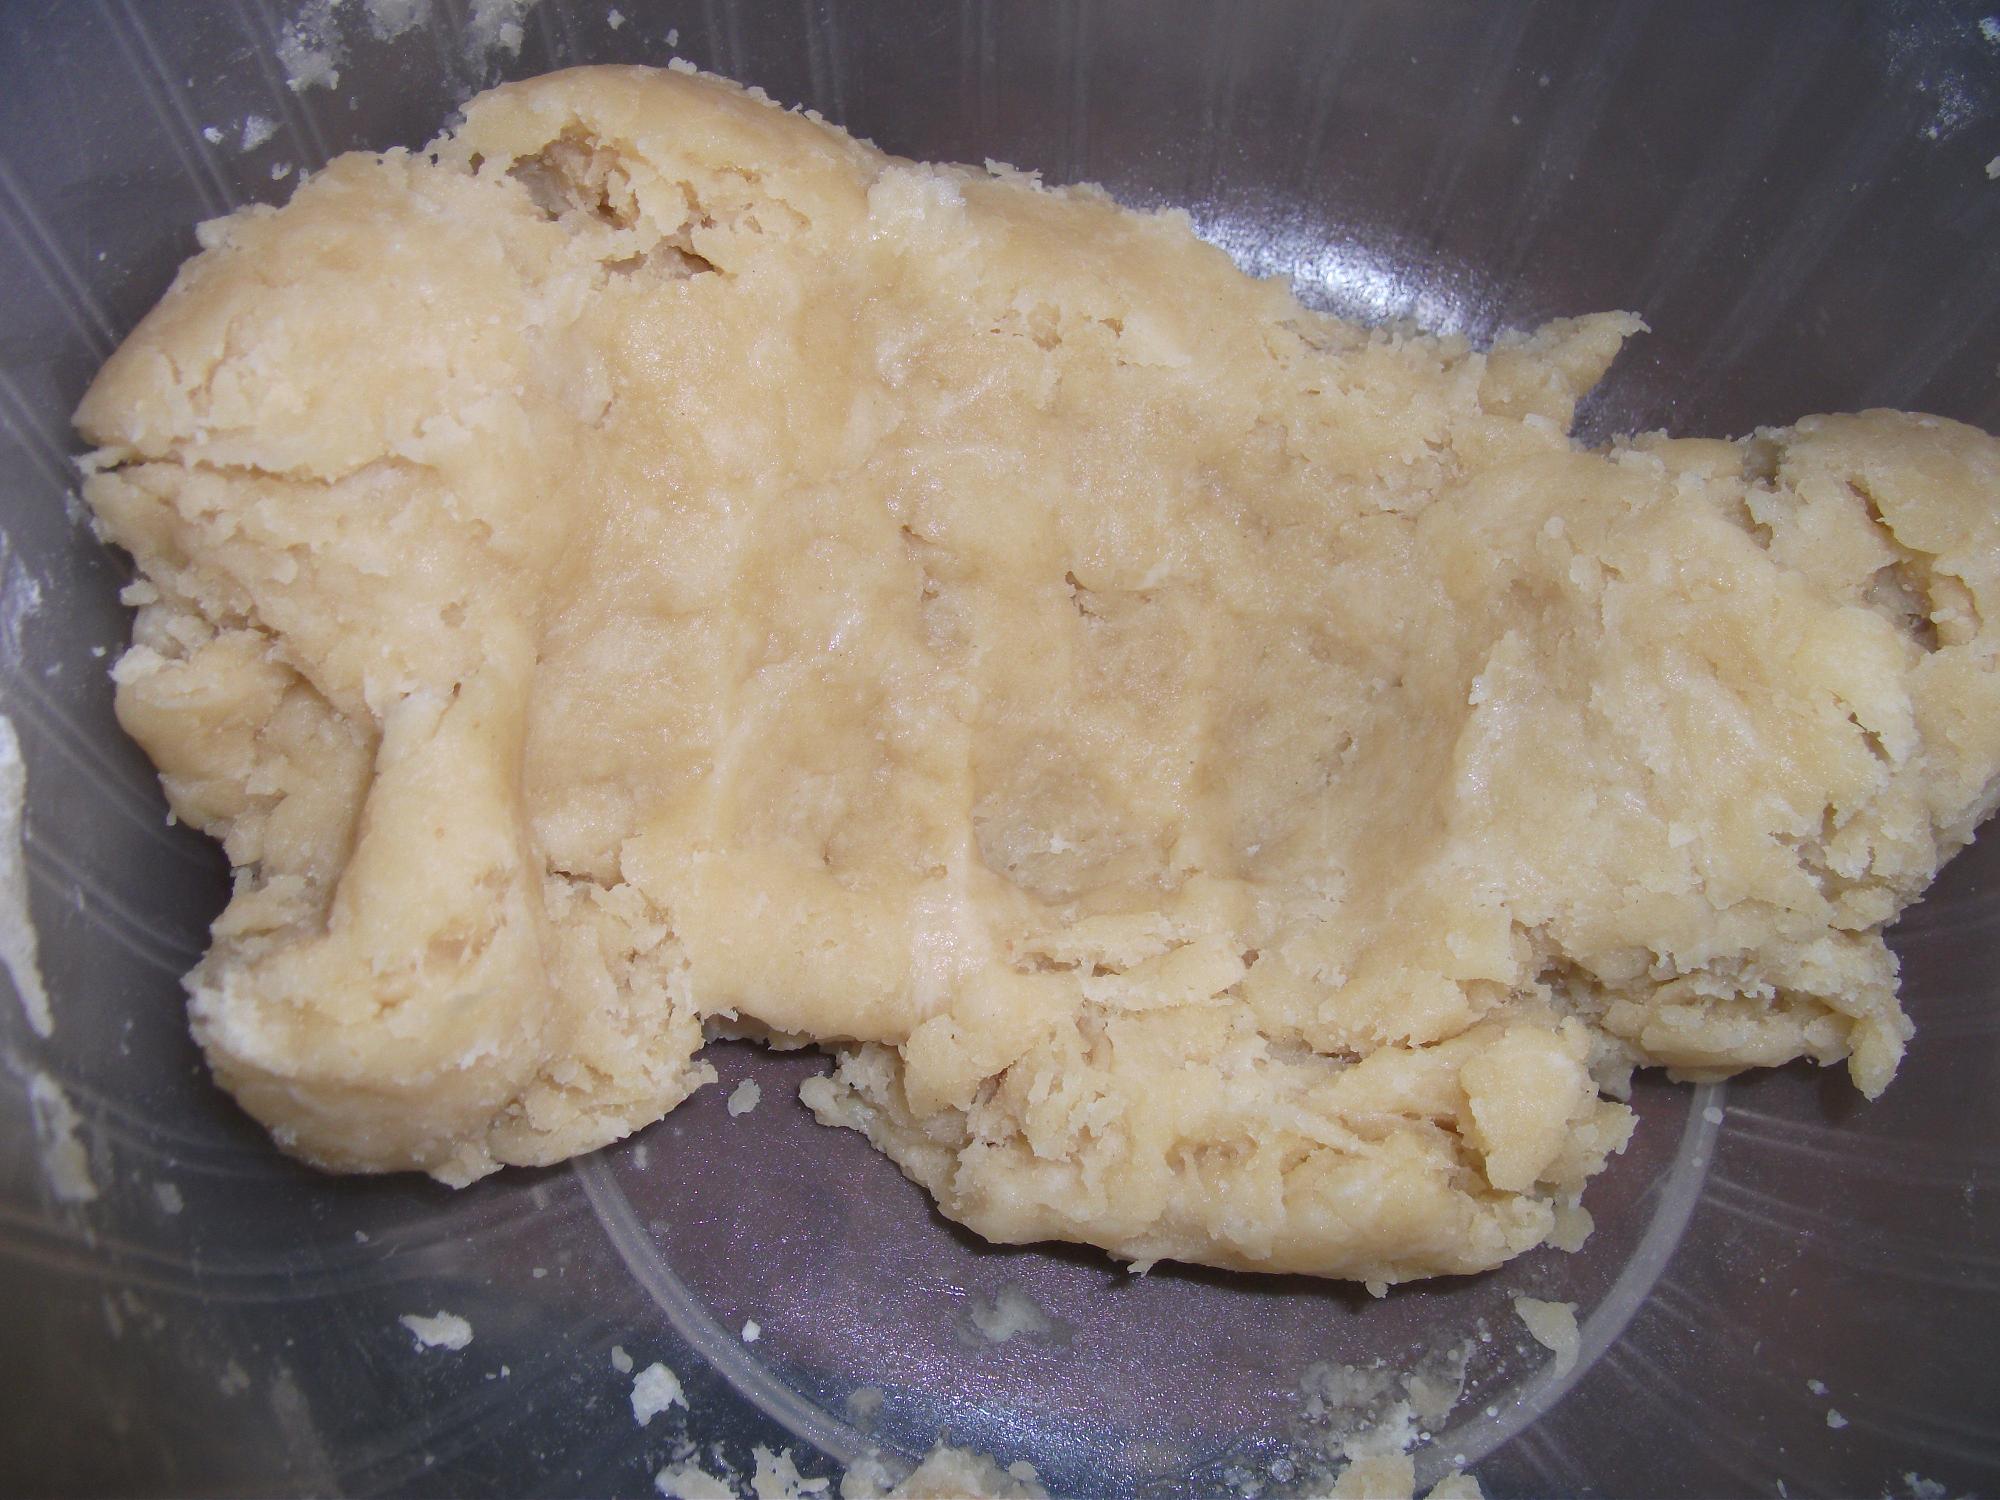
Next we start with the dough.  My daughter was unwilling to be my child slave labor even though I asked nicely.  She laughed at me.  Ungrateful child, I tell you!  Everything mixed well together, with the heavenly scent of rosewater.  I was almost able to knead for 15 minutes…maybe, knead until the dough is as smooth as a baby’s bottom.  After making this dough many many times, all I can say is you will build up arm muscles.

I let the dough rest for a few minutes while I used a metal colander to strain the excess wine from the fruit.  There wasn’t a lot left over, even with the use of an entire bottle, less than a cup of fruity wine.  Scappi shows a metal colander in Plate 11.  His is a bit shallower than the one I have, also made of metal.

Plate 11: Colander

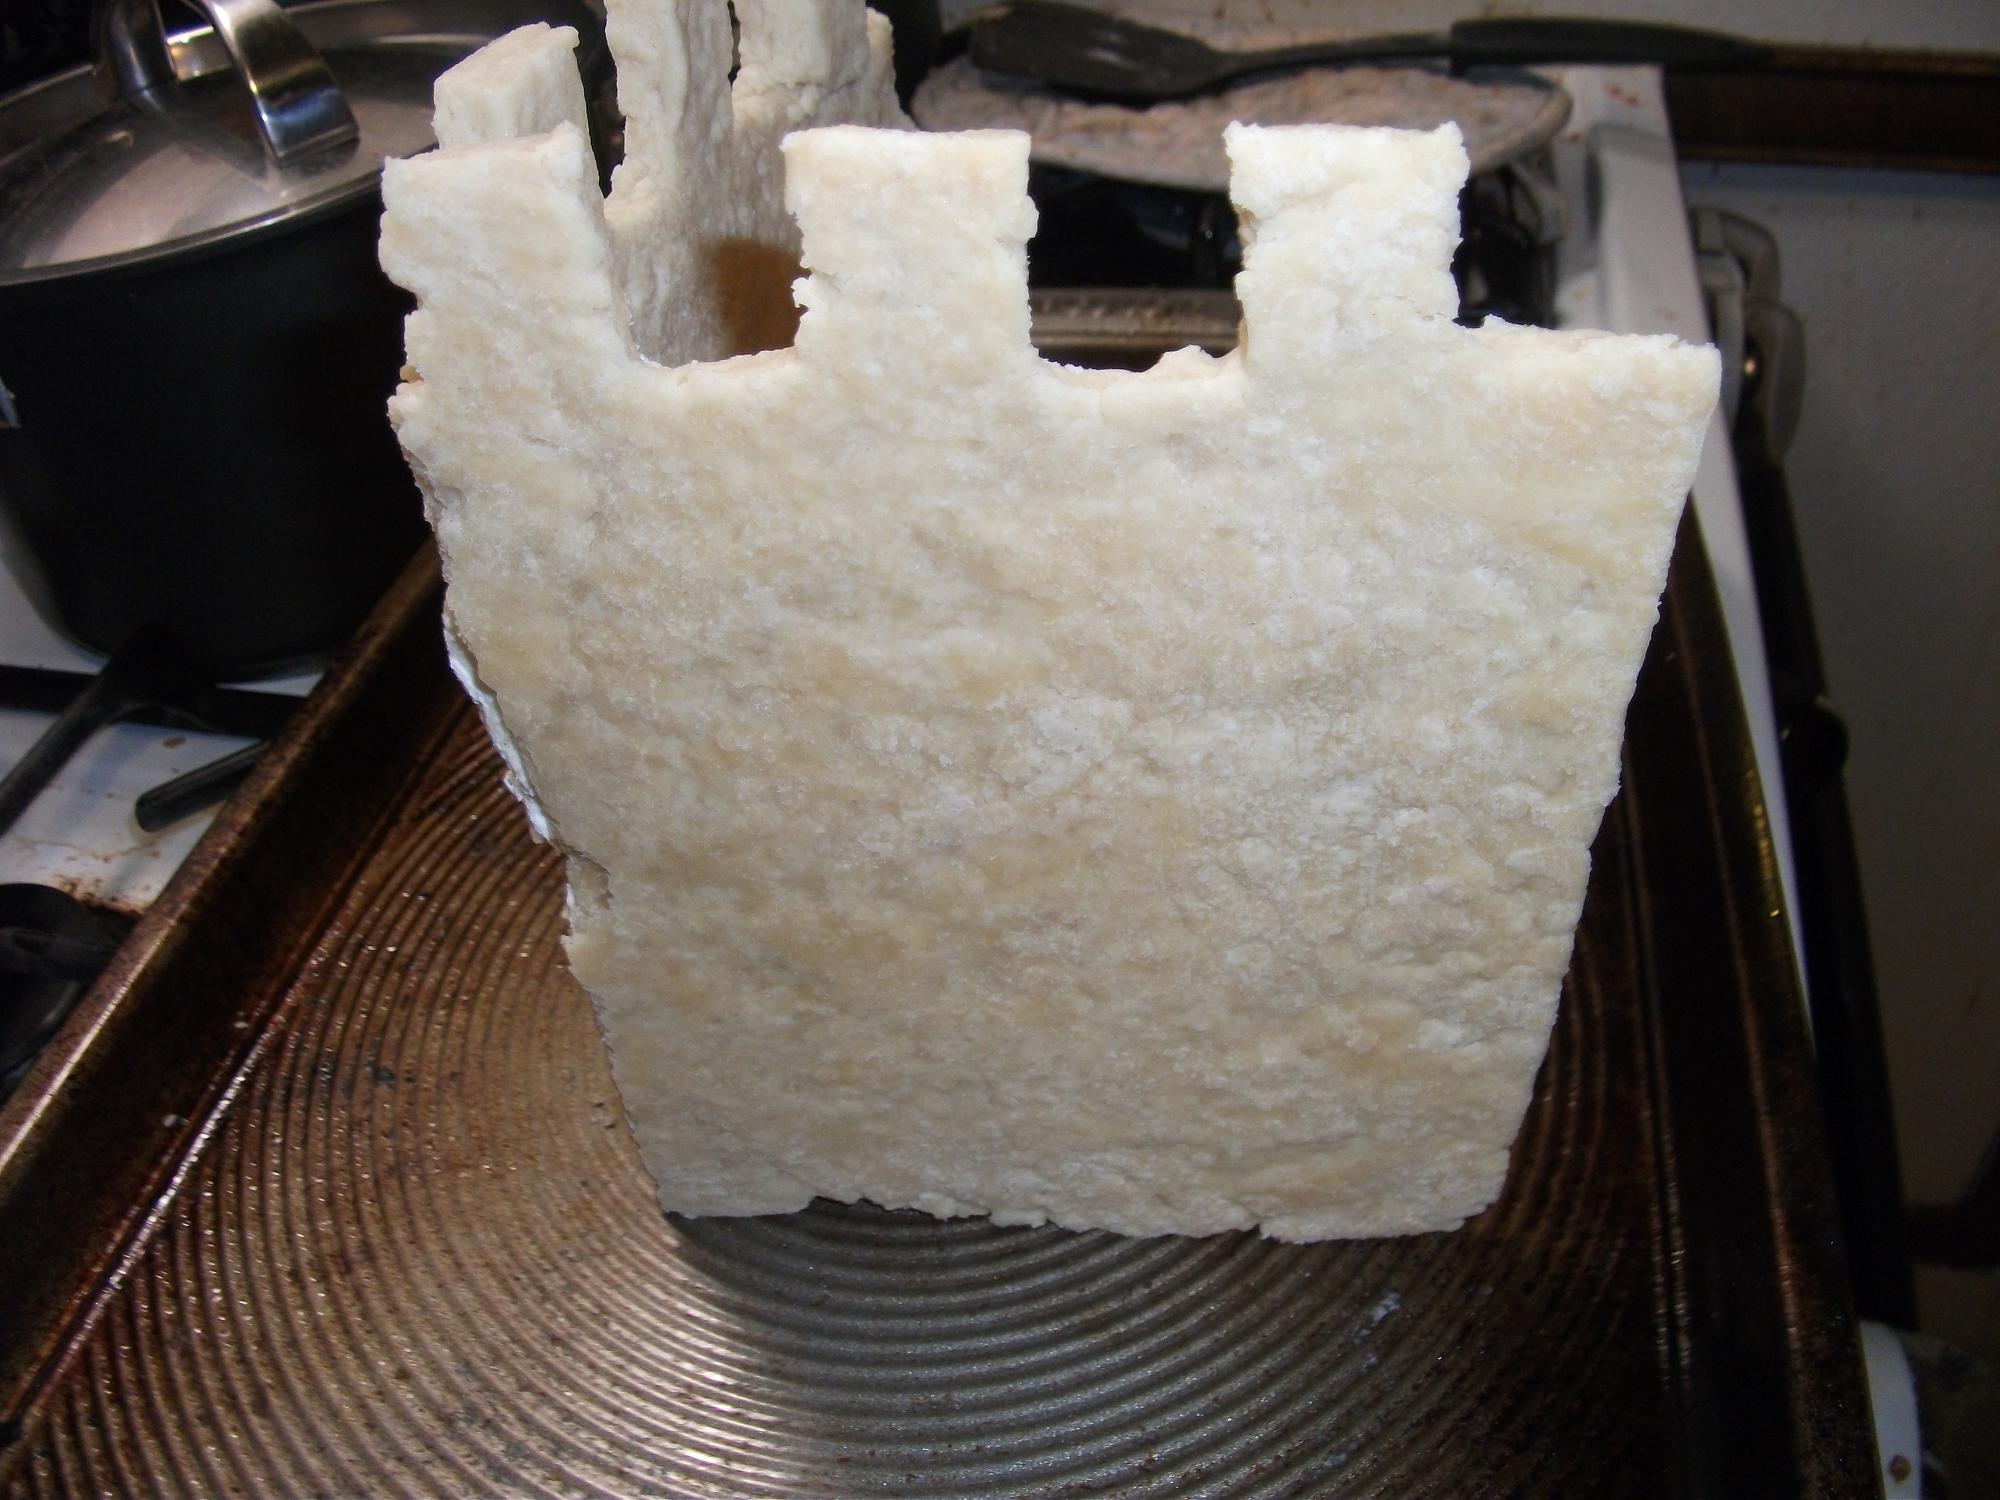
            The pastry dough was rolled out onto the counter.  If I did this every day for 10 hours a day, I’d be buff as all get out.  Next I spread the wine soaked fruit on top of the dough, and sprinkled it with sugar and cinnamon.  The rolling was nerve wracking.  This was done in one long snake like roll.  The ends, due to the space left at the edges will be flaccid, making it easier to roll into a spiral.  This leaves the other end open.  I could have pinched off the edges and painted them down with butter into the main body or form the opening of a shell.  I opted for the shell opening using a stone carved bowl while cooking.  I do know the stone bowl was heat resistant and enough of a rounded both to form the “mouth” of the shell.

When the twist came out of the oven there was a split in the pastry.  I was on my fourth try in 24 hours.  I was out of time and out of supplies.  I had to go with what I had.  My “fix” was to put a hard sugar coating to contain and cover the art work before painting.  This is where I think Scappi would have two or three twists going at a time for a head table.  I think my issue with this twist was a yeast split in the dough while cooking.  Everything else was on point and on recipe. 

            For the marzipan, I used molds and hand forming.  For the molds, I couldn’t use wooden molds or even metal used in period, they just aren’t available.  My skills in carving are nonexistent, nor do I know anyone who has the tools to make these items.   I could have attempted to carve the shells by hand with sugar and Arabic gum paste but again I can’t carve worth a darn.  Not enough band aids in the world for me at this time and place!  I had to go with silicone for the 3D effect.

I was trying for something I hadn’t done before, a pastry style subtlety.   For the seaweed, I originally was going to use spinach, egg and flour mixture or possibly another bit of marzipan.  The spinach sheets cut into wavy forms then wrapped around wine bottles for the upright seaweed or laid out on a towel for the flat seaweed bed illusion.  This idea fell by the way side.

 After a bit of research, I found that the wedding of Lucrezia d’Este to Gioavnni Bentivoglio in 1473 Bologna, there were sugar sculptures of gigantic size.  The forms ranged from castles, ships, people to animals.  (https://www.metmuseum.org/toah/hd/wedd/hd_wedd.htm)  This means sculpting of sugar is something known during the 1500’s in Italy.  So doing sugar sculptures is by no means a stretch of the imagination for this type of artwork.

Using organic cane sugar as opposed to the modern sugar, I had to work with boiling sugar to form the seaweed forms.  Each batch had to be carefully poured or risk damaging the kitchen and serious burns to myself and others if they were nearby.  Boiling sugar is not something you can just casually toss around, can cause second degree burns.  I have personally witnessed the damage done and scars left by boiling sugar.  In short words, the skin was melted off as the sugar hit the bone even when water was poured over to cool the hot mess.  Boiling sugar is as close to home made napalm as “most” people can make and I excise full caution every time. 

What I love about using organic sugar for this project, it boils to the hard crack stage so much faster.  I don’t know why, but with in minutes I would have another batch ready to pour for my sea weed.  The color was always good (unless I added weird things like snap dragons…hey it was an experiment!).  I seriously suggest any cook doing sugar candy use the organic if they have any availability for this item.

A quick notation on sugar –

“Large and prosperous households bought their white sugar in tall, conical loaves, from which pieces were broken off with special iron sugar-cutters. Shaped something like very large heavy pliers with sharp blades attached to the cutting sides, these cutters had to be strong and tough, because the loaves were large, about 14 inches in diameter at the base, and 3 feet high [15th century]…In those days, sugar was used with great care, and one loaf lasted a long time. The weight would probably have been about 30 lb. Later, the weight of a loaf varied from 5 lb to 35 lb, according to the moulds used by any one refinery. A common size was 14 lb, but the finest sugar from Madeira came in small loaves of only 3 or 4 lb in weight…Up till late Victorian times household sugar remained very little changed and sugar loaves were still common and continued so until well into the twentieth century…” (David, pp. 139)

This is as close to modern sugar as we can go without trying for the heavily molasses unrefined for the head table.

The “paints” were brushed onto the shell and marzipan seashells for a more authentic look and feel.  I used spices (cinnamon and turmeric) with egg white as the binding.  Using spices for paint wasn’t as good as I had hoped.  Next time mixing the marzipan with the spices then layering the colored marzipan into the mold, would work better than trying to paint spices on to the already formed dough.  My daughter loved the idea of helping me with this part.  When she wasn’t sneaking a seashell to eat she was painting as garishly period as possible with the edible paints provided.  My seashells are a tad bit tamer by comparison.  But they are all lovely and tasty!

The majority of techniques used were by hand or with items as close to period as possible, other than the molds and paint brushes.  Neither were available in wood or metal forms.  Necessary variations to keep from poisoning those eating the food with non-food grade coloring agents used.

Materials:

            Edibles:

Almond meal – Blanched ground almonds.  Almonds originated in southwestern Asia as an edible seed and pressed into oil, eaten raw or ground into a flour type consistency.  This versatile seed is used as a drink, a flour base for desserts or sugar coated. The almond is grown in Asia, US, Marcona, Spain and Greece. (https://www.britannica.com/plant/almond)

Butter – I used a commercial butter.  I have not researched the type of cows for the Italian period (it’s on my list of papers to do!)  I could have made my own butter with a blender; however I’m not up for standing for a long time and churning, though I do know how the technique of a butter churn or butter horse.

Cinnamon – Indigenous to the island of Sri Lanka (Ceylon) and successfully replanted to grow in Northern India, East Java and the Indian Ocean islands of Seychelles.  The word Cinnamon started from the Greek word for spices with the prefix Chinese.  This spice traveled over various routes passing through the hands of Phoenicians and Arabs on its lengthy journey to become a dominant spice in the spice trade wars. (Czarra, pp. 10-12)

Cloves – Native to Moluccas in Indonesia, while successfully growing in Madagascar, Zanzibar and Pemba.  Harvested by hand when the clover flower buds turn pink at their base.  (Czarra, Pp 12-13)

Corinthian Raisins – Not having access to Corinthian Raisins, I used golden raisins for their coloring and sweetness.  The dates and currents were already a lot of brown on the inside, a bit of golden would go well.

Currants – Found in the Greek city of Corinth.  Also referenced as Ribes, corinthes, corans, currans, and bastarde corinthes.  There are 150 species found in Europe, Asia and North America ranging from black currants, ornamentals, golden currants to gooseberries. (https://ag.umass.edu/sites/ag.umass.edu/files/fact-sheets/pdf/currants.pdf)

Eggs – As this is an Italian dish, the most likely chicken eggs used for this would be the Sicilian Buttercup.  Don’t let the name fool you, these chickens roam free because they hate to be caged and are very fierce.  Not good pets but excellent eggs and taste. (https://www.americanbuttercupclub.org/about-the-breed.html)

Dates – Originating in the Near East and North Africa, a short distance from Rome, making them easily transported.  Aristotle compared the dates to daktylos (fingers) giving them their name.  High and sugar, eaten fresh or dried, sometimes ground into a meal or made into a syrup. (Toussant-Sumat, pp. 675-676)

Flour – Ground wheat. Ground grain of any sort can be made into flour.  Scappi calls for “Make a dough of two pounds of fine white flour…” (Scappi, pp. 488-489) hence the ground white. The finest grade of flour was made by boulting, a process in which part of the wheat kernel is discarded (out layer) so that only the inner layer is ground.  This ground flour is not the “white” flour of today but whiter than the whole wheat flour that would have been available with the grind of the entire wheat kernel. (https://oakden.co.uk/medieval-flour-and-pastry-article/)

Nutmeg – Native to the Banda Islands of Indonesia, nutmeg is the actual kernel of the fruit.  Nutmeg can be stored for a long time in airtight containers.  The outer fruit/lace of the nutmeg fruit is called mace.  (Czarre, pp. 16)

Powdered sugar – Finely ground Sugar.

Rosewater – Scappi mentions rose water as a matter of course for dishes.  (Scappi, pp. 42)  I have made rosewater before and it was the most astringent tasting thing I have ever put in my mouth.  Lovely color but useless for food in my opinion.  I went with store-bought for edibility.

Sugar – I used organic sugar.  Compared to the normal cane sugar, the difference is pretty startling.  Organic sugar has just enough molasses to make the sugar seemed tinged with gold.  Compared to actual dark brown sugar, with heavy molasses it seems almost pure white. 

Saccharum officinarum “…considered a spice even rarer and more expensive than any other…pharmaceutical use…gives its species name of officinarum.”   Considered very expensive till the late 1500.  Loaf sugar given the name due to the conical shape derived from refining into a hard and very white refined form. Caffetin or Couffin (English equivalent of “coffer” or “coffin”) named for the form, packed in plaited leaves palm and from the city shipped from called Caffa in the Crimea.    Casson a very fragile sugar also considered the ancestor to Castor sugar.  Muscarrat considered the best of all sugars, reported to be made in Egypt for the Sultan of Babylon. The Italian name mucchera denotes that it had been refined twice. (Toussaint-Samat, pg. 553-555)

            For a complete history on the spice trades via land or via water is a 50 page thesis paper or covered in multiple books such as Nathaniel’s Nutmeg (good story with at least one good fruit tart recipe), The scents of Eden (love this book). Spice: The History of a Temptation, The Spice Route, Dangerous Tastes.  The Tastes of Conquest (another excellent book), Out of the East: Spices and the Medieval Imagination (on my short list to acquire). The short version is spices were trade in ports and markets after long arduous and dangerous journeys via land or sea.  Please see the notations on the spices on points/islands of origins.

Paints- Period but not always edible:

Cinnamon – Produces a lovely red coloring, though this does imparts a strong cinnamon flavor to the marzipan.

Cochineal – Spanish Conquistadors conquering Mexico discovered that the Mesoamericans had found the perfect red dye coloring. Dye comes from of a small bug found on cacti.  50,000 to 70,000 bugs are needed per pound of dye.  The dye is produced when pouring boiling water over the dead bugs.  (https://www.smithsonianmag.com/innovation/bug-had-world-seeing-red-180961590/) This produces a strong red coloring.  In other words, bug juice.  I draw the line at knowingly eating this.  Because I won’t eat this, I won’t put this in my edible artwork.  Replaced with edible paint and cinnamon.

Lapis Lazuli – A mineral used as an expensive pigment in period paintings such as Bacchus and Ariadne by Titian.  Considered expensive and used only by accomplished painters with rich patrons. (https://geology.com/gemstones/lapis-lazuli/)   Produces lovely blue coloring. Not food grade.  Because I could not verify if this was cut with something toxic I replaced the dye with blue edible paint. 

Lead – Lead White used for paintings along with gypsum and chalk.(http://www.visual-arts-cork.com/artist-paints/renaissance-colour-palette.htm) Seen in “Miracle of the Slave”, 1548 by Tintoretto.  Produces a fine white coloring. Toxic to poisonous.  Replaced with white edible paint.

Malachite – A green mineral, found as early as 618 AD for paintings.  (https://www.mdpi.com/2075-163X/8/5/201/htm).  Seen in “Garden of Earthly Delights”, 1504 by Hieronymus Bosch.  Produces an amazing green coloration.  Not food grade.  Because I could not verify if this was cut with something toxic I replaced the dye with spinach juice.

Parsley –  Native to the mediterranean from the Apiaceaa family.  Attempted use as a green coloring agent.  Failure on dying sugar art green but makes a lovely, if interesting, sugar art display.  (https://www.britannica.com/plant/parsley)

Pearl – Natural formed when a grain of sand (or other irritant) invades an oyster soft interior.  The oyster coats the irritant with fluid called nacre.  Many coats are used to smooth out the rough edges. (https://pearls.com/pages/how-pearls-are-formed) Used as early as Roman times for heart disease by grinding pearls.  For black bile, ground pearls were mixed with musk. (King, pp. 314).  Produces lovely pearlescent shimmer.  Attempted to hand grind pearls in my pestle.  This did not go well.  Could not get a consistent sand like quality.  Rough and gritty.  Replaced with edible paint to replace gritty chunks.

Saffron – The usable part of the saffron plant are the three stamen.  The saffron is part of the Iridaceae family, growing wild from Italy to Kurdistan.  Produces a lovely red color and very expensive due to the quantity needed for dying.  (ToussaInt-Samat, pp. 518) 

Snapdragons – A flowering plant native to the Mediterranean and North America from the Pantaginacea family.  Attempted use as a red dye for sugar art.  A failure for coloring.   (https://www.britannica.com/plant/snapdragon)

Spinach Juice – Spinach is chopped then boiled.  The water reserved for coloring of sugar and painting onto pastry crust.

Note on Subtlety:

A subtlety could be made of just the edible, such as a re-skinned peacock, or as a combination of paper mache and lumber to accent the food in the display.  These decorative subtleties were for powerful displays and less about eating, with the production being done by carpenters, metal smiths and painters and very little with chefs. Horace Warpole describes a banquet given in honor of the birth of Duke of Burgundy, where the centerpiece was of wax figures moved by clock work at the end of the feast to represent the labor of the Dauphiness and the happy birth of the heir to the monarchy. (Martins/Craig, pp. 17)

Paint brushes:

            Per Cennini, paint brushes should be made from the middle hairs of cooked vair tails, trimmed then tied with thread or waxed silk thread before tucking them into a feather shaft.  After this is complete find a twig/wooden handle to fit into the other end of the feather shaft.  His preference for feather shafts was vulture, goose, chicken hen or dove. (https://www.medievalists.net/2016/08/how-to-make-medieval-artists-tools/)  I went with store bought brushes as I am fresh out of vair tails, cat hairs, squirrel hairs and the dog hair available is to curly.

Table Cloth and Dish (es):

For the table cloth I used a white linen cloth.  Here are several examples of white linen cloth used in Italian art work during Scappi’s era.

            Image 3 The Feast of Herod and the Beheading of Saint John the Baptist, by Benozzo Gozzoli

            A second picture denoting white linen cloth for the table covering.

Image 4 , The Marriage Feast at Cana by Paolo Veronese

            Both artists depict a feast with white linen.  So one can deduct that a white linen cloth for covering a table is, if not mandatory for good taste, at least acceptable for a feast.

Image 3 The Feast of Herod and the Beheading of Saint John the Baptist, by Benozzo Gozzoli

Here we see table ware of glass and not just metal plates. In the next painting, we see table settings of what looks to be silver or pewter.

Image 4 The Marriage Feast at Cana by Paolo Veronese                     

The twist is served on a metal plate.  All materials used were as close to period as possible with documentation of the inedible food paints and the use of substitutions.

            Transportation of this artwork has been an absolute pain the arse.  All pieces have to be individually wrapped with care for long trips.  In period, this art work piece would have only had to travel a few hundred feet from kitchen to table which makes transportation to an event a logistic night mare of trying to transport pieces more fragile than fine crystal that could shatter with every bump, turn or stop.

Complexity:

Had I presented just the twist, without any decoration, the taster would enjoy and amazingly complex dish of fruit, wine and spice; however they would have been visually underwhelmed with the presentation.  I wanted to do something more.  The shape lends itself well to a crown or coronet.  I could have gone with gilding, studding the twist with pearls and lapis stones with rock candy sugar “diamonds”; but I didn’t think that was going to be visually impressive enough.  Then I thought of doing two snakes eating the other snakes tail, while doing painted scales of dough and painting dragon heads; however Scappi was very insistent that this was a rolled pastry.  I wanted something that fit the shape of the twist, while giving the viewer the sense of something not of land.  A true subtlety.  The idea of an underwater dessert was born.

Italian Pastry Twist

Translation:

“…get a pound of currants that have been brought to a boil in wine, a pound of dates cooked in that wine and cut up small, and a pound of seeded muscatel raisins that have been brought to a boil in wine; combine all those ingredients and mix them with the sugar, cinnamon, cloves and nutmeg. Spread the mixture out over the sheet of dough along with a few little gobs of butter. Beginning at the long edge of dough, roll it up like a wafer cornet, being careful not to break the dough. A twist like that needs only three rolls so it can cook well; it should not be too tight. Grease its surface with melted butter that is not too hot. Begin at one end to roll it up, not to tightly so it become like a snail shell or a bae. Have tourte pan on hand lined with a rather thick sheet of the same dough greased with melted butter and gently put the twist on it without pushing it down. Bake it in an oven or braise it with a moderate heat, not forgetting to grease it occasionally with melted butter. When it is almost done, sprinkle sugar and rosewater over it.

Serve it hot. The tourte pan in which the twists are baked has to be ample and with low sides.”

(Scappi, pp. 488-489)

Dough:

Make a dough of two pounds of fine flour with six fresh egg yolks, two ounces of rose water, an ounce of leaven moistened with warm water, four ounces of fresh butter or rendered fat that does not smell bad, and enough salt. That dough should be kneaded well for half an hour. Make a thin sheet of it, greasing it with either melted butter that is not too hot or with rendered fat. With the pastry wheel cut the edges one after the other, which are always quite a bit thicker than the rest. Sprinkle the dough with four ounces of sugar and an ounce of cinnamon.

(Scappi, pp. 488-489)

Dough Ingredients:

7 cups pastry flour

1 stick of butter

6 egg yolks

1 oz. of sour dough yeast (use sourdough starter or 2 package of regular yeast if sourdough is unavailable)

Melted butter to brush over pastry and pastry sheet

1 tsp salt

4 Tbsp. rose water

Dough Dusting:

4 Tbsp. of sugar

2 Tbsp. cinnamon

Filling:

3 C currants

3 C chopped dates

3 C raisons

1 bottle good wine

1 tsp each of ground cinnamon, cloves, nutmeg

1 tsp rosewater

1 Tbsp. sugar

1 stick of butter, sliced thinly as needed for dotting

Optional:

2 sticks of butter (instead of 1)

1/3 C. rose water

Redaction:

Start with making the dough. Even though the rose water sounds excessive it isn’t. If anything

I’d add another Tbs. and another stick of butter.

I put the flour into the bowl first, with a bit of salt, and then add the butter mixing by hand. Once the butter was mostly incorporated, I slowly added the egg yolks, rose water and yeast. I had to add about a cup of water to help bring everything together.

When Scappi says moisten the yeast, I believe this is where he means add the yeast to a cup of water as this was the only way the dough was going to form. This forms the dough from rough to smooth elastic that is just amazing to work with.   Here the finished dough is shown.  As smooth as a baby’s bottom.

Note on Butter and Rose Water:

            After making this recipe a multiple times, I added more rose water as I was unable to actually smell or taste with just 1 tsp as per Scappi.  1/3 C sounds like a lot and it is; however for this recipe I think a little excess is called for.  The taste and smell is just divine!

            As for the extra butter, this made the dough an even greater joy to work with.  The taste was out of this world.  If you want to make two versions, the original and then with the added butter and rose water, you won’t be disappointed!

            After the dough was finished, I let it sit while I chopped the dates, and measured out the currants and raisins. Next the spices were measured out and a good red wine found.


A quick note on Corinthian raisins: He called for currents and Corinthian raisins. It is possible that the Corinthian raisins called for were currents however, my believe this is a mistranslation. If Scappi had wanted currants, currants and dates, he would have said Double the amount of currants to the amount of dates used. Hence the use of raisins instead of double the amount of currants.

            I used a nice Italian red. 

            I went with a good red as cooking will leach a bit of flavor out. This red was amazing.  Make sure you use one you’re willing to drink and serve to friends.  It really makes a difference!  Once plump, roughly 30 minutes, pour the fruit into a sieve and let the excess wine drain out. When the fruit mixture is cool enough to handle we get the dough ready for stuffing.

Note: Scappi’s recipe could read to incorporate the spices with the fruit in the wine mixture, or wait till the re-hydrated fruit is finished cooking then mix once you are ready to spread over the dough. My first try at this recipe, I added the spices to the fruit and wine.

I thought about doubling the above recipe to start. That is unnecessary. This recipe will take care of filling all the dough you need.

Roll the other half out and cut into a circle that fits into a pie pan, brush with melted butter the bottom of the pan before putting on the bottom layer of dough. Then brush the dough in the pan with butter. Do not skip the bottom dough layer! This keeps the twist from burning on the bottom.

Roll out the first half of the dough into a thin sheet, trimming the edges to form a nice rectangle. Then lay the mixture on top of the dough leaving ½ inch at the edges. Sprinkle with cinnamon and sugar mixture. Dot with butter.

Starting from the long edge, roll three times.

Then coil the pastry.

Place on top of the 2nd sheet of dough that is at the bottom of round metal pie tin.  Brush with melted butter.

Heat the oven to 350 until done, roughly 30 minutes. When it comes out of the oven dust with sugar and rose water.

For the opening to the Nautalis portion of this subtlety I added a stone dish for the opening. GREASE the dish before you wrap the dough around it… I didn’t do this the first time and the dough cooked onto the stone bowl so that I had to present with the bowl stuck inside. I tried to pass it off as part of the dish but it was still noticed.

Marzipan:

            Marzipan is an almond thick paste that can be formed into flowers, trees, birds etc.  In period the marzipan would be colored with saffron, cinnamon etc. to produce colors that would sometimes override the flavor of the candy.  Sometimes the color was more desired then the flavor and the spicing used would overpower the dish so much so as to be less sumptuous then a less colorful dish. Vivid colors, Wheaton explains, were highly prized and were often achieved at the expense of flavor (Wheaton, pp. 15/Martins) Taillevent also suggested more common spices for green coloring such as parsley, sorrel and winter wheat still green.  Gold and silver leaf was brushed onto the surfaces of food i.e. pastries for a greater visual impact. (Martins)

Ymages in Sugar:

And if ye will make any ymages or any other thing in suger that is casten in moldys, seethe them in the same maner that the plate is, and poure it into the moldes in the same manere that the plate is poured, but loeth youre mold be anoyntyd before with a litell oyle of almaundes.  (Heiatt, pp. 142)

While this is a great notation that marzipan was used in period, it’s not big on ingredients, so I went to Scappi…and was severely disappointed.  Per the notations in Book III. Lean Dishes: Egg dishes (275.1) “Scappi does not give a recipe for pasta di marzapae.”  So I had to keep looking for a recipe with ingredients.

It took a few moments but I did find a recipe with ingredients and period.  

To make Marzipan. Take almonds appointed as above, & flatten the paste as for making a tart, then form the marzipan as fancy as you want, then take sifted sugar & mix with rose water, & beat it together that it is like a thick batter, cast there a little on the marzipan, & flatten with a well held knife until the marzipan is all covered, then put it into the oven on paper: when you see that it boils thereon & that it does like ice, tear apart from the oven, when it doesn’t boil, & sprinkle on nutmeg: if you want it golden, make it so. (http://www.medievalcookery.com/)

Translation:

And if you will make any images of any other thing in sugar that is cat in molds make them in the same manner that the plate is, and pour it into the molds in the same manner that the plate is poured, but let your mold be anointed before with a little almond oil.

Ingredients:

2 C. Blanched ground almonds

2 C. Powdered sugar

1 Egg white

2 tsp Rose water

Redaction:

I mixed the almond meal and powdered sugar together, being sure to get out all the clumps.  Next I added the egg yolk and rosewater so that all would gel together.  I had to make two batches as this is just an amazing tasting not-cookie.  The fact that I get to form fun images with it is just a bonus.  I will note that my powdered sugar was bought instead of taking regular table sugar and grinding finer in a mortar and pestle.

Once the dough had a chance to rest, I pressed it into the shell molds. 

The images were allowed to harden a bit more overnight, then painted with spices (Cinnamon and Turmeric).  My painting skills are laughable.  Egg white was used as the binder for keeping the powdered spices on the marzipan, though I have read that a clear alcohol could also be used; however, I haven’t read of clear alcohol being used in period for a binding only egg white. 

I also painted a few with edible paints instead of using actual ground period pigments.  The use of spices as paint is interesting but my artwork wouldn’t win at “Cake Wars”.  Next time I will try with the spices being incorporated into the dough and the colored dough pieces then pressed into the molds.  A learning curve as it were.

I made extra marzipan to make small flower corals that stand upright with multiple branches.  Here I rolled out the marzipan and made small twisted strands, colored with cinnamon and turmeric. These strands were attached to a base, and then an egg white wash used to attach the strands together.  Here I used cinnamon and turmeric as the contrasting colors.  Tasty and beautiful.  They do well to compliment the varying heights showing in this display.

My daughter helped me paint the remaining 50 sea shells using more modern paints. She was in the mind set, the bolder the better.

I have to say I love this edible.  I could snack on this all day, which is probably why it was so popular in medieval cookbooks. 

Sugar Sculpture: 

            With words by Rodinson, we see that many countries had a way to make and shape sugar. 

“: A dish found in every cookery book of the middle ages, called lozenges, losinges, lesynges etc.  These different names ended up meaning, in French or neighboring languages, the geometric term losange or lozenge which displaced the word rhombus in Franc, England and, to a varying extent, other countries…It seems…found the recipe translate in Latin and Italian cookery books from the end of the thirteenth and fourteenth century …round plates of sweets cut into rhomboids, which is easier than cutting into rounds …” (Rodinson, pp. 210)

            The original recipe is simple a 2:1 ratio of sugar to water  I took 1 cup sugar to ½ water and boiled to the softball stage.  Coloring is added with the water so as to not disrupt the water ratio.  Here I pour the softball sugar onto a pan covered with wax paper.  I have seen other sugar confections poured onto marble countertops and holding forms to keep the liquid inside, without any table top covering for the marble.  I used what I could period wise and available. 

The first 5 tries were abysmal.  The first two wouldn’t set up at all.  The next three were squishy and couldn’t stand.  They were slow melting puddles.  The first two I used a candy thermometer and the next three I did the softball stage test with ice water.  Not going to lie.  I got a bit upset, even shed a few tears as I trashed my failures away.  I did get one set of semi usable sugar “seaweed”.  The results are sticky but very malleable and unable to stand upright.  This is not what I wanted at all!  The sea weed was so bad my roommate asked if Shrek had sneezed all over my working space. 

I had to change things up and put my big girl panties on after spending a night thinking of different things to fix this mess.  I went back to my first experiments with straight up lozenges and ditch the water and went with honey as the main liquid.  Better results were achieved.

Recipe:

1 C. Sugar

1 Tbs. rose water for scent

Coloring spice

¼ C. Honey

            I ran out of spinach water for green coloring and had to use green food dye.  Not pleased with this but after 6 cups and 3 bundles of boiled spinach I was done cooking spinach for the next 4 months.  Cochineal was used in an attempt for several other “coral” sugar sculptures until I ran out of bug juice.  Again I had to substitute food coloring and cinnamon.  I did a few with saffron.  This was an expensive experiment but resulted in lovely pieces.

Real Cochineal (bug juice for dying).  I didn’t have much so ran out quickly.  Once I ran out, I decided I wasn’t willing to eat bug juice and no one else should have to either.  I draw the line at this and nonfood grade colors i.e. lapis lazuli and malachite even those were considered good coloring agents.

            I laid out parchment paper onto cookie sheets.  Rose water was added because I love the smell.  It could just as easily have been another type of spice instead of rose water i.e. cinnamon, cardamom, saffron.  Then I took the sugar and honey mixture to a hard boil.  This is where I can make a smooth line on the back of a wooden spoon with another spoon and the liquid does not fill in the resulting gap.

No candy thermometer used, just period know how or when sugar is at the hard candy break.  I had to judge by eye for a certain type of “frothiness” and by the scraping of the liquid off the back of a wooden spoon with another.  If the scraped area did not fill in the sugar was ready to pour. 

The sugar mixture is carefully poured onto the parchment paper.  This is like homemade napalm.  Do NOT let this get on your skin or you will have severe burns.  Once the melted sugar is cool enough to handle and still malleable, I formed seaweed over coffee mugs.  The hardened sugar is as fragile or more so than dried egg shells. 

            A second type of sugar art was attempted.  This time I took the sugar mixture off the stove and let it cool for 60 seconds.  I put two bowls of ice next to my work station.  Here I slowly poured the liquid sugar over the ice.  This will do two things.  The sugar will harden into small short, non-formable, sculptures or melt into the ice water that forms.  I had both things happen.

            I attempted to make one other type of food art for the underwater scene.  I tried to make a “lace coral” using a simple recipe of water, oil and flour.  Three tries with varying amounts of oil/cochineal colored water/flour ratios and I had to let this experiment go. 

The resulting mess wasn’t edible (even before the bug juice) and I had reached my quota of failures for the week.

Conclusion:

            This piece of food artwork was 90% new to me.  I have never done the Scappi Twist before.  So redacting the fruits, the dough and the art idea were 100% new.  The marzipan, I had used many years ago but not to the extent of forming and painting.  A new skill learned.  I have never worked used sugar to form tall, long pieces of artwork.  I’m going to be really blunt, there was a lot of swearing and a few tears as things shattered, broke, tore and burned; however I learned a new skill.  This subtlety was a lot of new for me and I loved every minute of it. 

            Is it period?  As much as modernly possible with everything that could be made using period ingredients and available period techniques.  I do know that I used/and worked with as period ingredients and recipes, with a few exceptions made for health and supplies, that were available. 

            Is it large enough?  For a full 100 person feast, several twists would have been made to serve everyone; however the grande artwork piece would have been reserved for the head table.  Here I need to add that a subtlety could made of just the edible, such as a re-skinned peacock, or as a combination of paper mache and lumber to accent the food in the display.  (Martins/Craig, pp. 17) 

Let’s talk failures: 

            This project as I’ve noted is not just a one and done type of cooking entry.  New skills were learned along with a new recipe.  New work arounds were tried for various coloring agents while trying to perfect the art of sugar.  The sugar coloring used both period and modern.  I tried cochineal, parsley, saffron, and spinach, turmeric, cinnamon, and snapdragon for period coloring.  When I ran out of the period ingredients (mostly green) I had to turn to modern food coloring.  Some experiementing was better than others.  The parsley as a food coloring agent was so so.  It made a beautiful work of sugar glass that was a little green with bits and pieces of the actual herbage.  Very lovely and usable.  The snap dragon (red) made the most amazing pink sugar, until heated up.  Once the snap dragon sugar mixture heated up the snap dragons went from red to black and the sugar was just an almost brown.  Not pretty and not usable.  This made me sad.

            I had four failures of the twist in a 24 hour stretch.  Each time I made a twist something went wrong, didn’t look like and they all had large “cracks” form on the outside, leaking the wine soaked fruit.  These tries weren’t presentable.

            Not a big deal, unless the cost of the dried fruit, spices, and wine at $50-80 per round begin to add up.  I have gone through multiple bottles of wine and more dried currants, dates and raisons than expected.  I’ve had to fix cracks in the main entry by using sugar instead of making another twist because there was no more time allotted.  Unfortunatly the twist wasn’t going to handle a 5 hour drive anywhere even with the sugar glass “glue”.  I had to give up and wait for another day/time.

            I believe my error was doing the dough first then the soaking of the fruit.  This allowed the dough to rise.  The first few times I did the twist, I did the fruit first then the dough and had no cracks.  The next four, I did the dough first then the fruit and had cracks.  This was my mistake.  I had no sleep and was stressing over the long drive with fragile foods.  I should have caught my error sooner.  I didn’t.  Next time though!

           The sugar seaweed broke, cracked or just didn’t set properly.  The stands for the sugar seaweed ate part of the seaweed glass and didn’t form.  Almond paste was a good semi holding base but some of the sugar glass fell over due to the weight of the “sea weed”.  I tried making a sugar glass base to hold the sea weed.  The base was to hot or not deep enough.  The hot base ate the sea weed by inches rendering the sea weed into stubs also known as useless. 

            I consider myself pretty accomplished in the kitchen doing period recipes; this subtlety was probably the most painful in cost, time and broken parts.  Would I do it again….ask me in a few weeks when the freshness of the failures have worn off.

           As a modern society, we have become obsessed with watching modern cooking shows like Cake Wars that we forget that SCA cooks are hobbies in normal kitchens, smaller budgets and usually one person.  There are no fancy kitchens.  No aides other than significant others or children “helping”.  There is no fancy equipment as the cook is trying to go as period as possible.  Ovens, stove tops and possibly kitchen aids with a few smaller silicone items on hand are as about as fancy as it gets.  Please remember that for the truly fancy stuff…

“These decorative subtleties were for powerful displays and less about eating, with the production being done by carpenters, metal smiths and painters and very little with chefs. Horace Warpole describes a banquet given in honor of the birth of Duke of Burgundy, where the centerpiece was of wax figures moved by clock work at the end of the feast to represent the labor of the Dauphiness and the happy birth of the heir to the monarchy. (Martins/Craig, pp. 17)”

            Could I have done more?  If I were actually willing to risk people’s lives by including lapis lazuli, malachite, and lead powders for paints, probably.  I just don’t think people should be poisoned for food art.  I enjoyed making something like the twist into an underwater scene.  It brings a flare of cooking an amazing dessert with the flare of unusual creativity in art work.  Well worth the time and skills learned.

References:

Craig, Elizabeth. English Royal Cookbook. (1953). New York Press

Czarra, Fred. Spices, A Global History. (2009). Reaktion Books Ltd.

David, Elizabeth. English Bread and Yeast Cookery. (1977). Grub Street Cookery

Hansen, Marianne.  And Thus You Have  a Lordly Dish: Fancy and Showpiece Cookery in an Augsberg Patrician Kitchen. Medieval Food and Drink.  (1995). St. University of NY Press.

Henisch, Bridget Ann. Fast and Feast: Food in Medieval Society. (1976). Pennsylvania State University Press.

Hunter, Lynette. Sweet Secrets from Occasional Receipts to Specialized:  The Growth of a Genre; as cited in Banquetting Stuffe. (1986) Edited by C. Anne Wilson. Edinburgh University Press.

Hieatt, Constance, Hosington, Brenda, Butler, Sharon. Pleyn Delit: Medieval Cookery for Modern Cooks. (1979) University of Toronto Press.

King, Anya H., Scent from the Garden of Paradise: Musk and the Medieval Islamic World. (2017) Koninklijke Brill.

Rodinson, Maxime., Arberry, A.J. Medieval Arab Cookery. (2001) Prospect Books.

Scappi, Bartolomeo. The Opera of Bartolomeo Scappi. (1570).  (2008). Translated by Scully, Terence.  University of Toronto Press.

Scully, Terrence. The Art of Cookery in the Middle Ages. (1995). The Boydell Press, Woodbridge.

Tirel, Guillaume. The Viandier of Taillevent: and edition of all extant manuscripts. (1988). Translated by

Scully, Terence.  University of Ottawa Press.

Toussaint-Samat, Maguelonne. A History of Food. (2009). Blackwell Publishing, LTD.

Wheaton, Barbara. Savoring the Past: The French Kitchen and Table from 1300 to 1789. (1996).  Simon & Schuster Inc.

Image 1 https://www.britannica.com/biography/Sandro-Botticelli

Image 2 https://www.pinterest.com/pin/220957925439888372/  Aguamanil de Nautilus ,1570. Colección Francesco I de Medici. H: 30 cm. Palazzo Pitti, Museo degli Argenti, Florencia, Italia.

Image 3 http://www.italianrenaissanceresources.com/units/unit-6/sub-page-05/narrative/

Image 4 https://eclecticlight.co/2016/01/31/the-story-in-paintings-a-feast-of-veronese/

Image 5  http://www.italianrenaissanceresources.com/units/unit-6/sub-page-05/narrative/

Image 6 https://eclecticlight.co/2016/01/31/the-story-in-paintings-a-feast-of-veronese/

https://ag.umass.edu/sites/ag.umass.edu/files/fact-sheets/pdf/currants.pdf
https://www.americanbuttercupclub.org/about-the-breed.html
https://www.britannica.com/plant/almond
https://www.britannica.com/plant/parsley
https://www.britannica.com/plant/snapdragon
https://geology.com/gemstones/lapis-lazuli/
http://www.godecookery.com/
https://blog.kathrynmcgowan.com/tag/hampton-court-palace-tudor-kitchens/
http://www.medievalcookery.com/
https://www.metmuseum.org/toah/hd/wedd/hd_wedd.htm
https://www.mdpi.com/2075-163X/8/5/201/htm
https://pearls.com/pages/how-pearls-are-formed

http://www.reference.com/browse/subtlety/Patrick Martins/nyu

https://www.smithsonianmag.com/innovation/bug-had-world-seeing-red-180961590/
http://www.visual-arts-cork.com/old-masters/botticelli.htm
http://www.visual-arts-cork.com/artist-paints/renaissance-colour-palette.htm

February 8, 2020 | 2 comments

Peacock Subtlety: Part 2

Peacock Dora and more 054

The first time I wrote about peacock on the table of kings and the very well-to-do, the cooking was completely theoretical, with stand-in stunt ducks and a preserved skin.  http://roxalanasredactions.com/?s=peacock

This portion covers the messy, gory cooking parts of actually turning a freshly killed peacock into a dish once served to kings.

Part 1: The Bird

Peacock Dora and more 030

This is the freshly killed peacock (not by me).  Short story, I went to a farmer’s house to pick up a couple of wild peahens, with fertilized eggs and baby chicks dancing through my head.  When we got to the Middle of Nowhere, Texas my daughter and I were greeted with the sounds of gunfire — a bit disconcerting.  We took a look around, staying on the polite side of fences, and saw the peahens and goose we were originally after.  While we were petting said friendly goose and his love interest, contemplating which recipe he would best be served in, up comes the Farmer Lady with a gorgeous and dead Indian Blue Peacock. She announced, “Here’s your cock!” I couldn’t do much more than say thank you and pay the lady for her magnificent cock and the two hens.  Sorry, the goose wasn’t going to fit in the car once I had the peacock with his tail in my car.  It’s not that big a car!

I did ask about how she could sell her birds so cheaply.  Seems the peacocks were let loose in the wild 20 some years ago and have flourished in the tropics of Texas — so much so that the resulting multiple flocks have become a nuisance for the ranchers and not just the beautiful lawn and table ornaments they were originally destined to be.  My win, their loss.

            An apropos poem for this bird handed to me, the cook.

“Peacock: you admire him, often he spreads his jewel-encrusted tail.  How can you, unfeeling man, hand this creature over to the cook?” (Mart.XIII-1XX/Faas, pp. 295)

During the time of Henry VIII, this bird would have incredibly expensive due to their breeding habits.  Based on my searches, a live bird’s pricing from a reputable breeder is usually on the order of $600.  The scarcity of peacocks caused the pricing to be such that only nobility could afford such a rare beauty for their yard or table.  So what I paid for this magnificent bird was a fluke, due to the nuisance the random flocks had become, rather than the norm.  This bird: much more affordable.

The peacock, unlike the chicken, was not a common bird.  (thecoolchickenreturns.com) Unlike the chicken, a peahen will only lay 3-9 eggs a year while a single chicken might lay up to 200 eggs each year.  (Damerow).  This cuts down on the number of pea chicks born and raised to maturity in any given clutch or year.  Low numbers with great beauty, much like gold or rubies, raises the price of the peacock out of the common man’s reach.

A quick bit of history on the eating of peacock.  Peacocks were valued throughout history, not only for their feathers but for their flesh.  Poems and songs were written about these gorgeous feathered fowls and their likeness graced plates, vases and even thrones.  They represented different ecclesiastic values to different religions.  This bird, with its jeweled-eyed tail, was coveted for both the look and symbolism represented in its display.  From a throne in India to the tables of rich Romans to paintings and vases in Persian Empire; even to the table of English royalty, many used this favored bird in recipes and decoration.

“Such subtle creations could be comprised of just the edible, or as the more elaborate a set up became, a combination of paper mache and lumber to support a larger and even grander display.  These decorative subtleties were for powerful displays and less about eating, with the production being undertaken by carpenters, metals smiths and painters and very little with chefs.” (Martins)

This is a research paper on cooking a beautiful period dish served to royalty . It covers the trials and tribulations of making this display happen in today’s modern world, which lacks an abundance of peacocks, as well as the “workarounds” needed to display the dish in a mostly period manner.

Part 2: Skinning

           With the bird in hand and period recipes dancing through my head, the first hurdle for this kingly presentation presented itself.

The Romans, French and English all agreed that the peacock’s skin and feathers should be saved to redress the dish(s).

Roman:

Cure the skin with coarse sea salt, so that it dries out a little, and wash it off just before you dress the roast bird in it…” (Faas, pp. 297).

French:

And when it is cooked, it must be re-clothed in its skin and let the neck be nice and straight or flat; and let it be eaten with yellow pepper. (Goodman, M-30)

English:

“Take and flay off the skin with feathers and tail, leaving the neck and crest still upon the bird, and preserving the glory of his crest from injury when roasting by wrapping it in a linen bandage.  Then take the skin with all the feathers upon it and spread it out on the table and sprinkle thereon ground cinnamon… Then take and sew him again into his skin and all his feathers, and remove the bandage from his crest.  Brush the feathers carefully and dust upon them and his comb gilding to enhance his beauty.  After a while, set him upon a golden platter, garnish with rosemary and other green leaves, and serve him forthwith as if he were alive and with great ceremony.” (Craig, pp. 157)

Yeah, the skinning part wasn’t quite as easy as these books made the undressing of the bird sound.   So here are my step by step pictures and running dialogue.  Let the messiness begin!

Peacock Dora and more 035            This is the messy part.  There is no other way to say this than ewww!  If you’re squeamish stop right here because the pictures just increase in gore factor.  Now, I’ve skinned and plucked more than a few feathers.  I raise period birds for eggs and meat.  Getting a bird ready for the oven is nothing new; however, trying to preserve the skin of a peacock with a 5 foot tail while your child and cat are trying to “help” is…exceptional.  I’m pretty sure period cooks didn’t have this issue.  The cats would know better than to be under foot.

So the first thing I learned is that this bird had some opalescent scales on the skin.

Peacock Dora and more 034A better picture when some of the scales flaked off while I was attempting to cut the skin.

Peacock Dora and more 033            I don’t know if this is normal, never having cut into the skin of a peacock before; however, I can say that these scaly flakes were gorgeous but made the first few attempts to cut into the skin a real bitch.

Once the initial cut was made, progress was made on separating the belly and leg skin from the bird.

Peacock Dora and more 036The feather portion of the skin ended at the peacock’s knees where the normal heavy-duty scaly legs started.

Those legs were almost as long as my forearm and had wicked claws.  I can see how these things are able to fend off both raccoons and foxes.  The peacock was only a couple pounds lighter than the period Spanish Black turkey I raised to make a Kraken subtlety.  That turkey managed to survive the Great Flock Killing of 2015 (by a couple of damn raccoons).  So yes, these birds can and do survive quite well with their natural defenses.

Back to the skin.  The skin had to be cut around the knee joint in a circle then sliced open.  Trust me, there was no way I was going to be able to pull the leg through and I didn’t want those clawed feet anywhere in the final cooked dish.  I disjointed the bird at the knees to make removing the lower legs easier.

The wings I left on the bird skin.  I attempted to take the skin off the wings but realized it was too fragile there for the amount of force needed to pull the many tendons/ligaments away from small bones.  Here I disjointed the wings and cut them at the inner breast joint.

Peacock Dora and more 037            As you can see the blood is pooling close to the neck where it was shot.  I had to drain the blood off a few times as I was making the cuts.  This is where I say either wear clothes you don’t mind getting bloody or skin in the buff so you can jump in the shower when it’s done.

Also note this bird is not covered in what we would consider a tasty amount of fat, as seen on modern day factory farm chickens.  This bird was wild.  It has a healthy amount of flesh and just enough fat along the skin and tail, yet the bird would never be considered as factory raised.

The skin from the back was actually the hardest to peel off.  I had to use my hands and a very small sharp knife to get into this area without slicing up the skin.   This portion of the deskinning was the hardest.  This skin felt thinner, though it really wasn’t, and the fat levels almost non-existent as I separated the skin and flesh.

A portion of the neck and head were left on.  All the period recipes say to leave the head on with feathers.  I couldn’t keep a pig’s ears from burning when I did a period pig head (http://roxalanasredactions.com/stuffed-boars-head/), so I was not about to risk the head of a peacock to the oven and my “linen bandaging” skills (which are nonexistent).  I had to do a quick improvisation.  2 inches under the head remained intact in the skin while I took out the rest of the neck.  The meat portion of the neck in the cooking had skewers to keep it upright for when the remaining neck and head were placed on top of the cooked portion.

Part 3: Cooking

             Most cooks have had the chance to work with their meat of choice before starting a major project.  Peacocks are as rare as hen’s teeth here so I had to adjust on the fly. I started with the period recipes for the Romans:

Roman:

Sometimes the peacock…were roasted. (Faas, pp. 297).

Another good Roman recipe; unfortunately this one does not include the redressing:

Grind chopped meat with the center of fine white bread that has been soaked in wine.  Grind together pepper, garum and pitted myrtle berries if desired.  Form small patties, putting in pine nuts and pepper.  Wrap in omentum and cook slowly in caroenum.”  (Giacosa, pp. 90)

French:

Peacock/Swan “Kill it like goose, leave the head and tail, lard or bard it, roast it golden, and it with fine salt.  It lasts at least a month after it is cooked.  If it becomes mouldy on top, remove the mould and you will find it white, good and solid underneath.” (Taillevent, pp. 23)

Or

Re-clothed Swan (substituting Peacock) “…in its skin with all the feathers.  Take it and split it between the shoulders, and cut it along the stomach; then take off the skin from the neck cut at the shoulders, holding the body by the feet; then put it on the spit, and skewer it and gild it.  And when it is cooked, it must be re-clothed in its skin and let the neck be nice and straight or flat; and let it be eaten with yellow pepper. (Goodman, M-30)

Italian:

If you want to roast a peacock on a spit, get an old one between October and February.  After it has been killed let it hang for eight days without plucking it and without drawing it; then pluck it dry…When it is plucked draw it…..put one end of a hot iron bar into the carcass through the hole by which it was eviscerated being careful not to touch the flesh: that is done to remove its moistness and bad smell.  To stuff it use the mixture outlined in Recipe 115, or else sprinkle it with salt, fennel flour, pepper, cloves and cinnamon; into the carcass put panicles of dry fennel and pieces of pork fat that is not rancid, studded with whole cloves or whole pieces of fine saveloy.  Blanch it in water or sear it on the coals.  Stud the breast with whole cloves. (The breast can also be larded or wrapped in slice of pork fat as is done with the pheasant in Recipe 135).  Roast it over a low fire, preserving the neck with its feathers as is done with the pheasant.  Serve it hot or cold as you wish, with various sauces … (Scappi, pp. 207)

The Opera of Bartolomeo Scappi, recipe #139 suggested for pheasant or peacock.

If you want to roast the small ones on a spit, as soon as they are caught pluck them dry and draw them; leave their head and feet on.  Stuff them with a little beaten pork fat, fresh fennel, beaten common herbs, raw egg yolks and common spices – which is done to keep them from drying out.  Sew up the hole and arrange their wings and thighs so they are snug.  Sear them on coals.  Wrap them, sprinkled with salt and cloves, in a calf or wether caul, or else in slices of pork fat with paper around them…When they are done serve them hot. (Scappi, pp. 206)

English:

Take a peacock, break his neck, and cut his throat, and flay him.  The skin and the feathers together, and the head still to the skin of the neck, and keep the skin and the feathers whole together; draw him as a hen, and keep the bone to the neck whole, and roast him, and set the bone of the neck above the broach (spit), as he was wont to sit alive; and above the legs to the body, as he was wont to sit alive; and when he is roasted enough take him off, and let him cool; and then wind the skin with the feathers and tail about the body, and serve him forth as he were alive; or else pluck him clean and roast him, and serve him as though do a hen. (Renfrow, pp. 572).

“Take and flay off the skin with feathers and tail, leaving the neck and crest still upon the bird, and preserving the glory of his crest from injury when roasting by wrapping it in a linen bandage.  Then take the skin with all the feathers upon it and spread it out on the table and sprinkle thereon ground cinnamon.  Now roast the peacocke and endore him with the yolkes of many eggs, and when he is roasted remove him from the fire and let him cool for a while.  Then take and sew him again into his skin and all his feathers, and remove the bandage from his crest.  Brush the feathers carefully and dust upon them and his comb gilding to enhance his beauty.  After a while, set him upon a golden platter, garnish with rosemary and other green leaves, and serve him forthwith as if he were alive and with great ceremony.” (Craig, pp. 157)

“A peacock may also have the skin and feathers removed as described above when it may be stuffed with spices and sweet herbs, and finely chopped savory meats, and roasted as described in the foregoing recipe.  Then replace the skin and feathers when it should be “served…”…with the tail of the peacock was covered with leaf of gold, and a piece of cotton dipped in spirits was put in its beak.  This was set fire to as the bird was brought in Royal procession to the table with musical honours.”  (Craig, pp. 157-158)

That’s quite a few ways to cook a peacock; however, most of the recipes had a few common elements:  the peacock, larding and salt while roasting.  Clove is mentioned, as is roasting on a spit.  I went with ‘less is more’ for this ad hoc project.

The body, freed from the skin, had to be rinsed to remove various bits of feather and blood before I could start to dress it in bacon.  As you can see, there is a good amount of meat on the bird.  This peacock was only a few pounds shy of what a wild turkey would dress out as.

Peacock Dora and more 038So here was a quandary:  if I wanted to redress the bird it had to be butt side up, yet as a cook I wanted the breast side up.  Argh!  Either way, this bird had to be covered in bacon.

I dithered for about 3 minutes, trying to visualize redressing with the skin.  I went with the easier task and put the bird butt side up, wrapping it all in bacon.

Now when I said I had no preparation for this, I meant it.  I had 30 seconds warning I would be coming home with a peacock for cooking and no time to prep prior.  I was lucky to have a side of bacon on hand in the freezer to start the wrapping project.  That was the good news.  The bad news was that the bacon was thin and not anything like the thick cut bacon (2lbs would have been the amount needed) that I really would have preferred.  You live, you cook, you learn.

Peacock Dora and more 046           Butt side up and the breast still needs to be covered in bacon.  Note the toothpicks.  This is what was holding the bacon to the downward facing breast.  Pull those out when you have finished cooking.  Trust me.  I forgot this part and had to pull everything off before restarting to redress the bird.  The neck was being held “Upward” by long wooden skewers.  Metal skewers would have worked as well.  I grabbed what I had on hand while trying not to panic over the time the skinning took me to get this bird prepped for the oven.

On reviewing the recipes, I see that I missed the ‘sprinkle with cloves’ portion of the recipe.  Depending on the recipe, the bird would have been studded with whole cloves or sprinkled with salt and ground cloves, then wrapped in calf caul (organ fat) or larded with bacon.  I missed the clove portion.  I was a tad flustered.  Next time though!

This is how the bird looked coming out of the oven.

Peacock Dora and more 049           I made sure it was well covered in bacon as I wanted a juicy bird.  Once you go bacon you’ll never go back.  Bacon-wrapped makes the best, juiciest bird(s) I’ve ever tasted and I was really hoping this would be the case here.  I was trusting Scappi to know his shit on the period cooking.  (That’s Bartholomew Scappi, the period Italian cook to the popes.  Read the first research paper here (http://roxalanasredactions.com/?s=peacock)  with the recipes.)

4th Part: The Skin

Now we get down to the fastest but oddest part to this dish.  The skin.  Most people like eating crispy skin from their fowl.  This dish would rather show the skin and the feathers off than cook it without the feathers.  I can see this…and was able to implement this with a bit of kitchen magic.  In period when a swan or peacock was skinned salt or cinnamon was used to keep the skin from going bad.  (Craig)

Peacock Dora and more 044            Here is the unprepared skin.  It’s still red and gooey.  I had no idea how else to do this, though I suspect more time should have gone into cleaning out the blood and flesh, then wiping down with a damp cloth to clean up the leftover bits and blood.  This was a huge learning curve.  Going with the flow here.

Here I’ve coated the skin in sea salt as done in period. (Faas, Giacosa, Apicius, Taillevent, Goodman, Scappi). Salt deters bacteria in an exceptional way.  Cinnamon has some of the same properties but not in the same “dry everything out so it dies screaming in agony” way.  So, salt is what I used to keep the skin from going bad on me (no one wants salmonella!).  The skin was then left out until the peacock was done.

I pulled out thread and needle for when the time came to attach the skin back over the bird.

Peacock Dora and more 048            I wanted a fairly strong thread, so went with the quilting thread.  Nope, I did not have silk or linen thread on hand for this.  Again the “30 seconds choice of taking a peacock home” came into play and there was a lot of ad-libbing to be done.

It turned out I wouldn’t need these items — but more on that in the next section.

Part 5: Redressing and Serving Forth

So here we are at the final scene to this hastily-prepared dish. The peacock is placed butt-up on a nice hand thrown pottery plate.  The actual type of dish this would be served on is not mentioned; however, it would be safe to say that the higher on the table the dish went, the better quality and metal the plate for the peacock.   I did not have a silver or gold tray quite big enough to fit this magnificent bird so I used a hand-thrown pottery plate.

Peacock Dora and more 049

This is sooo looking like a snail at the moment.  (I may consider doing a chicken dressed as a snail for a subtlety at some point, but not today).  We’re about to fix this look.  Yank out all the toothpicks but keep the skewers in place.  You’ll need the skewers to keep the neck skin in in place and hold the head up.  Yanking out the toothpicks keeps the keeps the skin from being pierced.  Now in period, a subtlety could and would have metal or wooden pieces in and around to keep the illusion going.   Subtleties could consist of just the edible or, as the setup became more elaborate, a combination of papier-mâché and lumber to support a larger and even grander display.  These decorative subtleties were for powerful displays more than about eating, with the production being done by carpenters, metals smiths and painters and very little by chefs. (www.reference.com/browse/subtlety).

Peacock Dora and more 050            Here I purposely change how the re-dressing goes.  In period the skin would be put over the dish.  The bloody fleshy very salted raw skin over the cooked body.  That’s a great way to give someone food poisoning.  I think I’ll pass on that as I’m the one eating this bird tonight! As you can see I’ve covered the peacock in foil.  You could use parchment paper (a closer period alternative) however I had this on hand (Notice a theme here?).

Once the bird is wrapped for your protection, slip the skin over the body with the neck and head going over the cooked neck portion.

Peacock Dora and more 051         My shy peacock is gorgeous!  The skin did not have to be sewn as I thought it would.  The skinning opened the flesh enough that it draped like a perfectly fitted dress over the body.  The tail feathers are long enough that propping them against the wall works to display his regal tail.  However the tail portion of the cooked body will need to be covered by silk or a cloth as the skin won’t fit all the way over the butt while the neck and main body are covered.  In period, not just in my kitchen, they would have used a wire form to hold the tail in place, probably wrapped around the cooked peacock, hiding under the skin but with a wire “fan” to press against the tail and hold it up for a glorious display.  That’s how I would have done it if I were presenting this dish to a head table.

Once the peacock has been displayed, take it back to the kitchen and slice the meat onto a plate for serving.

Peacock Dora and more 064

The reasoning is that you don’t want to yank off a salty bloody skin over food that someone is going to have to eat.  No one really wants to see that side of the dish.  Remember this is FOOD MAGIC, a dish of awe and inspiration.  No need to let the populace (or the king) see how this surprise is really done.

Part 6: Conclusion

Monarchs put feasts to good use as ways to make a vivid point, like inducing guests to pledge allegiance to a planned crusade.  An example of this was when Philip the Fair, at the Feast of the Pheasant, showcased a giant Saracen entering the feasting hall leading an elephant (there is some question about the edibility of said pachyderm), with a knight (Oliver de La Marche) playing the role of the captive Eastern church. (Wheaton, pg. 8/Martins)  Another example of the royal use of subtleties involved Henry VIII.  George Cavendish wrote about a feast sponsored by the great Tudor king in such waxing enthusiasm for the feast “…I do both lack wit in my gross old head and cunning in my bowels to declare the wondrous and curious imaginations in the same invented and devised.” (Henisch, pp. 236/Martins).  The feasting was a display to move men and women into wondrous thoughts, glossing over a harsh reality of court life: a grand and compelling gesture.

A subtlety could be a simple item such as a redressed peacock on proud display or stuffed fowl riding roast piglets, or as elaborate as a full pastry castle with trees containing candied fruit, with mythical beasts glazed and stuffed, as well as musicians playing music from the limbs of the trees.  Allegorical scenes were not uncommon.  Some scenes could be “Castle of Love” or “Lady of the Unicorn”.  (Martins).  Taste wise.  I was terrified that this bird was going to be tough and nasty.  Wild caught game is allowed to “age” for a reason.  Aging a bird (including chickens) gives the flesh the opportunity to mellow and break down for a more tender and tasty bite.  The peacock had to be done as soon as I walked through the door.  There was no chance to age the meat (the skin wasn’t going to fit into my freezer at all with that gorgeous tail intact).  When I took the first bite I was pleasantly surprised.  There was a slight gamey taste but not overwhelming or nasty.  The meat was a bit chewy but not jerky tough.  Honestly, I expected rooster tough as this was a full grown male in his prime.  The meat was tasty and juicy, which I think can be attributed to the bacon wrapping.

I find this to be a dish best made and served on site if it were for an event.  The skin would be hard to keep from going bad unless frozen (not sure that would work) in a chest freezer as my upright was too small for this skin and tail feathers.  As for being able to replicate this on demand, I can’t.  Unless there are male peacocks on hand the day of an event AND the steward and cook are willing for me to kill, skin and gut a peacock in their kitchen while working around a 5 foot tail this isn’t going to happen at an event either.  This was a onetime shot or at the whim of the Farmer Lady when she shoot another peacock.  I learned a lot, but realize that the hardest part is knowing the limitations on what is possible in the future for a display.

There was a bit of ad-libbing on my part for this whole dish, with a steep learning curve on how to skin and redress.  Overall though, I’m pretty damn pleased with the recreated period presentation.  The skin came out magnificently and I had the main ingredients to keep the dish (mostly) true to the original.


References:


Craig, E., (1953). English Royal Cookbook. Andre Deutsch Limited, London.


Damerow, G., (2010). Raising Chickens. Storey Publishing.


Fass, P., (1994). Around the Roman Table. University of Chicago Press, Chicago. 1994.


Giacosa, I., (1994).  A taste of Ancient Rome. University of Chicago Press, Chicago.


Good man of Paris.(1395). Le Managier De Paris.


Renfrow, C., (1998). Take a


February 13, 2017 | No comments

The Kraken

An Original Subtlety

By Honorable Lady Sosha Lyon’s O’Rourke

The Kraken

http://www.wired.com/wiredscience/2013/09/carta-marina/#slideid-412001

Kraken crawling

Dining in the Tudor and Elizabethan era was a time of great merriment and fabulous feasting, which sought to display a host’s wealth and dining creativity.  I have undertaken an original subtlety depicting the great ocean monster “The Kraken”.  This subtlety is based on historic president where subtleties could be great works from rolling pachyderm to re-skinned peacocks.

It is the nature of this creature to swallow men and ships, and even whales and everything else within reach. It stays submerged for days, then rears its head and nostrils above surface and stays that way at least until the change of tide. Now, that sound we just sailed through was the space between its jaws, and its nostrils and lower jaw were those rocks that appeared in the sea, while the lyngbakr was the island we saw sinking down. However, Ogmund Tussock has sent these creatures to you by means of his magic to cause the death of you and all your men. He thought more men would have gone the same way as those that had already drowned and he expected that the hafgufa would have swallowed us all.  (Orvar – Oddr)

I.  A History of Subtleties

Subtleties are works of art in food and story telling.  A subtlety should be, per Hunter, an intermission with in a meal between courses that entertains while heavily disguising the origins of the main ingredients.  Fooling, or tricking the eye into seeing the unusual and mythical, while using every day food items in unique ways, subtleties promoted thought and good will towards the host.

 Hunter notes the coinciding of the change of venue for the banquet course (to another room) to promote conversation in the fifteenth century with the publication in the vernacular of Platos Symposium (defined as a meeting to exchange ideas after a meal… The qualities of wit and wisdom associated with the literary …appear to metamorphose sotil into the more modern sense of subtle through association with the sweetmeat course (Hunter 1986:38,39). Witty conversation was to work with the sweetmeats or confectionery subtleties to help the diner digest physically and mentally. Once the effects of wonder wear off, the need for quick wit, humor and subtle sayings represent the transfer of ingenuity from the chef to the guests. The subtlety is creative and prompts creativity; if the chef can make it, the guest should be able to comment on it. Unlike with many other performance genres, the subtlety relies on ingenuity from both the audience and the director in order to be successful. It also depends on a unique form of ingenuity: playing with nature. (Martins)

 An early example, written by an Egyptian caliph in the eleventh century describes from one Islamic feast day a hundred and fifty seven figures and seven table sized palaces made of sugar.   Another set of notations of subtleties, occurring from the book Satyricon, by Petronius, wrote that a Roman feast dinner included a rabbit that had been made to look like the mythological winged horse Pegasus.  From the 1300 through 1500, subtleties, also known as sotelite in English and an entremet in French, became popular for royal and noble displays as stiff competition between England and France developed during the fourteenth and fifteenth century.  (The Renaissance cornered the market on subtleties; art work in food started much earlier).  (Mintz, pp. 88/Martins. p 12)

These feats of food were put on by the nobility and very wealthy. These fleeting art works were for display and thought not for a monetary gain at first sight or taste.

The intention of a subtlety is to create an experience rather than something that can be given as a gift or sold.  Unlike permanent displays of power, the subtlety it not durable, it spoils, it has a fixed life-span that ends when it is eaten. The subtlety also enters the dining hall in motion: the set itself is wheeled in, fire blazes out of the mouths of beasts and the actors are put into life-like poses intended to be animated by other performers or the imagination. (Martins)

Monarchs put the feasts to good use as ways to make a vivid point, i.e. the inducing of guests to pledge allegiance to a planned crusade.  An example of this was when Philip the Fair, at the Feast of the Pheasant, showcased a giant Saracen entering the feasting hall leading an elephant (there is question about the edibility of said pachyderm), with a knight (Oliver de La Marche) playing the role of the captive Eastern church. (Wheaton, pg. 8/Martins).  Another example of the royal use of subtleties was by Henry VIII.  George Cavendish wrote about a feast sponsored by the great Tudor king in such waxing enthusiasm for the feast “…I do both lack wit in my gross old head and cunning in my bowels to declare the wondrous and curious imaginations in the same invented and devised.” (Henisch, pp. 236/Martins)  The feasting was a display to move men and women into wondrous thoughts, glossing over a harsh reality of court life or a grand and compelling gesture.

A subtlety could be simple items such as a redressed peacock on proud display or stuffed fowl riding roast piglets; or as elaborate as a full pastry castle with trees containing candied fruit, glazed and stuffed mythical beasts, and musicians.  Allegorical scenes were not uncommon, with themes like “Castle of Love” or “Lady of the Unicorn”.  A subtlety could made of just the edible, such as a re-skinned peacock, or as a combination of paper machie and lumber to accent the food in the display.  These decorative subtleties were for powerful displays and less about eating, with the production being done by carpenters, metals smiths and painters and very little with chefs. Horace Warpole describes a banquet given in honor of the birth of Duke of Burgundy, where the centerpiece was of wax figures moved by clock work at the end of the feast to represent the labor of the Dauphiness and the happy birth of the heir to the monarchy. (Martins, pp 2/Craig, pp. 17)

Creating a display:

Creating a display seem to rely heavily on allegorical content from myth, fantasy or biblical content, such as the Pegasus from myth at the Roman table (Scully, pp. 107) or Lady of the Unicorn.  Part of the thought process that goes behind making a display was how each animal was viewed in allegorical terms.

“…the horns of an antelope might get caught in a bush in

the same way humans might get caught in a life of sin. The nightingale represented love, the elephant implied chastity, the ape, ludeness and lust and the peacock, the purity of someone who never turns to sin.” (Martins)

The main display item, per these views, should play upon the strength of the subjects or as humorous joke on the subject presented.

Menu:

The menu for adding a subtlety could be during the end of a course or at the end of a meal.  One menu described a 5 course meal with a crown subtlety at the end.

“…At each end, outside the green lawn, was an enormous pie, surmounted with smaller pies, which formed a crown. The crust of the large ones was silvered all round and gilt at the top; each contained a whole roe-deer, a gosling, three capons, six chickens, ten pigeons, one young rabbit…

To serve as seasoning or stuffing, a minced loin of veal, two pounds of fat, and twenty-six hard-boiled eggs, covered with saffron and flavoured with cloves.

(www.elizabethan-era.org.uk)

This display put on for an honored guest shows the detail and extravaganza that went into each dish and for the visual delight for the guests, not only for the bodily need of food but also for the intellectual delight and discussion by the guests long after the meal had been consumed.

II. The Kraken Subtlety

This subtlety is done in the style of the Elizabethan subtlety.  I fell in love with the subtleties listed in the medieval cookbooks describing how a the front of a chicken was married with the back of a fish forming a cockatrice.

The Amphisien Cockatrice looks much like a cock with a long serpent-like tail ending with a second head. It is a rare charge in heraldic achievements.

June 2015 038

When I decided on the Kraken, I wanted something both medieval and original.  Some that combined several different foods that would not normally be touching let alone combined into one dish to create a spectacle type of food.

The Kraken, whose name derives from the Norse Draken, is an ancient maritime creature ranging from the cold northern coast of Norse legend to the warm seas of Greece.  The Kraken could be a sea dragon or a serpent with many legs, possibly even resembling an island, which could plunge to great deeps without warning and drag a large ship down. In the tales of the Kraken, ships were dragged into the sea by arms as long and massive as a ships mast.).  The Kraken has also been described as a crab-like creature that caused whirlpools when sinking to the depths. (Orvar-Oddr, pp 1/ancient-origins/mythicalrealm)

Erik Pontoppidan, the Bishop of Bergen and renowned naturalist, insisted that the Kraken was “the largest and most surprising of all the animal creation” lending credence that this creature actually existed and not the imagination of ship wrecked sailors with water starved fevered imagination. (mythicalrealm)

Aspects of the legends in common are that the creature was huge, huge enough to pull down a full sized ship with a complete and armed crew. Roughly, the size of an island, there could be tentacles that resembled those of a squid and possibly legs of a crab or a sea serpent.  All in all, a combination to give nightmares when sailing the briny sea.

My subject choice is fairly unique.  I chose the Kraken, not on whim but on sight.  Let me explain.  I saw this incredible unique dish and had a period epiphany on what might have been served as a subtlety dish.  I was moved and possessed to see this project completed to perfection both in looks and in taste.  I had the cooking skill and knew where to gather the ingredients.  The paper came together through various research projects and books.


Period Ingredients:

If this subtlety was served in England, the Turkey breed would be the Black Spanish (Spanish turkey) or a Black Norfolk (English Turkey).   (Albc-usa)  The squid, which would be more common around the English Channel and SW of England and parts of Scotland, could have been used in period being far more common then the cuttlefish. (bristishseafishing.co.uk) The brown crab would have been used for their legs, instead of the smaller crabs which are both period and abundant but do not match the size of the common brown. (bristishseafishing.co.uk) For the shrimp portion, an English cook would have used the common prawn (Palaemon serratus) or their near kin Palaemon elegans, adspersus and longirostris also would have been used.  These prawns are differentiated only by small external details such as different segments or leg paddle shape.  These prawns and shrimp live in the same areas around England and are devoured with great appetite. (bristishseafishing.co.uk)

Each portion of the Kraken subtlety was cooked separately except the turkey, bacon then assembled into the creature before you.


Kitchen:

An Elizabethan kitchen included whole spits from which to turn oxen and pigs in as well as a host of chefs and underling to present a note worthy subtlety for the royal courts pleasure. This varies greatly from a modern kitchen, which is lucky to be able to roast a piglet in…one at a time.  Trying to prepare a feast is a multi-week task for cooking of many animals where on a feast day many animals could be cooked at one time in these huge roasting pits.

Redon insists that the first part of an evolved kitchen is the knife.  The knife is the first line in slicing, cutting, and chopping the variety of items necessary to prepare a feast.  Modern knives are less likely to go dull with the serrated edges, making the process of cutting and chopping easier then in period where a kitchen knife would need to be sharpened periodically.

Next was the mortar and pestle for grinding up spices, herbs, breads and meats for measured inclusions into a chef’s careful creative dish. (Redon)  Personally I prefer to use a mortal and pestle for small items; however due to the fact there is only me and not a kitchen of help I find a small coffee grinder or a small cuisinart helps with the items that require more then a tablespoon.

I have used both hand ground and machine ground spices for various cooking projects.  I find the hand ground spices are usually a little larger and rougher, than their machine ground counter part, but only marginally, depending on the grinding determination of the cook.

The plates for serving dinner on were of baked bread (trenchers) during Henry VIII and prior ages. During Elizabeth’s reign, her plates were of silver instead of bread trenchers, showing a higher level of dinnerware than previous kings.  I used metal pots and pans, trying to duplicate the temperature range of medieval cooking oven and stove with my modern gas stove.


Spices: 

Spices included but were not limited to ginger, cinnamon, cloves, grains of paradise, long pepper, aspic, round pepper, cassia buds, saffron, nutmeg, bay leaves, galingale, mace, cumin, sugar, garlic, onions, shallots and scallions (Taillevent, pp, 230)  Spices not only add flavor and color but were also testaments to the wealth of the host adding to the sumptuousness of any given dish.  This dish will be relatively light in spices due to the recipes used.  This does not negate the importance of spices, but will place an emphasis on the natural flavors of the meat and aquatic items used.


Color:

Some times the color was more desirable then the flavor and the spicing used would over power the dish so much so as to be less sumptuous than a less colorful dish. Vivid colors, Wheaton explains, were highly prized and were often achieved at the expense of flavor.  Taillevent also suggested more common spices for green coloring such as parsley, sorrel and winter wheat still green.  Gold and silver leaf was brushed onto the surfaces of food i.e pastries for a greater visual impact. (Wheaton, pp. 15/Martins pp. 5)


III. Making of the Subtlety

The overall idea for the subtlety is a gorgeous piece of edible artwork meant to invoke the awe and terror of the sea.  As I attempted each section, I realized that there were cooking steps within the main cooking dishes, which had to be done such as cooking squid separately from the turkey wrapped in bacon therefore each item is a separate cooking experiment.

With this rough and varied description, I have assembled a subtlety that could have been served at a medieval feast with a nautical theme.   The body of the “beast” would have to be from a creature that was very large but still portable and a delicacy.  This to my mind could be a turkey brought forth from the New World on a very long and arduous voyage across the sea.  To denote the scary but mighty tentacles, I have opted to stuff the arse end of the turkey with octopus, as if the mouth were covered in large tentacles out of a sailor’s nightmare.  The legs I made from snow crab for both a tasty treat and scary mobility.   The back is covered in bacon to represent the island for which it might lure sailors onto its back before plunging into the depths drowning them.  Olives were used for multiple eyes to finish off the truly magnificent and scary of watery beasts.

Rosemary was used to mimic the seaweed and kelp of the deep ocean.  Salt was used at the bas to represent the sand and display the wealth of the nobility for whom the subtlety was created by.


The Kraken Recipe:

I have taken the liberty of combining a couple of excellent period recipes to build the Kraken.  I used the Scappi’s American Peacock recipe and the Roman Octopus recipe combined to form this very tasty and scary subtlety.

I took a turkey and wrapped it in bacon, weaving it tightly over the breast and legs to form a second skin that is not only allegorical but locks in the juices and flavor.


 wrapping turkey for kraken


I decided to incorporate shrimp for the eyebrows.  Unfortunately, the first round of eyebrows became exceedingly crispy after spending the same amount of time in the oven as the turkey.  I had to switch out the original “eyebrows” for less well-done bacon wrapped shrimp.  For the eyes I used oil cured black olives, which is another Italian food item.

While the turkey was cooking I went to work on the octopus and squid.  I was unsure how I wanted to use and display the squid but I didn’t want to use whole squid or whole octopus.  I would have preferred to have gotten a much much larger octopus or octopi, however there were no shops selling anything other then baby octopus.  I bought them knowing the octopus were to small for my imagined display but hoping to put them to use.  I did decide to get squid as they had longer tentacles which would be useful for the “mouth” of the Kraken.  I pulled out the beak of the squid opening them up and took off the heads of the octopus and the squid.


split squid


These were then dunked into boiling water.  This had the effect of curling both the squid and the octopi into much smaller and chewier bits with much stiffer arms.

IMG_0699


The crab legs were also dunked into boiling water so that they would be come edible.

The crab legs were placed on the plate.  The bacon wrapped turkey was then placed on top of the legs.  The olives were pinned into place with toothpicks and the squid arms formed both the lower portion of the Kraken mouth and an upper mustache on the turkey.


IMG_0701


IV. Period vs Modern

Period wise, the turkey would have been roasted in a large wood-fired oven instead of a gas stove either in a pottery or metal pan.  I actually used a large metal pan but not one made in a period fashion.  The bacon would have been homemade or bought from a supplier who made it in their kitchen.  I tried making homemade bacon using Master Gunther’s recipe.  I could not get the slices thin enough to actually wrap or drape properly, also my bacon was seriously odd tasting and way too salty.  The squid or octopus (depending on what was a fresh catch for the day) would be cooked in a metal or pottery pan.  Again, I used a non-period metal pan for this.  The same for the crab legs in cooking and market freshness.  The olives would have been brined on a farm then brought to the castle or nobles house (if the farm were in conjunction with the nobility or the market place if further away).  The olives I used were bought in a store, not exactly the same as a period market, and brined somewhere else for sale.  Hopefully, in a few years my own olive trees will be producing and I can experiment with brining and tasting then.

The display plate is hand thrown pottery in a period style.


V. Conclusion

My overall impression is that this type of project would have been a chef’s idea of how to both amuse and surprise the nobility with a grand feast for the eyes.  The visuals would cause both unquiet, due to the nautical scary tales told, and delight at the unique edibleness of the entire display.  If this display were served in period, the Kraken would do what it was suppose to.  The display would cause the guests pause while they contemplated the nuances of what was before their eyes.

When I first gathered the ingredients together, I was really nervous putting this piece together.  I had never put pieces together in a food item to create a towering monolith of frightful proportion.  I discovered that thin bacon just does not cover the turkey very well.  Thick cut bacon is needed to keep shrinking to a minimum and maximum coverage (larding) maintained.  Once I pulled the crab legs from the pot, things were much calmer.  The crab legs fit perfectly on the plate, the turkey looked awesome straight out of the oven and the octopi and squid had boiled very well.

This project was the most fun in making any subtlety I have yet tried.  The theme is tasty, unique, and odd.  Just the way I like it!  The overall project was not difficult, nor were the ingredients (other then the squid/octopus) hard to acquire.  Overall, I would gladly do this project again.

Works Cited/Works Consulted:

Craig, E., (1953). English Royal Cookbook, Favorite Court Recipes. Hippocreen books.

Damerow, G., (2010). Storey’s Guide to Raising Chickens.

Hieatt, C., Hosington, B, Butler, S. (1979). Pleyn Delit: medieval Cookery for Modern Cooks. University of Toronto Press.

Hunter, L., (1986) Sweet Secrets from Occasional Receipts to Specialized:  The Growth of a Genre; as cited in Banquetting Stuffe.  Edited by C. Anne Wilson. Edinburgh University Press.

Markham, G., (1986). The English Housewife. McGill-Queens University Press.

Martins, P. (1998). Subtleties, Power and Consumption: A Study of French and English cuisine from 1300-1500). Nyu.edu

McDonald, W., (2004). Recipes from Banquet dels Quatre Barres.

Orvar-Oddr saga

Redon, O., (1998). The Medieval Kitchen, Recipes from France and Italy. University of Chicago Press.

Renfrow, C., (1996). A Sip Through Time. Pg.113

Renfrow, C., (1998). Take a Thousand Eggs, A collection of 15th century recipes. 2nd edition.

Toussaint-Samat, M., (1992). History of Food. Barnes & Nobles.

The Four Elements of Fire, Joachim Beuckelaer 1569

The Opera of Bartolomeo Scappi (1570). Translated by Scully., T.,  University of Toronto Press.

The Viandier of Taillevent , ed. Terence Scully,(University of Ottawa Press, 1988).  As present by http://www.reference.com/browse/subtlety and by Patrick Martins, nyu

The Vianderi of Taillevent., (1998) presented in “A Collection of medieval and Renaissance Cookbooks).

The Well-Stocked Kitchen, Joachim Beuckelaer, 1566

http://media-cache-ec0.pinimg.com/736x/89/ca/80/89ca809248a0a901d1ab824dcca82b98.jpg

http://www.wired.com/wiredscience/2013/09/carta-marina/#slideid-412001

http://www.angelfire.com/ia3/kraken/myth.index.html

http://www.probertencyclopaedia.com/browse/D4.HTM

http://www.mythicalrealm.com/creatures/kraken.html

http://www.ancient-origins.net/myths-legends-europe/legendary-kraken-00267

http://www.reference.com/browse/subtlety

http://www.elizabethan-era.org.uk/elizabethan-banquet-feast.htm

http://www.godecookery.com/cookies/ingred.html

http://www.albc-usa.org/

http://wiki.answers.com/Q/How_many_eggs_can_a_turkey_lay

http://thecoolchickenreturns.blogspot.com/2006/05/chickens-in-ancient-rome.html

http://britishseafishing.co.uk/crab-species/


Appendix 1

Recipes


Translation:

Turkey:

To roast turkey cock and turkey hen, which in some places in Italy are called ‘Indian Peacocks.

A turkey cock and turkey hen are much bigger in the body then an ordinary peacock; and the cock can spread its tail like the peacock….Its breast is broad…its flesh much whiter and softer then that of the common peacock and it is hung for a shorter time then any similar fowl.

If you want to spit-spit roast it, do not let it sit for more then six days in winter before being drawn or in the summer for more then two.  Pluck it dry or in hot water…If you want to stuff it, use one of the stuffings of Recipe 115…stick it with fine lardoons of pork fat, although if it is fat, an stuffed there will not be any need for larding; you will have to stud it though with a few whole cloves.  Mount it on a spit and cook it slowly, that bird cooking much more quickly that a common peacock. (Scappi, pp. 208-209)

Stuffing:

…for every four pounds of beaten pork fat get two pounds of parboiled veal or goat-kid sweetbreads…four ounces of sugar, four egg yolks, a handful of herbs, nine not-too-ripe plums or else muscatel pears…instead of sweetbreads you can use calf, kid or pig brain, parboiled. (Scappi, pp. 193-194)

Ingredients:

1 small young turkey

1 lb chopped bacon ends

1 lb bacon strips

3 Tbs sugar

4 egg yolks

Herbs –sage, rosemary, basil, thyme, bruised laurel leaves, parsley – rinsed and chopped

½ lb sweetbread

Whole cloves for studding


Redaction:

I have cooked turkey on many occasions; however cooking a period recipes require a slight mind shift.  The stuffing is very different as the main ingredient is pork fat not bread crumbs and there is the inclusion of sugar to counter the savory, not to mention egg yolks instead of whole eggs.

The first thing to do is try to get a heritage turkey, from either a specialty shop or raising one.  Should a heritage turkey be unattainable, go for a young turkey NOT an old turkey.  The older the turkey, the tougher the meat.  Young and sweet is what you would want to serve to the pope or visiting royalty.


Turkey raw

Clean out the giblets and set to the side while gathering and mixing the stuffing ingredients.

My first task was to pick herbs from the garden.  A handful of or a few stems of each of the above listed herbs were gathered then rinsed well.

Herbs in strainer

Once they were patted dry, I de-stemmed the leaves from woody stalks.  The bay laurel I left intact but bruised the leaves for maximum flavor.  Everything else was then chopped and set to the side.

 chopped herbs

The sweetbread was chopped into small chunks and set to the side as well


chopped sweetbread

I used bacon ends for the pork fat instead of raw pork fat.

 chopped smoked bacon

I could have used rendered pork fat but I don’t think that is what was really used.  Rendered pork fat would drip and slide with out actually staying inside the turkey for flavoring, as it has a fairly low melting temperature.

I did not have slightly tart plums on hand.  I used dried un-sugared plums with the thought that in period if plums were not in season dried plums (prunes) would have been used instead.

dried plumsI also added more then 9 as I actually like the flavor of dried plums and wanted to offset the bacon ends with a bit more sweet.

chopped dried plums

The bacon ends were placed in a bowl.  From here I added the sweetbread, herbs, sugar, egg yolks, and dried plums.

Mixed all together

Then I mixed well.

final mix herbs


I was now ready to stuff a turkey.

stuffed raw turkey

The turkey was stuffed to just the right amount.

endview of bacon wrapped turkey


Once stuffed, I laid bacon strips across the top of the turkey breast “as fine lardoons” (Scappi, pp. 193-194) .  A fat turkey is subjective and I like bacon.  Bacon is never a bad thing when it comes to meat.  So bacon it was on top of the turkey in a criss-cross decorative patterning.

 roasted turkey on platter

The bacon will shrink so lay the bacon half over the first strip when laying out your pattern.  You’ll understand once you’ve cooked the bacon on top of the turkey once.

I did not have a spit handy so had to use a gas stove oven and a rack.  From here it was 2.5 hours at 350.

The turkey is incredibly moist while the stuffing is very meaty with savory and sweet flavorings.

Modern vs. Period:

I did not have a period turkey.  I could have bought a “heritage turkey” however the packaging did not say what “heritage” and I really wanted a Black Spanish or Black Norway.  I am just going to have to raise my own I think.

The herbs came from my garden and were mostly period.  The dried plums were from California and did not designate the type which means that a period type of plum was probably not used.  The eggs were organic but the sugar was regular table sugar instead of brown or turbinado; however fine sugar was known in Italy at this point.


Sugar- Considered very expensive till the late 1500.  Loaf sugar given the name due to the conical shape derivded from refining into a hard and very white refined form. Caffetin or Couffin (English equivalent of “coffer” or “coffin”) named for the form, packed in plaited leaves palm and from the city shipped from called Caffa in the Crimea.    Casson a very fragile sugar also considered the ancestor to castor sugar.  Muscarrat considered the best of all sugars, reported to be made in Egypt for the Sultan of Babylon.  The Italian name mucchera denotes that it had been refined twice. (Toussaint-Samat, pg. 553-555)


I did not have a wood fire spit on which to roast the now stuffed turkey.  I had to rely on the modern convenience of a gas stove and a roasting pan with a rack.  This does not give the wood flavor that a smoke fire would thought the smoked bacon helps with this; however the heat was maintained at a regular temperature which precludes charred spot or raw and undercooked areas.


Boiled Octopus


Translation:

For octopus: pepper, liquamen and laser. Serve

(Faas, pp. 341)


Ingredients:

1 octopus

2 TBS ground pepper corns

1 Tbs fish sauce

1 tbs garlic or 1 tsp of Asafoetida


Redaction:

The notes say that there are several ways in which octopus was cooked.  One of the fastest being, unskinned to preserve the beautiful colors to start.  The next cooking method would be to poach for no more then 5 minutes and allow to cool slowly or cook for hours in a very low temperature in white wine, water and herbs.  Garlic or asoafoetida could have been added to the water as well.


I gathered the octopus with asoafoetida and peppercorns (pre grinding) next to the stove.

baby octopi w spices

Next the spices were added to a pot of boiling water.

peppercorns in simmering water

Once the water and spices were at a rolling boil, I added the octopi.  Here are the cooked octopi.  They look very different from their raw state.

 cookied ocotpi

February 11, 2014 | No comments

A Subtlety

Ansteorra Taking the Castle at Gulf Wars

I.  A History of Subtleties

Subtleties are works of art in food and story telling.  A subtlety should be, per Hunter, an intermission with in a meal between courses that entertains while heavily disguising the origins of the main ingredients.  Fooling, or tricking the eye into seeing the unusual and mythical, while using every day food items in unique ways, that promoted thought and good will towards the host.

Hunter notes the coinciding of the change of venue for the banquet course (to another room) to promote conversation in the fifteenth century with the publication in the vernacular of Platos Symposium (defined as a meeting to exchange ideas after a meal… The qualities of wit and wisdom associated with the literary …appear to metamorphose sotil into the more modern sense of subtle through association with the sweetmeat course (Hunter 1986:38,39). Witty conversation was to work with the sweetmeats or confectionery subtleties to help the diner digest physically and mentally. Once the effects of wonder wear off, the need for quick wit, humor and subtle sayings represent the transfer of ingenuity from the chef to the guests. The subtlety is creative and prompts creativity; if the chef can make it, the guest should be able to comment on it. Unlike with many other performance genres, the subtlety relies on ingenuity from both the audience and the director in order to be successful. It also depends on a unique form of ingenuity: playing with nature. (Martins)

From the 1300 through 1500, subtleties, also known as soteltie in English and an entremet in French, (Martins) became the rage for royal and noble displays as stiff competition between England and France raced on during the fourteenth and fifteenth century.  (The Renaissance cornered the market on subtleties; art work in food started much earlier).  There were early notations of subtleties occurring, from the book Satyricon, by Petronius, who wrote that at a Roman feast dinner included a rabbit that had been made to look like the mythological winged horse Pegasus. Another earlier example, written by an Egyptian caliph in the eleventh century describes from one Islamic feast day a hundred and fifty seven figures and seven table sized palaces made of sugar. (Mintz, pp. 88/Martins).

These feats of food were put on by the nobility and very wealthy. These fleeting art works were for display and thought not for a monetary gain at first sight or taste.

The intention of a subtlety is to create an experience rather than something that can be given as a gift or sold.  Unlike permanent displays of power, the subtlety it not durable, it spoils, it has a fixed life-span that ends when it is eaten. The subtlety also enters the dining hall in motion: the set itself is wheeled in, fire blazes out of the mouths of beasts and the actors are put into life-like poses intended to be animated by other performers or the imagination. (Martins)

Monarchs put the feasts to good use as ways to make a vivid point, i.e. the inducing of guests to pledge allegiance to a planned crusade.  An example of this was when Philip the Fair, at the Feast of the Pheasant, show cased a giant Saracen entering the feasting hall leading an elephant (there is question about the edibility of said pachyderm), with a knight (Oliver de La Marche) playing the role of the captive Eastern church. (Wheaton, pg. 8/Martins).  Another example of the royal use of subtleties was by Henry VIII.  George Cavendish wrote about a feast sponsored by the great Tudor king in such waxing enthusiasm for the feast “…I do both lack wit in my gross old head and cunning in my bowels to declare the wondrous and curious imaginations in the same invented and devised.” (Henisch, pp. 236/Martins).  The feasting was a display to move men and women into wondrous thoughts, glossing over a harsh reality of court life; or a grand and compelling gesture.

A subtlety could be a simple item such as a redressed peacock on proud display, stuffed fowl riding roast piglets or as elaborate as a full pastry castle with trees containing candied fruit, mythical beasts glazed and stuffed as well as musicians.  Allegorical scenes were not uncommon.  Some scenes could be “Castle of Love” or “Lady of the Unicorn”.  (www.refernce.comm/browse/subtlety).  Subtleties could comprise of just the edible or as the more elaborate a set up became, a combination of paper machie and lumber to support a larger and even grander display.  These decorative subtleties were for powerful displays and less about eating, with the production being done by carpenters, metals smiths and painters and very little with chefs. (www.reference.com/browse/subtlety). Horace Warpole describes a banquet given in honor of the birth of Duke of Burgundy, where the centerpiece was of wax figures moved by clock work at the end of the feast to represent the labor of the Dauphiness and the happy birth of the heir to the monarchy. (Craig, pp. 17)

Creating a display:

Creating a display seems to rely heavily on allegorical content from myth, fantasy or biblical content, such as the Pegasus from myth at the Roman table (Scully, pp. 107) or Lady of the Unicorn.  Part of the thought process that goes behind making a display is how each animal is viewed in allegorical terms.

“…the horns of an antelope might get caught in a bush in

the same way humans might get caught in a life of sin. The nightingale represented love, the elephant implied chastity, the ape, ludeness and lust and the peacock, the purity of someone who never turns to sin.” (Martins)

The main display item, per these views, should play upon the strength of the subjects or as humorous joke on the subject presented.

Menu:

The menu for adding a subtlety could be during the end of a course or at the end of a meal.  One menu described a 5 course meal with a crown subtlety at the end.

“…At each end, outside the green lawn, was an enormous pie, surmounted with smaller pies, which formed a crown. The crust of the large ones was silvered all round and gilt at the top; each contained a whole roe-deer, a gosling, three capons, six chickens, ten pigeons, one young rabbit…

To serve as seasoning or stuffing, a minced loin of veal, two pounds of fat, and twenty-six hard-boiled eggs, covered with saffron and flavoured with cloves.

(www.elizabethan-era.org.uk)

This display put on for an honored guest shows the detail and extravaganza that went into each dish and into the visual delight for the guests, not only for the bodily need of food but also for the intellectual delight and discussion by the guests long after the meal had been consumed.

II.   “Ansteorra Taking the Castle at Gulf Wars”

Using these as a guide line, I have decided to work with the subject of “Ansteorra Taking the Castle at Gulf Wars”.  This plays on the upcoming war between Ansteorra and Trimaris held in kingdom of Meredies.  I decided to recreate the castle with towers (though my memory could be faulty on whether the current castle has towers or not) stuffed with sugared fruits and to have golden eggs and mead inside the castle as the “prize”.

Hay bales made of gingerbread detail the field that the fighters take, whether it is to capture the castle or a “bridge”.  The path leading up to the castle and around the castle is of  gold springerfel cookies.

The shortbread shields and swords are to represent the fragility of the on field items used upon the field of war in their broken nature. Colored marzipan flowers represent the ladies and lords that comprise the spectators from all of the known world of the SCA.

The Ansteorran knights and dons are made of chickens with a crest of black and gold rooster feathers symbolizing the cockiness of the Ansteorran fighter upon the battle field, while the peacock feather symbolizes the beauty and proud display that fighters put into their looks and their fighting.  The idea of a piglet used for a horse (representing the jousting community) may or may not be incorporated at this point in the display due to the availability of a suckling piglet in February.

The “ponds” are sauces for the chicken.  These represent the rains that are almost always constant at the Gulf Wars site, causing flooding both at the fighting areas and the camping areas.  The broken sea shell at the base of the castle gate represents the defeat of Trimeriss at the hands of the three Ansteorran knights and Dons at the gate.  The shields and weapons of the knights are painted in gold and silver gilding for a little bit of extra flash.

The ever present pine trees are represented by the asparagus bunches so that the forest the fighters fight in or around is represented.

Kitchen:

An Elizabethan kitchen included whole spits from which to turn oxen and pigs in as well as a host of chefs and underling to present a note worthy subtlety for the royal courts pleasure. This varies greatly from a modern kitchen, which is lucky to be able to roast a piglet in…one at a time.  Trying to prepare a feast is a multi-week task for cooking of many animals where on a feast day many animals could be cooked at one time in these huge roasting pits.

Redon insists that the first part of an evolved kitchen is the knife.  The knife is the first line in slice, cutting, and chopping the variety of items necessary to prepare a feast.  Modern knives less likely to go dull with the serrated edges, making the process of cutting and chopping easier then in period where a kitchen knife would need to be sharpened periodically.

Next was the mortar and pestle for grinding up spices, herbs, breads and meats for measured inclusions into a chef’s careful creative dish. (Redon)  Personally I prefere to use a mortal and pestle for small items; however due to the fact there is only me and not a kitchen of help I find a small coffee grinder or a small cuisinart helps with the items that require more then a Tbs.

Then the various pots, pans and molds necessary for the final cooking.  The molds could be of would or metal.  (Craig).  The plates for serving dinner on were of baked bread (trenchers) during Henry VIII and prior. During Elizabeth’s reign her plates were of silver instead of bread trenchers, showing a higher level of dinner ware then previous kings.  I used either metal molds or silicon for easier washing (again see singular kitchen person not a horde of helpers) as well as pots and pans with non stick surface to aid in clean up.

Spices:

Spices included but were not limited to ginger, cinnamon, cloves, grains of paradise, long pepper, aspic, round pepper, cassia buds, saffron, nutmeg, bay leaves, galingale, mace, cumin, sugar, garlic, onions, shallots and scallions (Taillevent, pp, 230).  Spices not only add flavor and color but were also testaments to the wealth of the host adding to the sumptuousness of any given dish.

Color:

Some times the color was more desired then the flavor and the spicing used would over power the dish so much so as to be less sumptuous then a less colorful dish. Vivid colors, Wheaton explains, were highly prized and were often achieved at the expense of flavor (Wheaton, pp. 15/Martins) Taillevent also suggested more common spices for green coloring such as parsley, sorrel and winter wheat still green.  Gold and silver leaf was brushed onto the surfaces of food i.e pastries for a greater visual impact. (Martins)

III.  Making of the Subtlety

The overall idea for the subtlety is a gorgeous piece of edible artwork meant to invoke the awe and hurra of winning Gulf Wars.  As I attempted each section, I realized that there were cooking steps with in the main cooking dishes, which had to be done i.e. rendering lard from pig fat or soaking walnut shell husks for black coloring.  Each item is a separate cooking experiment.

Each edible item had to be researched, redacted via trial and error several times  then set up for the final display with extra items on hand in case some thing “broke” beyond repair.

I first started with small items such as the making of yogurt from milk to make the cheese for the “glue” on the castle walls.  Then to orange peels and candied fruit.  The two type of cookies used were fairly easy to find though the springerle cookie recipes offered many different variations, the one used was the oldest recipe I could find.  The springerle were then redacted with only a slight modification (peach schnapps instead of cherry schnapps).  The short bread is just one of my favorite type of cookies so again after finding a period recipe, redaction was used to find the best flavor with the ingredients in the right proportion.

The orange peels were the redaction for which to try candied fruit on.  The peels are pretty and tasty and very period.  They are also the basis for making of candied fruit which are used to stuff the towers with.

Gulf Wars has many battles, the bridge battle and the town battle as some of the more anticipated portions.  I thought that having an edible representation of this would be a really nice touch. So I went in search of a period dish that could be made into squares that was tasty.  I hit upon period gingerbread.  Unlike modern gingerbread, period gingerbread has a rather thick almost fudge like texture that can be molded into square forms easily.  First though period bread had to be made, Raston.  The raston requires ale yeast and must for the yeast part of the bread for rising.  The bread will form a “foot” when cooking as the bread rises.  The foot and the crust is removed and the soft inner part of the bread is then allowed to dry.  (A foot is the bottom part of the dough ball that the dough rises on when cooking to form the bread.) Once the bread has dried, it is ground up into bread crumbs, mixed with honey and spices then formed into square “hay bales” tied up with a rough twine.

The castle walls I was dreading redacting as the recipes were elusive.  Once I found the recipes I wanted to use as a basis, there was the rendering of lard from pig fat.  Finding pig fat was a rather interesting task that took several grocery stores and more then a few weird looks.  The first set of rendering did not go well as the fat ended up cooking to long and taking on a scorched taste.  The second batch, again with the odd looks for buying just the pig fat at the meat counter, went much better.  I did experiment between using butter and duck fat vs. butter and pig lard.  The lard won hands down for dough durability.  The flavor has a distinctive pork flavor; however the soft farmer’s cheese really goes well with it.

Once I had the lard done and the dough in the right consistency, a template for making walls and then towers had to be worked on.  None of the research I had showed or mentioned how a circular form was built or how battlements were made.  From what I can glean the actual square cut battlements could have been cut out by hand, free form.  I didn’t want to trust my hand battlements to such guess work so I made a paper template from which to cut out the square portions at the top of the dough.  For the actual towers, a sheet of paper was tied with string, then covered with foil, sprayed with oil then the battlement cut dough was wrapped around the form and cooked up right.  In period, my guess for the towers would be that the head cook would have used either a round wooden form or metal tube, well greased.  I did not have access to either so choose to use some thing more available that was potentially as period.  Paper, string and oil were very much available though the foil would not have been, though this could be symbolized as a metal tube.

The choice of what type of meat to use bounced from using whole ducks to piglets, or possibly whole goats as well.  The eventual solution came from what would fit into my oven.  Whole ducks would be ideal but the necks are overly long so that an upright duck would not fit into my oven.  Laying down the duck to roast produced a great roasted duck, but not one that would stand on its own with out serious bone breakage and destroying of the overall form.  Whole goats were also right out due to the stove size issue.  What I did settle for were whole chickens that could be cooked up right with use of metal tubes and very small young piglets.  Upright chickens, I believe were period as seen from the cockatrice descriptions (half chicken front and half fish back) with the use of twine and wire to make the whole subtlety work.  While my chickens do not include heads or feet which were available at certain stores, I went with the more common neckless and footless variety due to the oven size again.

Many period feasts had sauces for the meats.  I thought that using blue ceramic dishes with the period sauces would be great ways to display the sauce while making a reference to the “rain” that is ever present at Gulf Wars.  I debated using rye flour “cups” however I found that the only reference to a rye dough was used for the baking of thick walled “coffins” for meat pies.

Each of the edibles has the food groups of meat, pastry, sweets.  I was missing vegetables, when the idea of representing the pine trees hit.  There was only one vegetable that I could think of that would stand upright well and could be cooked in a tasty manner that wouldn’t turn it to mush.  Asparagus spears fried in butter and wheat flour then tied with coarse twine, makes a great “forest”.

I decided that gold leaf should be included as a bit of a zing to show the richness of the display.  Leafing was mentioned in the menu section as silver leaf and gilt (usually referring to gold leaf) all around.  (www.elizabethan-era.org.uk)  Unfortunately edible gold leaf was a bit pricy, so I used a gold leaf that was just as pretty but contained a little more copper then is considered safe to eat.  The gold leaf is real, just not edible so is not included in the eating section of this display.

The flowers are made from marzipan.  This is a very period almond sweet that is very moldable.  Figures were made out of marzipan such as trees, animals or flowers.  Not having any molds for people with period clothing or animals and not being much of a sculpture I went with a flower mold.  The flowers have been colored with cinnamon and turmeric which is not tasty but give a good color.  I have included a few of the colored flowers with the edibles to show that in period color was some times preferred over taste in a subtlety.  I really liked the idea of the flowers representing those who watch the battles, the flowers of the kingdom lords and ladies who support and put forth great effort for fighters to be clothed, geared, fed and get to any event or war.

The idea for the sweet stuffed eggs was another subtlety I really wanted to try and the idea of gold foiled eggs just made me squee.  This was more of an added cool item then some thing that had to go into the display (like the castle walls).  With the golden eggs being the “prize”, sort of a Jason and the Argonaut’s reference, I decided that mead should also be included in castle, because what goes better with a win then wine?

There are many different aspects to this display.  Each portion has a story to tell in the making of or the cooking of and not just the representing of an idea.  I had an incredible time put every thing together and doing the research for all these ideas.  Nothing was easy and in some cases rather nerve-wracking, liking making sure the walls didn’t crack or crumble in the wrong spot or that the milk turned into actual yogurt and not rotting milk.

I have included all the recipes with the research and redactions. Most will have commentary on what I tried while working through each recipe.  The ingredients are as period as possible with only minor substitutions i.e. walnuts instead of chestnuts for seasonality or availability.

IV.  Recipes

Castle

Castle Pastry Walls

Pastry from the period manuals is with out modern measurements so a bit of guess work is involved.  Making a good pastry is not as easy at it sounds.  The pastry has to be tasty, yet able to hold the interior ingredients if being used as a shell or in this case be able to stand up to being stood up.  Working from 3 books, Pleyn Delit and The English Housewife and The Medieval Kitchen, I redacted a fairly good recipe for pastry castle walls that borrowed this or that from the suggested recipes in each book.

The first recipe is from Pleyn Delite.  Here the original description for castle walls in a subtlety is “Take and make a foyle of gode past with a rollere of a foot brode & lynger by cumpas.  Make iiii coffins of the self past upon the rollere the gretnesse of the smale of thyn arme of vi ynche dep; make the gretust in the myddell.  Fasten the foile in the mouth upwarde, & fasten the otheree foure in every side.  Kerve out keyntlich kyrnels above, in the manere of bateilllyng and drye hem harde in an oven other in the sunne… FC 197”

(Hieatt, 140)

Translation goes “Take and make a dough with a roller a foot wide and long.  Make coffins (lengths?) the width of the small of your arm and an inch deep.  Make the greatest one in the middle.  Fasten the dough on the end upward and fasten the other four on every side.  Curve out the dough in the manner of the batteling and dry them hard in an oven or in the sun…

The original recipe that was offered in Pleyn Delite is more of a how to fashion the castle, only detailing the manner in which to make the castle…the actual dough seems to be up to the cook.  Pleyn Delite does offer a recipe that seems to be from the writers’ point of view not from any actual attached recipe in the book.

The second recipe is from The English Housewife.  The recipe starts as:

Of the mixture of pastes, to speak then of the mixture and kneading of pastes, you shall understand that …your fine white crust must be kneaded with as much butter as water, and the paste made reasonable lithe and gentle, into which you must put three or four eggs or more according to the quantity you blend together, for they will give it sufficient stiffening. (Markham, pp. 96)

The third recipe for dough is from The Medieval Kitchen.  The recipe is not original but a translation.  Cut the fat into the flour.  Dissolve the salt in 1 cup of the water, then add the flour mixture along with the egg.  Work with your fingers until a smooth dough forms, adding more water as required.  Shape into a thick disk, wrap in waxed paper or plastic wrap, and refrigerate for 12 hours or overnight before using.  A larger paite will require you to double the recipe. (Redon, pp. 225)

I did like the base recipe from The English Housewife, but the dough was rather bland with only butter, egg and water to the flour.  After a bit of researching, I found that The Medieval Kitchen used lard with butter which makes for a tastier crust.  There are pros and cons for making a tasty crust as some recipes assumed that the crust would not be eaten and some assumed the crust would be.  I w2anted a crust that would bake well, stand up as walls and deliver a very good taste to accompany the cheese “glue” and the candied fruits.

Ingredients:

3 C. Flour        ¼ C lard           2 egg    1 tsp salt           2 Tbs water

My Redaction:

The recipe I did work ended up being a bit of The English Housewife and part from The Medieval Kitchen. The measurements I used will make one wall and a quarter at ¼ inch thick.  The dough is sturdy, easy to mix and very tasty, all the qualities I am looking for when researching the multitude of recipes suggested.

This makes 1 and 1/5 wall of good flavor and stoutness.

I combined the flour and salt together and formed a well in the center.  The butter and lard was melted together.  The lard used was from rendered pig fat, giving a slight pork flavor to the pastry.  I allowed these to cool to slightly warmer then room temperature then added in the well in the middle of the flour.  I then added an egg and 2 Tbs of water.  Everything is mixed until dough is formed.

On a lightly floured surface, I turn out the dough and roll it to about ¼ inch thick.  Now the original recipe says to 1 inch thick, however I am not making the castle as tall as a foot high so the walls do not need to be quite so thick.

Using a paper pattern I cut out squares in the upper portion of the battlements along walls.  The bastion walls also have battlements cut along the upper portion, however instead of being baked flat these round portions of the castle are wrapped around a greased form and baked upright.

The walls are connected to the bastions with brie cheese.  Any soft cheese will work and compliment the flavor of the slightly salty and slightly pork flavored pastry.

Rendering Fat into Lard

Lard is the rendering of animal fat into a solid(ish) state to be used in cooking or as a base for an herbal rub such as a bruise balm.  Rendering fat into lard isn’t hard, just time consuming.  After reading a blog call www.JoePastry.com and being a huge fan of Little House on the Prairie when young, I decided to render my own lard instead of using Crisco or expensive farmer’s market lard (usually flavored with rosemary).

The first step is to pick the type of fat to be used.  The fat from the back or the sides of an animal are usually considered better then the fat from around the organs.  (This is not including caul fat which has different cooking properties).  The fat from the organs, I am unclear as to why, seems to be more odiferous then the melting fat from either the back or the side.  I have heard that leaf lard is the way to go (as being the fat from the back) or that you should never use leaf lard (being the fat from the organs). So the naming of the fat differs depending on where you live, hence the reference as back, side or organ fat.  The exception to this is the ball of fat found on some sheep referred to as tail fat.  The rendering method is the same, just the location is different.

The type of lard you want is the next step.  Pork, beef, sheep, chicken or even duck can be made into lard or just fat for chicken or duck fat.  Why the fowl get fat instead of lard for theirs I don’t know…it just is.  All have very different tastes.  Each animal imbibes the fat with a flavor.  Some flavors are stronger then other.  Tail fat for instance tastes strongly of mutton while duck tends to have a smoother flavor that is not very strong, more like a hint of duck.

Once the type of fat for rendering has been decided upon, place the fat into a pan and cover with either a lid or foil and cook until the meat parts turn brown.  I cooked the fat in the oven, though a wood burning stove with room for a pan would work as well.  2lbs of fat take about 2.5-3 hours.  Once the meat pieces in the fat start to turn brown take the pan from the oven and allow this to cool a bit.  Ladle into molds.  I used muffin molds which measure ¼ cup per muffin round.  Once the liquid has been put into molds, put the mold pan into the freezer.  This makes the lard easier to remove from the pan by running a butter knife along one edge and levering up.  The small rounds usually pop right up if they are frozen solid. The individual lard cakes can be stored in plastic bags in the freezer for up to 3 months.  The crispy pieces left over, are called crackling and can be used for other dishes.  Save these!

Orengat

Candied Orange Peel

Translation:

Cut the peel of an orange into five pieces and scrape away the skin inside with a knife; then set them to soak in pure fresh water for nine days, and change the water every day.  Then boil them in pure water, but only until they come to a boil, and when this is done spread them on a cloth and let them dry out well.  Then put them in a pot with enough honey to cover them and boil over a slow fire, skimming.  And when you think that the honey is cooked …then take out your orange peels and arrange them in a layer, and sprinkle powder of ginger over, then another layer, and sprinkle, etc., until finished; and leave a month or more before eating.

(Hieatt, pp. 133)

Ingredients:

6 thin skinned oranges

2 cups honey

Powdered ginger

Redaction:

I had to do a few variations.  The first is that I had no Seville oranges, so I used think skinned Texas navels.  The sections were cut into 6 sections instead of 5; however seeing that the navels were fairly large I was pretty sure the extra section could be over looked.  The orange peels of a Seville orange are reputed to be bitter, hence the soaking and draining, besides making the peels more flexible.  So instead of soaking for 9 days, I soaked the peels for 24 hours.

I skipped the step where the skins were to be blanched.  What could have happened if Seville oranges peels were used would be that I would have put the peels into boiling water for about 30 seconds, enough to soften them up even further.  The navel peels were pretty flexible and soft after 24 hours so the thought of making them softer worried me a bit.

Next I put the skins into honey, enough to cover and boiled till the peels were saturated and limp, roughly 15 minutes in the boiling honey bath.  The peels were then placed on parchment paper and sprinkled with ginger.  I placed anywhere from 5-6 peels per parchment sheet.

Dragee and Spices in Confit

Candied Fruit

This recipe has been condensed by the authors as being extremely long and convoluted.  Here is their shortened version.

To clarifie suger, and to mak anneys in counfite, which directs us to make caraway, coriander, fennel and ginger into confit the same way…

1 cup sugar                   ½ cup water                 6 oz anise seeds

Combine sugar and water in a heavy pan for 5 minutes, add seeds and stir until the syrup begins to look white; set aside for 10 minutes.  Then put back over low heat, preferably over a protective mat or heat diffuser, and stir until the sugar coating softens enough to be poured.  Pour onto a cookie sheet or a piece of clean screening over a cake rack. Spread the seeds out with a paring knife separate them as much as possible; as they harden…

(Hieatt, 135)

Ingredients:

1 C sugar         ½ C water        Dried fruit and nuts

Redaction:

I wanted to try this with dried fruits and nuts as seeds are very very tiny and take copious amounts of time.  I choice apricots, plums, and figs as these were all available in period and very tasty.  I also did a round of anise seeds just to see what would happen.

I did the almonds and the figs first.   I added the sugar and water together then boiled.  Once the sugar water started to boil I added the almonds and figs.   The mixture was allowed to boil then cooled.  Once the mixture had complete cooled, I heated up the pot with the items again.  I did this 5 times.  The 5th time I heated up the sugar water mixture most of the water had evaporated turning the sugar into a coating that clung to the fruit and nuts.

These two were my favorite.  The figs taste like Christmas candy while the almonds are just tasty!  The plums and apricots did not do so well.  The plums were cooked to a jam and the sugar coating did not stick to the almonds.  That was an interesting lesson to learn!

The anise seeds I added 2 cups to the 1.5 cups of sugar water.  This was a mistake.  The surface volume of the 2 cups of anise seeds exceeded the sugar water coating ability.  I added another .5 C of sugar and .25 C of water.  It should have been 1 full cup of sugar and .5 cup of water instead.  While the anise seeds did come out sugar coated I believe that they could have been better had more sugar water been available at the start.

Mead

Take one Measure of honey, and dissolve it in four of water, beating it  long up and down with clean Wodden ladels, The next day boil it gently, scumming it all the while til no more scum risth; and if you will clarifie the Liquor with a few beaten whites of Eggs, it will be the clearer.  The rule of it’s being boiled enough is , when it yieldeth no more scum, and beareth an egge, so that the breadth of a groat is out of the water.  The pour it out of the Kettle into wooden vessles, and let it remain there till it be almost cold.  Then tun it into a vessel, where sack hath been. (Renfrow, pp. 33)

Translation:

Take one measure of honey and dissolve it in four of water, stirring it long with a clean wooden ladle. The next day boil the mixture gently; skimming it the entire time until no more scum rises.  If you want to clarify the mixture add a few beaten egg whites so it will be clearer.  The rule being that the honey and water has boiled enough when a raw egg floats above the mixture by one groat length.  Once this has happened pour the honey/water into wooden vessels until almost cold, then pour into a vessel where a sack (of herbs) is ready.  Other way to read “…where sack hath been.” Is where old strong wine has been so that the new honey and water would build on the old wine must (read old yeast).

Ingredients:

Honey              Water               (herb satch/sack optional)

Redaction:

I made a few adjustments to the recipe due to a personal taste and ideas. The first change was that I used 18-20 lb’s of honey to about 3 gallons of water.  Not quite the 1:4 ratio suggested, more like 1:3.  ( I like sweet wines).

The next change was the lack of egg whites used for skimming of the honey.  I believe that the use of egg whites in honey, while boiling was due to a very raw honey in period being used for the start of mead.  When I say raw, I am talking wax and bee parts still stuck into the honey.  These impurities needed to be removed and the quickest way to do so was to boil the honey while skimming which is where egg whites come in and help to trap the impurities making the skimming and cleaning easier.  With today’s honey, there are few if any impurities in commercial grade or even farmer’s market honey, which removes the necessity of adding egg whites.

I noted that most meads/meatheglins are made with herbs and or fruit/rinds.  I wanted a drink that tasted of honey.  Plain and elegant.

The modern methods I employed was a good cleaning with a 1:20 solution of bleach to kill any bacteria including wild bread yeast that may be growing in my kitchen.  I used commercially available yeast, having non on hand from the old country.  I then used English oak chips about 1/3 cup to flavor the honey and water mixture during the first stage of brewing.  The chips were removed after 5 days when the green mead was then racked into a glass carboy.  The steps outside of period were lack of egg whites due to the clarity of the honey used, commercial yeast instead ale or wild house yeast, and as sterilized as possible containers.

Fighters  and Horses

Sauce for Fat Capon:

Translation:

Save the fat of the capon and the liver also, and strain through a sieve with beef broth, and add a little ginger and verjuice, and boil in a frying pan all together, and bind with egg yolks beaten then a generous amount of sugar and the wings and thighs of the capon, and pour your sauce underneath.  (Taillevant, pp. 134)

Ingredients:

1 C chicken fat 1 chicken liver              1 C beef broth

1 tsp ginger                   1 tsp verjuice                1 egg yolk

1 Tbs sugar

Note: Verjuice is a type of sour grape juice in period that requires substituting by using lemon juice or vinegar with a touch of sugar instead.

Redaction:

After assembling all the ingredients, I did a minor cheat.  Instead of straining the liver through a sieve, put the liver through the cuisnart for a very fine paste which is what the sieve would have done.  This was for both time saving and the fact I do not own a sieve.

The chicken fat instead of being from a freshly roasted hen, was saved from a previous dinner’s fat skimming, where as the period cook had to actually use the fat from a freshly cooked hen to whip up this lovely sauce, modern cooks can save the fat for another day.

Next I separated the egg white from the egg yolk and set this to the side.  The fat and beef broth were then combined into pot set on low.  The egg yolk was then added along with the liver, ginger and sugar.  The mixture was then stirred till combined and the fat melted.

Since verjuice turning the heat on medium till the mixture bubbles slightly.  After the sauce has boiled for 2 minutes, turn off the heat and allow the mixture to cool slightly.  Add the egg yolk and sugar.  I did not have verjuice.  This is a rather hard to find item.  What I used in place of verjuice was balsamic vinegar which I like as it is sour with a touch of sweet.

This sauce was allowed to simmer for 5 minutes.  The resulting sauce is a complex, rich and very smooth.  This is well worth the effort!

Capon in Salome:

Take a Capoun & skalde hym, Roste hym, then take pike almaunde, mylke, tmper it with wyne Whyte or Red, take a lytyl Saunderys & a lytyl safroun, & make it a marbyl coloure, & so atte the dressoure throw on hym in ye kychoun, & throw the mylke a-boue, & athat is most seemly, & serve forth. (Renfrow, pp 110)

Translation:

Take a capon and boil him, roast him, then take pike (?) almonds milk, temper it with wine. White or red.  Take a little sandalwood and a little saffron and make it a marble color and so at the dressing throw them in the kitchen and throw the almond milk and that is most seemly, and serve it.

Ingredients:

1 chicken roasted (with saved melted fat roughly  1 cup)

1 C almond milk           1 tsp saffron     a pinch of sandalwood

1/2 C red wine or white wine

Redaction:

For part of this recipe I had to use the fat from the chicken, about 1 cup worth, melted.  To that I added the almond milk with the sandalwood and saffron.  Once the sauce was made, I divided this into two batches and added white wine to one and red wine to the second.  This gives me two sauces instead of one.  The taste prior to the wine is silky and very rich.  Renfrow says to boil the sauce in a pan till reduced though the original recipe does not say to boil.  (Renfrow, pp. 110)  I simmered these until slightly reduced, about 5 minutes.

Now the sandalwood has a strong smell and a stronger taste.  I had to go very very easy on the sandalwood to make sure that I did not have a sandalwood sauce but a mixture of all the flavors.  When I say pinch..I mean a small pinch.

I wanted to have two sauces from this recipe so I added white wine to half the mixture and red wine to the other half.  This gives two sauces instead of one.  As this recipe stands you’ll end up with roughly 3 cups of sauce.  1 and ½ if you divde the base sauce into two.

This is a really nice sauce.  I think the red is my favorite so far!

Stuffed Suckling Pig

Translation:

The piglet, slaughtered and bled at the throat, should be scalded with boiling water, then scraped; then take some lean pork, remove the fat and offal from the piglet, and cook them in water: then take twenty eggs and hard-boil them, and some chestnuts boiled an skinned: then take the yolks of the eggs, the chestnuts, good and plenty of powdered ginger mixed with the meat; and if the meat becomes too hard add some egg yolks.  And do not open your pig at the belly, but through the side, making the smallest hole you can: then put it on a spit, and then fill it with your stuffing and sew it shut with a big needle; it should be eaten with yellow sauce if it is winter or with cameline sauce if it summer.

Note that I have also seen piglets larded, and they are very good.  That is how they prepare them nowadays – and pigeons as well.  (Redon, pg 104)

Ingredients:

9-14 lb piglet                1 lb bacon        4 C walnuts      7 cooked eggs

2 Tbs ginger (ground or fresh)   saffron

Redaction:

When I started this project, I had no idea how hard it was to find piglets.  They are as rare and as hard to find as peacocks!  I actually had to contract a slaughter house for the piglets so the actual slaughter and saving of internal organs was not available.  This precludes the ability to pull the offal out through one small slit in the stomach and then refill with the stuffing through that one small slit.  So with that in mind I have edited this recipe for a more modern consumer of purchased piglets.

I had thought to brine the piglet; however there is no mention that brining is needed.  Very young piglets do not need to be scalded to loosen up bristles though older pigs do, which is what this recipe is describing, a much older piglet that is still shy of full grown weight.  With the smaller piglet purchased for table size and cooking space availability this means that the actual cavity much smaller as well.  I substituted the chestnuts for walnuts as chestnuts are a seasonal item unless bought canned, which given the notoriety of canned items, I went for fresh shelled walnuts instead.  Those were the two main issues that had to be changed for this recipe, other then the need to sew up the piglet from neck to anus.

The bacon, walnuts, cooked eggs, and spices were mixed together in a large bowl.

The piglets were rinsed clean then stuffed with the mixtures and sewn back up.  An apple was stuffed into the mouth for a bit of humor.  Not having a spit available a grill or oven will have to do for the modern day medieval cook.  Once the piglet was done the meat was allowed to rest before serving.

The piglet was very tender and moist, and unfortunately very gamey.  The stuffing was nice, perhaps a bit more ginger needed.  I did feel bad for using so small a pig, one that had not grown to full size but I felt that this recipe would benefit from as close to authentic as possible working with a size of piglet that would fit into my oven.

Battlefield Haybales, Roads, Flowers and Trees

Rastons

Bread

Original:

Take fine floure, and white of eyren, and a litul of the yolkes; And then take warme barm, and put at thes togidre, and bete hem togidre with thi honed so longe till hit be short and thik ynough.  And caste sugur ynowe thereto; and then lete rest a while; and then cast hit in a faire place in an oven, and lete bake ynoug;  And then kut hit with a knife rownde aboue in maner of a crowne, and kepe the crust that thou kuttest, and pile all the crèmes within togidre; and pike hem small with thi knife, and saue the sides and al the cruste hole withoute; And then cast thi clarified butter, and medle the crème and the buttur togidre, And couer hit ayen with the cruste that thou kuttest awey;  and then put hit  in the oven ayen a litull tyme, and take it oute, and serue hit for the all hote.

(Renfrow, p. 205)

Translation:

Take fine flour and white of eggs and a little of the yolks; and then tame warm barm and put at these together and beat them together with the honed so long till it be short and thick enough.  Cast sugar now and then let it rest awhile.  Then cast it in a fire place in an oven and let bake enough.  Then cut it with a knife around within together. And pick them small with the knife and save the sides and all the crust hole with out.  And then cast the clarified butter, and melt the crumbs and the butter together, and cover it again with the crust that has been cut.  Then put it in the oven again a little time, and take it out and serve it forth all hot.

Ingredients:

1 Tbs. sugar                             2 eggs                          ½ C warm ale or beer

½ cup barm                              3 ½ cups flour

Redaction:

I gathered all the supplies together including beer, which was left out for several hours to reach room temperature and to go flat.  Barm is the left over yeast sediment from a brewing batch of either beer or wine.  I did not have a batch of ale going at this time so had to do a small cheat.  I used a packet of wine yeast with a Tbs of sugar and ½ C of the flat(ish) beer.

After the barm was mixed, I made a well into the flour and added the eggs and barm mix with ½ C of the remaining beer.  Everything was then stirred till mixed.  Once everything was combined and formed a soft dough ball, I placed the dough on a well floured board and kneaded for 5 minutes, adding flour to the board as needed.  Next I put the well kneaded dough ball back into the bowl that was floured on the bottom (to prevent sticking) and covered with a cloth.

The dough was then allowed to rise for an hour before turning placing onto a backing sheet and placed into an oven till done.

Gingerbread Hay Bales:

Gingerbread

Translation:

First Recipe:

Take a quart of honey & seethe it, skim it clean; take saffron, powdered pepper, throw thereon; take grated bread, make it so stiff that it will be cut; then take powdered cinnamon, & strew thereon enough; then make it square, like as thou would cut it; take when thou cut it, and caste box leaves above, stuck thereon, and cloves.  And if thou will have it red color it with sandalwood enough. (Renfrow, pp. 230)

Second Recipe:

Take a quart of honey clarified, and seethe it till it be brown, and if it be thick put to it a sih of water: then take fine crumbs of white bread grated, and put to it, and stir it well, and when it is almost cold, put to it the powder of ginger, cloves, cinnamon, and a little liquorice and aniseeds; then knead it, and put it into moulds and print it: some use to put to it also a little pepper, but that is according unto taste and pleasure. (Markham, pp. 120)

Ingredients:

1 C honey        2 C breadcrumbs (white bread preferred)

1/8 tsp ground black pepper, ginger, cinnamon, cloves

Whole cloves and cinnamon powder for display

Redaction:

I actually played around with the flavor a little bit and added a few more spices.  1/8 tsp cinnamon, cardamom, ginger and nutmeg. (I’m a spicy type of cook you know!)

If you will notice the bread crumbs are from a whole wheat bread I had.  In period if this dish were to be served to nobility or royalty the probability that the bread was made from good white flour with out a lot of whole wheat is much higher then a whole wheat or grain based bread.  I would suggest a good bread made from white flour, water, either ale or water , and the yeast can actually be the must from the bottom of the ale barrel or ale yeast if you wanted a more purist type of bread.

Place the honey in a pot and boil.  Skim the foam as it appears, add the pepper and the saffron and stir in the bread crumbs.  After the bread crumbs were added…in went the spices. Continue stirring until the mixture starts to stiffen up. Place in a mold lined with wax paper.

Here I used parchment paper.  As long as there is a lining that can be used to pull the fudge like dessert from the mold, you’re probably going to be safe using either wax paper or parchment paper.  A period mold would have been made of wood; however that takes wood and time, not some thing a lot of modern day people have access to or ability to carve well.  So I went with a metal mold picked up at a kitchen shop just for the purpose of molding dough.

This is the gingerbread mix firmly compacted down into the mold.  2 cups of bread crumbs does not make a lot of gingerbread.  So if a lot of gingerbread is desired you need to up the bread crumbs, spices and honey by a lot!

When the mixture has completely cooled remove from the mold, dust with cinnamon and stud with cloves.

Since I had already used cinnamon and cloves for taste, I sprinkled sugar over the resulting hay bales.  These are about 3 inches long and 1 inch high.  Small thick and very spicy!

Scotch Petticoat Tails

Petits Gateaux Tailes

Translation:

Circa 1568:Rub six ounces butter into one pound of flour, then mix in six ounces of powdered sugar and a teaspoonful of baking powder.  Add a little water, and work into a smooth dough with the hands.  Divide into two portions.  Roll into round cakes about the size of a dinner plate.  Cut a round cake from the center of each with a cutter four inches in diameter, then divide the outside of each into eight.  Prick all over each with a fork. Dust with the finest of sugar, and bake on buttered tins in a moderate oven for about twenty minutes, till crisp and golden.  Dust with castor sugar.

(Craig, pp. 112-113)

Ingredients:

6 oz. butter       1lb of flour        6 oz powdered sugar    1 tsp. baking powder

1 oz sugar for dusting

Redaction:

When combining the ingredients, I stirred the flour, sugar and baking powder together to achieve a well mixed consistency in the dry ingredients.  I used chilled butter, cut into squares, and worked into the dry mixture till everything reached a cornmeal stage then continued working till the butter was fully incorporated.

When the mixture could be saturated with no more butter I added just a touch of water to allow a dough to form and cooked for 20 minutes.

Now you may wonder about the fork marks (actually a tooth pick was used).  I have done a little reading on the subject and the over all consensuses is that it was a) traditional and b) used to let the steam from the melting butter out with out creating craters in the dough.

There is also suppose to be a circle taken out of the center but I did not have a circle cutter to fit and I like the whole pie cookie idea.  So I left the center whole.

For the shields, I cut the short bread into rectangles and triangles, to represent the Trimarian defeat at the hands of Ansteorrans, pressed the dough into a shell form and baked.  Once the cookies were baked, they were broken in half to signify defeat.

Springerle Cookies

This recipe is from Godecookery on line:

The Springerle cookie originated in Swabia & Switzerland by the 14th century; we use our own, original recipe, based directly on the Baseler Springerle receipt, one of the oldest Springerle recipes known to exist today:

Take 1 pound flour and pass it through a fine sieve and place it overnight in the oven hole (to keep it warm). Take a pound of dry sugar and 4 eggs, but big ones, 2 spoons cleaned anise (if you want good ones then roast the anise first). Then 2 tablespoons aged Baseler cherry schnapps (helps to get rid of the egg taste and helps the dough rise). Let the oldest boy mix the sugar eggs and anise. Then the second oldest, then the third, altogether at least 1/2 hour. Then add the schnapps, mix the flour, and knead the dough until it stays together. Roll the dough out, but not too thin, and carefully press, but with enough pressure the mold into it. Afterwards store on flour dusted board for 24 hours, in a warm place. Then bake with low heat. To get them nice and white, before baking, dust some flour on them and then blow it away. If you don’t get feet (a bottom layer) in your springerle, then the boys or the house girl will scold you: “It was badly stirred, or there was a draught in the room.” Springerle without feet are a nuisance.

Source: http://www.springerle.com/springerleE/REZEPT/rez03.html <Feb. 7, 2004>

http://www.godecookery.com/cookies/ingred.html

Ingredients:

4 C. Flour        2 C. Sugar        2 tsp ground anise         2 Tbs schnapps

4 Eggs

Redaction:

I combined the flour and sugar first, and then added in the ground anise, mixing well.  Next I made a well in the center of the dry ingredients and added the eggs and the schnapps.  Now the original recipe calls for cherry schnapps as it hides the egg flavor and helps the rising process.  I had peach schnapps on hand so used that.  I justify the change as the flavor does not matter so much as long as it goes with the anise and covers up the extreme eggyness of the batter.

When mixing the dough together, I found that the dough crumbles a lot for the first few minutes.  Keeping kneading.  The dough does eventually incorporate everything though there will be a moment or 4 when there will be a temptation to add in another egg or a touch of milk.  Do not do this!  Keep on kneading.  Everything will blend well turning into this rich, slightly sticky yummy dough.

When the dough ball stage has been reached, turn out on to a well floured surface and roll to about ¼ (or slightly thicker).  Sprinkle the surface with flour and make sure that under the dough is well floured too.  At this point you can either flour your cookie molds or lightly grease them.  I lightly floured the dough and lightly greased my molds as there will be some serious presage onto the dough going on.  Press the mold into the dough, so that the carvings will show through.  Do not be scared to LEAN into it.  Peal the mold off carefully then using a sharp knife cut out the pressed dough from the main batch of dough.  Place either on a parchment lined cookie sheet or a floured surface to dry.

Once all the cookies have been pressed, cut and set onto a surface, allow to dry for 12-24 hours depending on the humidity then bake the cookies at 325 degrees until dry but not golden.  Keep a close eye on the cookies.  Once cooked, they come out very rich and almost cake like.  Yummy!

Esparechs

(Fried Asparagus)

Translation:

If you wish to eat asparagus, take them, and clean them, and parboil them.  And when they are parboiled, flour them with wheat flour; and then put them in the paella, and fry them until they are cooked.  And they go on platters.  And whoever  whishes, put vinegar on it.  (McDonald, pp. 19)

Ingredients:

Asparagus

1 C. wheat flour            2 Tbs salted butter        ¼ C. red wine (or balsamic) vinegar

*McDonald suggest olive oil instead of butter and red wine vinegar – I liked butter and balsamic vinegar better, so cooked the asparagus accordingly.

Redaction:

The ingredients for this are pretty straight forward.  Wheat flour, asparagus, and butter.

I took a large handful of asparagus and cut off the last 2-3 inches so that only the tender top 5 inches were left.  The ends are cut off as they are usually tasteless and woody.  Not some thing even the best butter can remedy, so just remove them until you get to the green tasty parts!

I then placed the spears into water and let these be parboiled for 1 minute.  After that the spears were drained.  Parboiling does a quick cook with out destroying.  Note: do not over boil!  Just a quick hot boiling bath for 1-2 minutes. to soften up the asparagus cell fibers and you are good to go for the frying!  (well after draining off the water that is).

The wheat flour was spread out onto a small plate, where the individual spears were rolled.  After the spears were rolled in the wheat flour, 1 Tbs of butter was melted into a pan and half the asparagus was fried until golden brown on all sides.

*hint: if you want to use 2 Tbs of butter per batch, don’t hesitate.  There can almost never be to much butter where asparagus is concerned!

Then the cooked spears were removed onto a clean plate. The last Tbs of butter was melted and the remaining asparagus was fried. Once all the asparagus was cooked a bowl with balsamic vinegar was placed to the side for easy dipping.  These are excellent either plain or with vinegar!

Ymages in Sugar

Marzipan

And if ye will make any ymages or any other thing in suger that is casten in moldys, seethe them in the same maner that the plate is, and poure it into the moldes in the same manere that the plate is poured, but loeth youre mold be anoyntyd before with a litell oyle of almaundes.

(Heiatt, pp. 142)

Translation:

And if you will make any images of any other thing in sugar that is cat in molds make them in the same maner that the plate is, and pour it into the molds in the same manner that the plate is poured, but let your mold be anointed before with a little almond oil.

Ingredients:

1 C ground almonds     2 C powdered sugar     1 egg white

1 tsp vanilla                  pinch of salt.

Redaction:

I originally did this exactly as a poorly read Sugar Plate Ymages recipe from Heiatt and came out with the same type of candy that required boiling to produce a firm hard candy.  What I inadvertently did make was a Medieval Middle Eastern dessert called Samak wa-Aqras.

Marzipan is an almond thick paste that can be formed into flowers, trees, birds etc.  In period the marzipan would be colored with saffron, cinnamon etc to produce colors that would some times over ride the flavor of the candy.

I had to go to a different source (http://www.joepastry.com/category/pastry-components/marzipan/) for a good recipe for marzipan.  Once I had different ingredients, the marzipan actually came out much better.  I produced an almond paste and not an almond mix that needed to be boiled to form a candy.

I will note that my ground almonds could have been ground more finely and my powdered sugar was bought instead of taking regular table sugar and grinding finer in a mortar and pestle.

I mixed the almonds meal and the powdered sugar (1 ¼ C) together then added the egg white and vanilla along with a hint of salt.  Everything was combined until a thick but wet paste was formed.  I kneaded the mixture with more powdered sugar until a nice but not to dry dough was formed.  This required roughly another cup of powdered sugar.

For the forming of the roses, I used a silicone mold as opposed to a wooden or metal set of molds.  My molds were dusted with sugar instead of almond oil as I felt my dough was still a little to moist to use oil on.

I did three different types of roses.  One set of roses was just out of the plain dough with out any coloring.  The next two sets of roses were made using common spices.  I used cinnamon and saffron for a reddish brown coloring and turmeric for a yellow.

I was worried that after the roses were formed, the dough would loose the formed shape.  I found that leaving the roses out for a few minutes, stiffened the dough up nicely so that when the roses were put into air tight containers that the forms were not lost.

V. Conclusion

This project has taken an incredible amount of time and effort.  The idea is very fluid with broad historic guidelines as well as the ability to pick and choose which recipes that a person could choose from.  Each recipe requires researching on how to make i.e. the pastry walls required research on the various forms of pastry as well as the ingredients.  There were multiple trial and error efforts to arrive at a suitably pastry that could hold up to the standing stress and still be edible.  Several types of poultry were tested for standability yet the conclusion was that a modern stove is too small for ducks with heads and feet so headless and feetless chicken, which can be stood up in the oven with help (which per the research is very period) is a feasible option.

There were several dilemmas, via trial and error were over come, such as the finding of pork fat to render into lard, a period springerle cookie recipe, and the finding of small enough piglets that could be found locally.  There were many stumbling blocks.  Each step or new discovery added to the depth of the overall project.

The hardest section for me was actually deciding on what type of display for a subtlety I wanted to try.  I had thought to duplicate a listed period subtlety; however the diversity of the hardware decided me against making the non edible portions.  I wanted a totally edible display (or at least 95%).  I also wanted a display that was relevant to those in the SCA, hence the Gulf Wars theme.  I think the theme plays well with the historic use of subtleties of making a statement.  The display is 95% edible and still very eye catching as well as being relevant in the statement attempted.

References:

http://www.reference.com/browse/subtlety

http://www.elizabethan-era.org.uk/elizabethan-banquet-feast.htm

http://www.godecookery.com/cookies/ingred.html

Craig, E., (1953). English Royal Cookbook, Favorite Court Recipes. Hippocreen books.

Hieatt, C., hosington, B, Butler, S. (1979). Pleyn Delit: medieval Cookery for Modern Cooks. University of Toronto Press.

Markham, G., (1986). The English Housewife. McGill-Queens University Press.

Martins, P. (1998). Subtleties, Power and Consumption: A Study of French and English cuisine from 1300-1500). Nyu.edu

McDonald, W., (2004). Recipes from Banquet dels Quatre Barres.

Redon, O., (1998). The Medieval Kitchen, Recipes from France and Italy. University of Chicago Press.

Renfrow, C., (1996). A Sip Through Time. Pg.113

Renfrow, C., (1998). Take a Thousand Eggs, A collection of 15th century recipes. 2nd edition.

Toussaint-Samat, M., (1992). History of Food. Barnes & Nobles.

The Viandier of Taillevent , ed. Terence Scully,(University of Ottawa Press, 1988).  As present by http://www.reference.com/browse/subtlety and by Patrick Martins, nyu

The Vianderi of Taillevent., (1998) presented in “A Collection of medieval and Renaissance Cookbooks).

Castle Pastry Walls

Pastry from the period manuals is with out modern measurements so a bit of guess work is involved.  Making a good pastry is not as easy at it sounds.  The pastry has to be tasty, yet able to hold the interior ingredients if being used as a shell or in this case be able to stand up to being stood up.  Working from 3 books, Pleyn Delit and The English Housewife and The Medieval Kitchen, I redacted a fairly good recipe for pastry castle walls that borrowed this or that from the suggested recipes in each book.

The first recipe is from Pleyn Delite.  Here the original description for castle walls in a subtlety is “Take and make a foyle of gode past with a rollere of a foot brode & lynger by cumpas.  Make iiii coffins of the self past upon the rollere the gretnesse of the smale of thyn arme of vi ynche dep; make the gretust in the myddell.  Fasten the foile in the mouth upwarde, & fasten the otheree foure in every side.  Kerve out keyntlich kyrnels above, in the manere of bateilllyng and drye hem harde in an oven other in the sunne… FC 197”

Hieatte , 140. (Hieatt, 140)

Translation goes “Take and make a dough with a roller a foot wide and long.  Make coffins (lengths?) the width of the small of your arm and an inch deep.  Make the greatest one in the middle.  Fasten the dough on the end upward and fasten the other four on every side.  Curve out the dough in the manner of the batteling and dry them hard in an oven or in the sun…

The original recipe that was offered in Pleyn Delite is more of a how to fashion the castle, only detailing the manner in which to make the castle…the actual dough seems to be up to the cook.  Pleyn Delite does offer a recipe that seems to be from the writers’ point of view not from any actual attached recipe in the book.

The second recipe is from The English Housewife.  The recipe starts as:

Of the mixture of pastes, to speak then of the mixture and kneading of pastes, you shall understand that …your fine white crust must be kneaded with as much butter as water, and the paste made reasonable lithe and gentle, into which you must put three or four eggs or more according to the quantity you blend together, for they will give it sufficient stiffening. (Markham, pp. 96)

The third recipe for dough is from The Medieval Kitchen.  The recipe is not original but a translation.  Cut the fat into the flour.  Dissolve the salt in 1 cup of the water, then add the flour mixture along with the egg.  Work with your fingers until a smooth dough forms, adding more water as required.  Shape into a thick disk, wrap in waxed paper or plastic wrap, and refrigerate for 12 hours or overnight before using.  A larger paite will require you to double the recipe. (Redon, pp. 225)

I did not agree with the cheese suggestion by the Pleyn Delite as I have yet to find a period recipe where cheese was added to a crust that may or may not be eaten.  I did like the base recipe from The English Housewife, but the dough was rather bland with only butter, egg and water to the flour.  After a bit of researching, I found that The Medieval Kitchen used lard with butter which makes for a tastier crust.  There are pros and cons for making a tasty crust as some recipes assumed that the crust would not be eaten and some assumed the crust would be.  I wanted a crust that would bake well, stand up as walls and deliver a very good taste to accompany the cheese “glue” and the candied fruits.

Ingredients:

2 C. Flour        ¼ C lard           3 Tbs butter

1 egg    1 pinch salt       2 Tbs water

My Redaction:

The recipe I did work ended up being a bit of The English Housewife and part from The Medieval Kitchen. The measurements I used will make one wall and a quarter at ¼ inch thick.  The dough is sturdy, easy to mix and very tasty, all the qualities I am looking for when researching the multitude of recipes suggested.

This makes 1 and 1/5 wall of good flavor and stoutness.

I did have to do a little experimenting first.  I tried butter and lard for one batch of pastry

and a combination of butter and duck fat for another pastry combination.

My conclusion by the end of forming the pastry balls, was that while the duck/butter combination was actually better tasting, this dough formation could not hold a form with out flaking and breaking apart as I rolled out the dough.  The butter and lard combination was the combination I went with for the walls.

I combined the flour and salt together and formed a well in the center.

The butter and lard was melted together.  The lard used was from rendered pig fat, giving a slight pork flavor to the pastry.  I allowed these to cool to slightly warmer then room temperature then added in the well in the middle of the flour.

I then added an egg and 2 Tbs of water.  Everything is mixed until dough is formed.

On a lightly floured surface, I turn out the dough and roll it to about ¼ inch thick.

Now the original recipe says to 1 inch thick, however I am not making the castle as tall as a foot high so the walls do not need to be quite so thick.  The dough is cut into a large rectangle where a paper castle wall cut out is used to form the battlements.

Using a paper pattern I cut out squares in the upper portion of the battlements along walls.

This is the start of the wall cut out form.

At this point the form was placed on the rectangular shaped dough.

Now for the cutting!

The bastion walls also have battlements cut along the upper portion, however instead of being baked flat these round portions of the castle are wrapped around a greased form and baked upright after the battlements have been cut into the wall.

For this I used a piece of paper, string and foil.

Now for the foil.

And to make sure that the form can stand on it’s own.

The pastry is baked for about 15 minutes at 325, until dry but not brown.

The walls are connected to the bastions with brie cheese.

The inside of a corner.

This is where more cheese would be added to attached the cylinder of dough.

Any soft cheese will work and compliment the flavor of the slightly salty and slightly pork flavored pastry.

Sorry folks the full castle picture will be posted at a later date!  Enjoy these steps for more subtlety information will be incoming!

I don’t do Elizabethan much.  There are many many books and commentary on a great many varieties of recipes from this period.  Stuffed Boar’s Head is a bit different.  The recipes in both the redaction books and websites give pictures of finished/cooked pig’s heads and a brief over view of how the recipe was redacted.  This is a full blown, step by step (mostly) from raw pig to Stuffed Boars Head presentation ready for the High Table.

Candlemas pig

Christmas Royal Fare

Boar’s Head

“The Boar’s Head in hand bring I

With garlands gay and rosemary,

I pray you all sing merrily.”

So sang the procession when presenting the Christmas Boar’s Head to the King (or Queen) of England.  Boar’s Head.   A boar’s head was skinned then re-stuffed with meats, spices and fruits and cooked till golden.  This dish was the crown jewel of the King and his baron’s feast held during Christmas with large amounts masques and pageantry.  (Craig, pp. 154)     However this tradition of Boar’s Head has fallen out of favor since James the 1st that was rumored to have started the tradition of turkey instead of boar for the high table.

I have several recipes for Boar’s head.  Each one has a slight variation.

The first recipe is:

The boar’s head, always called “the noblest dish on board,” is as good as it sounds. Here is the way my family’s old chef dressed, cooked and garnished it:

Bone the head, leaving only the jawbones (for shape) and tusks. Make a small quantity of stuffing composed of minced pig’s liver, chopped apples, a little onion, sage and rosemary. Arrange this stuffing all around the inside of the head about half an inch in thickness. Now stuff the rest of the inside of the head with a second stuffing made of sausage meat, squares of ox tongue, chopped truffles, chopped apples, chopped mushrooms, chopped pistachio nuts and minced rosemary. Add one wineglass of Calvados (or sherry) and an equal quantity of cream.

When the head is filled tight with this, stitch a very strong cloth over the stuffing, then bind the whole head in another strong cloth, and put it in a large pot of boiling water to boil slowly for about eight to nine hours, during which time you add more boiling water as evaporation requires. When the head is cooked and is still warm reshape in cloth, remove the wrapping and let it get cold.

The ears, which have been cut off and boiled separately, are then replaced on the head with a skewer.  Place the head on an oblong dish, surround it with slices of truffles, slices of apples, and strew with rosemary.

–from The Viscomte in the Kitchen by Vicomte de Mauduit with introductions by Francis, Countess of Warwick and Elizabeth Craig, M.C.A., M.I.H., published in 1934 by Covici-Friede Publishers, New York. (Castlearcana)

The second recipe is:

From: The Cookbook of Sabina Welserin; 1553; version by David Friedman

How to cook a wild boar’s head, also how to prepare a sauce for it.

A wild boar’s head should be boiled well in water and, when it is done, laid on a grate and basted with wine, then it will be thought to have been cooked in wine. Afterward make a black or yellow sauce with it. First, when you would make a black sauce, you should heat up a little fat and brown a small spoonful of wheat flour in the fat and after that put good wine into it and good cherry syrup, so that it becomes black, and sugar, ginger, pepper, cloves and cinnamon, grapes, raisins and finely chopped almonds. And taste it, however it seems good to you, make it so.

If you would make a yellow sauce.

Then make it in the same way as the black sauce, only take saffron instead of the syrup and put no cloves therein, so you will also have a good sauce. (Theoldfoodie)

A third recipe:

Boar’s Head
“Christmas, then as now, had a variety of dishes associated with it. The first was the boar’s head, which formed the centerpiece of the Christmas Day meal. It was garnished with rosemary and bay and evidently was presented to the diners with some style, as told by the many boar’s head carols which still exist…Thomas Tusser in Five Hundred Points of Good Husbandry suggests a number of dishes, that, lower down society, the housewife should provide for her guests at Christmas. He mentions mutton, pork, veal souse (pickled pig’s feet and ears), brawn, cheese and apples, although none of these items was connected especially with Christmas; they were all associated with feasting generally. He also talks of serving turkey, but only as a part of a list of other luxurious items that the housewife should provide. It does not seem to be the centrepiece in the way that the boar’s head was in grander circles.”
Food and Feast in Tudor England, Alison Sim [Sutton Publishing:Phoenix Mill] 1997 (p. 113-115)

“Another British specialty was brawn made of the head and foreparts of a boar or pig. Richer and fattier than the hams, it was regarded as a delicacy for the medieval feast, and by Tudor times it have become fare for the twelve days of Christmas. In the thirteenth century it appeared in the last course of the meats, along with the game birds and spicery. It was also sometimes incorporated with vinegar, pepper, and other spices in a rich pottage called ‘brawn en perverde’; or was sliced and served in a thick spiced syrup of wine with honey or sugar…By the end of the fourteenth century ‘brawn en peverade’ or cimple brawn with mustard had become first-course dishes…The details of brawn preparation were first made public in Elizabeth’s reign by William Harrison. He decribed brawn as ‘a great piece of service at the table from November untl Frebruary be ended, but chiefly in the Christmas time…It is made commonly of the forepart of a tame boar….”
Food and Drink in Britain From the Stone Age to the 19th Century, C. Anne Wilson [Academy Chicago:Chicago] 1991 (p. 88-89)  (Foodtimeline)

A fourth recipe:

To make a re-dressed boar’s head – from And Thus You Have a Lordly Dish:

Take a head, large or small. Boil it in water and wine, and when it is boiled make sure that the bones all stay together next to one another. And remove all the meat from the bones of the head. Strip the skin carefully, the white part from the meat and chop the other meat from the boar’s head very small. Put it in a pan. Spice it well with pepper, ginger, and a little cloves, nutmeg, saffron, and let it get very hot over the fire in the broth in which the head was boiled. Next take the boiled head and lay it in a white cloth and lay the skin under it on the cloth. Then spread the chopped meat all around on the head and cover it with the flayed skin. And if you have too little meat from one head, then take it from two and cover the head entirely as if it were whole. Next, pull the snout and the ears out through the cloth. Also, pull the teeth together again with the cloth, so the head is held together while it is still warm, and let it lie overnight. In the morning cut the cloth from around the head. In that way it will stay whole. Then serve it with a cold farce made with apples, almonds, raisins. Thus you have a lordly dish.

Hansen, Marianne. “And Thus You Have a Lordly Dish: Fancy and Showpiece Cookery in an Augsberg Patrician Kitchen.” Medieval Food and Drink, Acta, vol. xxi. Binghamton University: State University of New York Press, 1995. (godecookery)

A fifth recipe:

“…Procure a pig’s head, specially cut with a large piece of the neck attached.  Singe the head well.  Wipe it very carefully with a cloth, then scrape all over with a knife with out scratching the skin.  …open it with a knife from the point of the under-jaw to the cut part of the neck, then strip off the flesh clean from its bones, with out piercing the skin.  Remove bones of the neck in the same way, and cut flesh into long strips, two inches thick and two inches broad.  Now place head and strips of flesh in a huge crock and rube will with a half a pound of moist brown sugar, a quarter pound of saltpeter, half an ounce of dried juniper berries, one teaspoonful of cloves, two cloves of garlic, five pounds of course kitchen salt.  Then add to pickle four bay leaves, four laurel leaves, a handful of thyme, a small pinch of sage, basil, marjoram and lavender, and six blades of mace.  Turn head in this pickle every day for a week, keeping it in a cool place meanwhile.  When about to dress head, remove from brine, wash it well with cold water, wipe it dry with a clean cloth, then pare of all uneven parts, and line head with the following forcemeat:  One and a half pounds of feel and half a pound each of fat bacon and sausage meat, all chopped into mince, and mixed with a teaspoonful each of salt and black pepper, two tablespoonfuls of parsley, finely chopped, a pinch of ground mace and a handful of peeled, chopped mushrooms…” (Craig, pp. 154-155)

This tells me that each time a Boar’s Head was cooked that the head cook or chef might decide to try some thing new each time and that there was no one way to do a stuffed Boar’s Head.

The elements in common:

Each recipe has several elements in common.  The first is that a boar’s head or a pig’s head is used as the main ingredient and show piece.  At some point boar became a rarity so pig’s heads were substituted.  This works out well for the modern day re-creationist, as pigs heads are more easily found then boars, but only just.  My personal experience has been that modern and upscale markets do not have heads on hand however markets that have marrow or tripe will probably have a head or two tucked away in the back for the medieval shopper.

Another element is that out of the four recipes, two mention the actual cooking technique of boiling the head to loosen the skin from the bones.  One says water to boil while the other says wine and water.   I can only theorize that the water and wine combination is either for taste or to mask the smell of boiling pig’s heads, possibly a combination of both.

Another element is the facial structure of the pig.  One recipe says to leave the jaw bones attached to the skin.  A second recipe states that the skin should be carefully detached from all bones.

The next element is on how to cook the boar’s head.  Two of the four recipes say to use a cloth for covering the face while cooking for shape retention.  Another recipe says to baste on a grate so that the head looks to have been cooked in wine.

The stuffing of the head seems to be up for debate.  Each recipe has the common element of using the pork pulled from the head.  Other meats used are tongue, liver, sausage, more pork as well as apples, pistachios, almonds and raisins.  The spices used in the various recipes call for sage, saffron, ginger, pepper, salt, cloves, nutmeg, sugar and rosemary.  From the various recipes the head could be either sweet or savory depending on the taste of the cook or the request of the king.

There are a couple side sauces mentioned in one recipe, either black or yellow sauce, possibly both were served on the side.  The other three recipes do not mention a sauce per say other then sliced and served with apples, raisins and walnuts.  One article mentioned that mustard was served on the side as well.

Several of the recipes are out of date by a hundred or so years.  Several recipes are in period.  The range of dates may vary, as do the recipes, but they all have the most basic of elements in common.  A boar’s head (or pig’s) is dressed for the Christmas celebration as this is a most noble of dishes.

Ingredients:

1 pig’s head (skin and meat)

1 beef tongue

2 apples

1 cup walnuts

1 cup almonds

1 cup raisins

1 tsp ea of ground ginger, clove, nutmeg, pepper, mace

1 pinch saffron.

½  gallon mead/wine

Brine:

2 cups vinegar

2 cups water

½ cup brown sugar

½ cup salt

2 cloves garlic

1 tsp mace, cloves, ginger

My redaction:

Prepping:

Starting with the first element, the pig’s head is thoroughly washed on the outside with soap and water, well rinsed then cleaned of all viscera on the interior part of the skull.

wilbur

If you look closely at the picture above you can see that the skin around the eyes has been removed.  If possible pick a head that has minimal skin removal from around the eyes or cuts under the chin.

The pig’s head was not sold in tact the one grocery store. I believe the back of the head was removed to extract the brains for sale.  (In some parts of the country eggs and brains are considered a delicacy so there for a sell able commodity.)  This leaves me with the frontal facial bones with meat and skin as well as ears of a pig.

After the viscera has been cleaned, the head is placed in a large pot with water and wine.  Several  recipes suggest that the head boil for 1-2 hours or until soft and loosened from the meat of the face.  I had to add lib this part as I had no pots big enough to accommodate even ½ a pig head with snout.  I had to remove the facial skin (including upper nasal bone).  This is a picture showing the removal of the facial skin starting from the outer edges of the head bones.

peeling side of skin

As for boiling the facial skin, the first time I did this I realized that this was a mistake.  Don’t boil the skin.

Separate the skin from the head with a good serrated knife.

freshly peeled

The boiling of the head is to cook the meat from the bones.  When the facial skin is cooked, the skin and underlying tissue (fat and meat) is rendered butter soft.  What this means is that the skin will not take any stitching required to repair the rents left from the butcher.

stiching

A close up of the skin being stitched.  This is using a regular needle and quilting thread.  I broke two regular needles, because the skin is extremely tough, so  suggest the use of a heavy duty embroider needle instead.  Linen thread was probably the most used in period; however quilting thread will do in a pinch.

My second attempt, the facial skin was brined as suggested in the English Royal Cookbook, instead of cooked.  Now this brining only happened for 36 hours.  It is recommended that the skin rest in a brine for 4-5 days.  The 36 hours brining worked really well for me.   I will leave this to the cook’s discretion on how much time to leave a face in brine for.

face in brine

This softens the skin (only a little), more importantly though the brine imparts a nice  flavor to the skin, which is then imparted to the inner layers when cooked.

The head bones were boiled in wine and water for 2 hours then allowed to cool for another 3 hours rendering the meat extremely tender and flavorful.

Once the meat on the head bones had been thoroughly cooked, the meat was cleaned and placed in a separate bowl.  A beef tongue was also cooked during this time as both Castlearcana and Craig’s recipes call for tongue, though Castlearcana’s recipe states ox tongue so a small compromise had to be done.

cooked whole tongue

The beef tongue is boiled for 2 hours then the outer skin is peeled and the attaching tongue ligaments are removed.   The tongue is cut into small cubes and put with the pork meat.

diced tongue

The pieces should be about the size of a woman’s pinky tip.   The pieces of meat from the head, should be cut small as well.  the reason for the small diced pieces of meat is that a person taking a bit should get a variety of flavors, not just pork or tongue or fruit.

Walnuts, almonds and apples are chopped into small pieces then combined with raisins and spices as well as almonds and walnuts.  (Apricots and plums can be added to the mix as well)  The fruits and nuts are placed together in a separate bowl from the meat.

I chose to do the sweet as opposed to the savory.  The savory recipes listed sausages and sage as ingredients, both of which are on hand, however I prefer the sweet for pork.  What the variety in recipes tells me, between the sweet and the savory, that the cook was either instructed or decided upon himself which type of stuffed boars head he was going to present.

Cooking:

The fruit, nuts and spices are all combined into one large bowl, the meat from the head and tongue being held in another dish.  The brined face of the pig was rinsed thoroughly before using.

sewn skin

For cooking the pig head, either a large flat cooking pan (cookie sheet) or a large round baking dish can be used.  What ever choice is made, remember that the dish, once cooked can not be easily moved to a different serving medium.  I choose to use a large round baking dish.  This was lined with foil to reduce scorching to the dish.  In period, the head would have been cooked either by boiling after being trussed up in muslin, or on cooked on a flat tile/sheet depending on which recipe is used as a reference.

I layered the meat then the fruit/nut mixture about half way in the backing dish.  Once the layers were mounded into the center of the dish, I then carefully arranged the skin over the mound tucking the neck flap down the sides then stuffing meat and fruit into the lower jaw skin, eyes, and cheeks so that the face was completely filled.

The ears were covered in foil to keep from burning.

head w ear covers to be baked

In period, a couple of recipes note that the ears were covered in linen “bandages” then removed towards the end when baked.

A pear was placed in the mouth, after the head is stuffed, to help retain the shape of the lower jaw which has no bone, while cooking.  An apple would work just as well.

For a period boars head the skin at the back of the head would have been split after cooking with the bones being removed.  The back seam would have been re-stitched together then stuffed to be presented.  This is not available as complete pig heads are not readily acquired.  Allowances have been made to work with half heads and beef tongue opposed to a complete boar’s head and the tongue of an ox.

Cooking can be from 45 minutes.  The display needs to have a nice golden crispness while not being burnt.

head out of oven

The first time I cooked this, the skin came out dark brown as having been cooked for to long.   Keep an eye on the skin at all times so as to not over cook.  15-20 minutes before the head is to be removed from the oven, take off the foil covers on the ears to allow browning, though some browning will have occurred even with the foil “bandages”.

Display:

The eyes were covered with apricots while the open ear section was covered in walnuts.  I lined the side with alternating apricots and prunes for both decoration and to cover up the aluminum foil underneath.

head w apricots

The ears were propped up with skewers and the mouth stuffed with a pear.  (The skewers can be removed after cooking as the ears will stay upright more or less on their own at this point).   The pear is in the mouth to keep the shape.  The snot bones keep the upper snout in the correct shape, the bottom is boneless and needs some thing to keep the lower lip looking like a lower lip.

Around the head the recipes vary on displaying some suggested more meat and fruit, I choose to use rosemary sprigs which would have been available during winter time to complement the colors of the roasted head.

Candlemas pig

Conclusion:

This dish requires a large amount of time and skill to do properly.  There can be no faint of heart when attempting this.  The sheer magnitude of removing both skin and meat in tact then replacing and then cooking is a feat worthy of the best chefs in period.  This dish could not be whipped up on the spur of the moment, but required at least a weeks worth of preparation for cooking, skinning, brining, re-sewing then the actual stuffing and cooking to present a worthy dish to the sovereign.

I did not enjoy doing this dish the first time.  I learned a lot from my first round of mistakes.  The second time was much easier, as I know knew the proportions required and the “cheat” of using a large cooking dish to help prop the head instead of relying on just the head shaped skin.  While the second time around was much easier, I do not plan on doing this dish again any time soon!

References:

Craig, E., (1953). English Royal Cookbook. New York

http://www.castlearcana.com/christmas/day13.html : Mauduit, V., (1934). The Viscomte in the Kitchen. Covici-Friede Publishers, NY.

http://www.theoldfoodie.com/ :  Friedman, D.,  From: The Cookbook of Sabina Welserin; 1553;

http://www.foodtimeline.org/food1.html :  Wilson, A., (1991)., Food and Drink in Britain From the Stone Age to the 19th Century, C. Anne Wilson [Academy Chicago:Chicago] 1991 (p. 88-89)  (Foodtimeline)

http://www.godecookery.com/ : Hansen, M., (1995). And Thus You Have  a Lordly Dish: Fancy and Showpiece Cookery in an Augsberg Patrician Kitchen. Medieval Food and Drink.  Bringhamton University: St. University of NY Press.